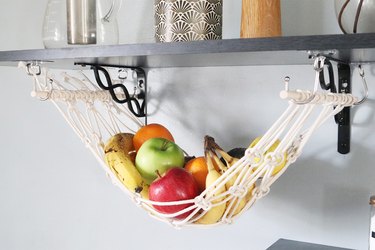
If you're on a mission to organize your kitchen, try making this DIY macrame fruit hammock. It's the perfect way to clear up your counter space while adding a bit of boho flair to your home. What's more, this hanging fruit basket project is an easy DIY — we promise! It requires basic supplies and simple macrame knots, so it's ideal for beginners. In fact, you only need to learn two macrame techniques: the lark's head knot and the square knot.
Once you've completed your hanging fruit hammock, you can install it underneath a kitchen cabinet or shelf. Of course, this macrame hanging basket isn't just for fruits. It can be used as a veggie hammock as well.
Video of the Day
Video of the Day
Needless to say, this macrame project proves that kitchen storage doesn't have to be boring. Are you ready to learn how to make a macrame fruit hammock? Check out this step-by-step tutorial.
Things You'll Need
Macrame cord or cotton rope (eight strands, 7 feet each)
Scissors
2 12-inch wooden dowels
Painter's tape or masking tape
4 adhesive ceiling hooks (like Command hooks)

Tip
You can also use regular screw-in ceiling hooks if you’d like. Ceiling hooks are available on Amazon and at craft or hardware stores.
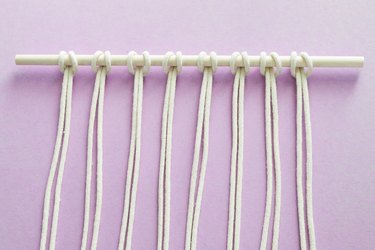
Step 1
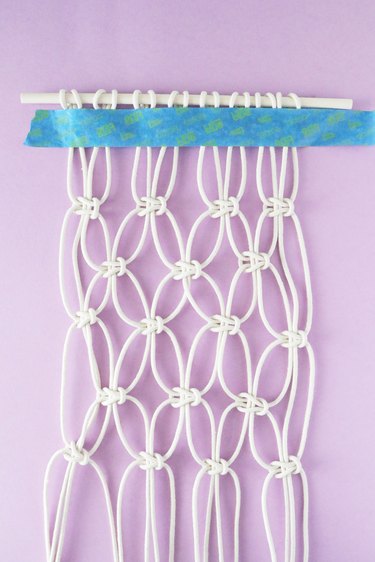
The first step is to attach the macrame cord to a dowel rod. You'll do this by making lark's head knots.
Fold one strand of macrame cord in half. Place the folded end under a dowel.

Step 2
Fold the loop over the dowel and then pull the two strands through the loop.

Step 3
Continue pulling the strands to tighten the knot. This makes one lark's head knot.

Step 4
Repeat with the remaining seven strands of cord.
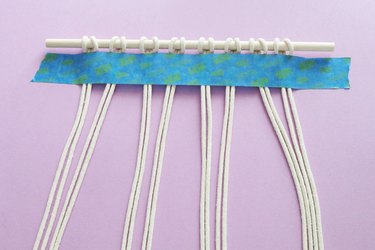
Step 5
Tape the macrame cord to a flat surface. This will make it easier to work.
Next, separate the strands into four groups of four.
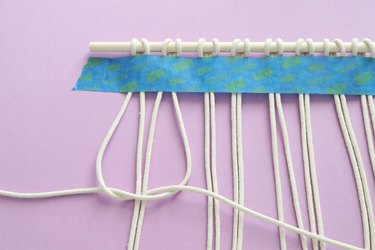
Step 6
Tie a square knot in the leftmost group. To do this, make a backward "L" shape with the outer right strand, placing it on top of the two middle strands. (It's OK if the "L" shape is curved.)

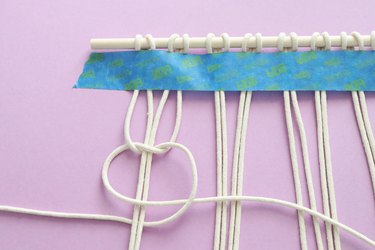
Step 7
Place the outer left strand on top of the right strand. Next, bring it under the two middle strands.
Step 8
Bring the outer left strand up and through the "L" shape made by the outer right strand.
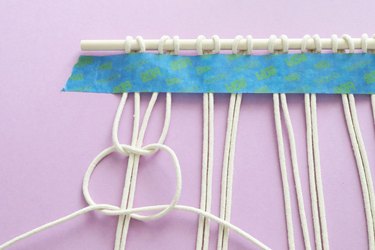
Step 9
To complete the square knot, you'll need to repeat the above steps but with the opposite strands.
Make an "L" shape with the outer left strand and then place it on top of the two middle strands.

Step 10
Place the outer right strand on top and then bring it under the two middle strands.
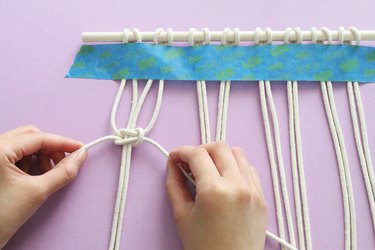
Step 11
Bring the outer right strand up and through the "L" shape made by the outer left strand.
Step 12
Pull the outer strands to tighten. This completes one square knot.
Step 13
Repeat with the remaining strands, working with one group at a time. This will create a row of four square knots.

Step 14
Now, move the two leftmost strands to the side. Repeat with the two rightmost strands. You won't be working with these strands during this step.
Group the 12 middle strands into three groups of four.

Step 15
Tie a square knot in each group. This will create a row of three square knots.

Step 16
Regroup the strands into four groups of four. Tie a square knot in each group to create another row of four knots.
Repeat this sequence, alternating between four and three square knots. Continue until your work is about 20 inches long.
Tip
You can make your macrame fruit basket slightly shorter or longer depending on the specific space.
Step 17
Tie the end of each strand to a second dowel.

Step 18
To secure each strand, tightly tie a knot just beneath the dowel. Trim the excess cord using scissors. You can also fray the ends if you'd like.

Step 19
Install the hooks underneath a cabinet or shelf. Each pair of hooks will hold one dowel, so be sure to install them about 10 inches apart.
Place the dowels onto the hooks to hang your macrame hanging basket. Add the fruits and veggies.
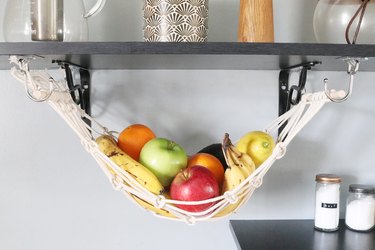
The great thing about this easy macrame DIY is that it doesn't need to be a hammock forever. If you decide to remove it, you can display it as a macrame wall hanging. How's that for crafty home decor?