A bright green holly wreath bursting with red berries is the quintessential Christmas decoration for the winter holidays. Holly represents the holiday perfectly, with its festive greenery and small red berries, representing fertility and life.
This easy to create holiday wreath looks great on a front door or mantel. Expect this long-lasting favorite Christmas wreath to give your home a holly, jolly atmosphere all holiday season long.
Video of the Day
Video of the Day

Things You'll Need
Holly
Grapevine wreath form
Garden shears
Rubber bands
24-gauge paddle wire
Bow
Pinecone
Create your wreath
1. Choose your grapevine wreath size
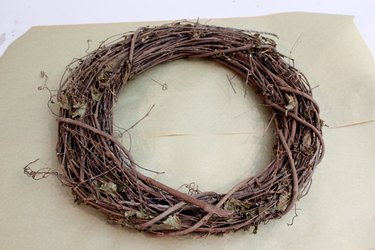
Select your grapevine wreath form, which is available in the floral section of your local craft or home decor store. Grapevine wreaths are ideal foundations for many types of DIY wreaths because, even if the wreath form shows through, it is still attractive. In this example, we've used an 18-inch wreath form. This is also a great idea for transforming a grapevine fall wreath into a winter one.
2. Purchase or collect your holly

If you do not have holly growing in your yard, you can purchase it in bulk online directly from holly farms. With garden shears, cut stems of fresh holly to about 8 in. Remove any holly berries that have dried or blackened. For this wreath, we used about 30 stems.
Tip
If you do not have enough holly, you can supplement the wreath with other green leaves like eucalyptus, mistletoe, ficus or magnolia.
3. Band the holly sprigs together to form a bunch

Using rubber bands, tie the holly stems into bunches of three stems each. Be sure to place a stem with berries on the top of each bunch. Also, try to position the stems so that the leaves all face forward.
4. Wrap the wreath in wire, securing the holly

Tie one end of 24-gauge paddle wire to the grapevine form. You can purchase paddle wire in your local craft store. Place your first bunch of holly on the grapevine form, and wrap the wire around the holly. Be sure to go around the bunch twice with the wire—once in the middle and once where the rubber bands have tied the bunch—so the holly is secured in place. Move the leaves around to hide the wire.
Warning
Holly leaves have variegated sharp ends, so be very careful when handling them. Wear garden gloves to protect your hands.
5. Layer the next bunch over the first
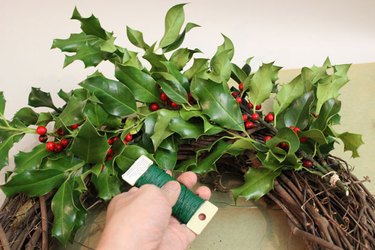
Place the next bunch of holly on the wreath form so the top of its leaves cover the exposed stems and the rubber band of the first bunch. Keep winding the wire around this holly bunch in the same way. Continue to add bunches of holly as you go around with the paddle wire, making sure that all the leaves go in the same direction.
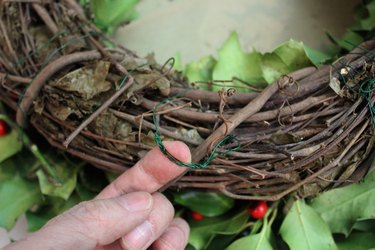
6. Make sure the rubber bands are concealed

When you've gone all the way around the wreath with the holly, tuck the stems of the last holly bunch underneath the leaves of the first bunch, so all the rubber bands are concealed.
7. Trim the wreath

Step back and look at your completed wreath. Use shears to trim any holly leaves that stick out so you have an even shape all around.
Tip
For a more formal wreath, trim uniformly all around. If you'd like a more natural look, leave some sprigs longer than others around the perimeter of the wreath.
8. Create a loop for hanging the wreath
Decide where the top of your wreath will be, and on the back side, tie a loop with wire to create a wreath hanger.
Decorate your holly wreath
1. Add a bow to your wreath

Wrap wire around the middle of a wreath bow, and tie the wire around the wreath to secure the bow.
10. Add a pinecone to finish off your holly wreath

Wire a pinecone around the bottom scales so the wire is hidden. You can also add a favorite Christmas ornament or poinsettia instead. Wrap the wire around the middle of the bow. The bow and pinecone finish off the holly wreath in festive style.
Hang it as front door decor or above a mantle. If you are hanging it outside, consider various options for hanging on various materials, such as stone walls or metal doors or other metal surfaces.
This Christmas holly wreath is sure to become one of your favorite holiday decorations and a recipe for a perfectly merry Christmas!