
The winter holidays are all about glitz and glamor, and New Year's Eve is no exception. The celebration is brimming with sparkle and bling, making it the perfect time to whip up a pair (or three) of statement earrings. To help you out, we created a tutorial explaining how to make a trio of festive drop earrings made of tinsel pom poms, clay champagne bottles and mini disco balls!
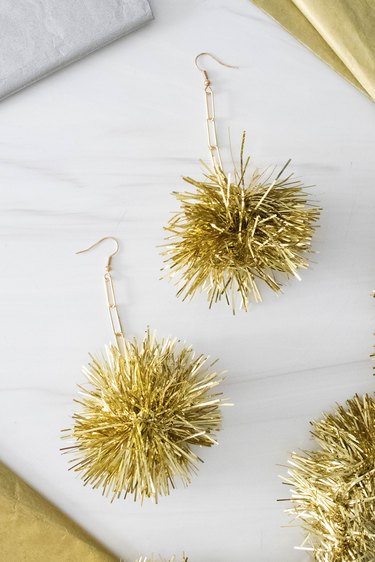
For starters, the tinsel dangle earrings are made from leftover Christmas tinsel. It's an easy and clever way to repurpose decorations from the Christmas tree into New Year's Eve earrings. (Not to mention, you can save them for next year and wear them as Christmas earrings, too.)
Video of the Day
The clay champagne bottle earrings are super fun because the bottles are made from scratch. The technique is also surprisingly simple, so don't worry if you're not too experienced with polymer clay. In just a few steps, you'll have a pair of unique earrings fit for any New Year's Eve party.
As for the mini disco balls? They're made with foam balls and square rhinestones, allowing you to customize the shape and style of the piece. But if you're looking for a shortcut, you're welcome to use mini store-bought disco ball ornaments.
Read on to learn how to make DIY New Year's Eve earrings, plus tips and ideas for personalizing each pair.
Video: New Year's Eve Earrings
Earrings #1: Tinsel Pom Poms
Things You'll Need
Leftover tinsel
Hot glue gun
Scissors
Jewelry pliers
Chain
2 jump rings (2 mm. or larger)
2 earring hooks

Tip
We used gold jewelry findings to match the gold tinsel, but the chain, jump rings and earring hooks can be any metal you like. You can even mix and match colors. For example, try pairing silver tinsel with rose gold findings for a fun twist.
1.Make the tinsel pom pom

Cut a strand of tinsel, about 3 in. long. Remove any stray pieces from the ends.

Bend the ends toward each other.

Attach the ends with a bit of hot glue.

Make a second tinsel pom pom.
2. Add jewelry parts

Open up a jump ring using the jewelry pliers. Attach it to the wire base of the tinsel.
Add a 2 in. strand of chain and close the jump ring. To the other end of the chain, attach the earring hook. (The chain can be longer or shorter. Alternatively, you can skip the chain completely and hang the tinsel pom pom directly on the earring hook.)
Your sparkly tinsel earrings are ready for NYE!
How to Make Tinsel Hoop Earrings
Looking for an edgy twist on this project? Add the tinsel pom poms to simple hoop earrings (both large and huggie hoops work well!). It’s an excellent way to spruce up a basic pair of hoop earrings, whether you’re looking for a simple Christmas gift or a New Year’s Eve statement piece.
Earrings #2: Clay Champagne Bottles
Things You'll Need
Dark green polymer clay
2 earring hooks
2 eye pins
Craft tweezers
Jewelry pliers
Thin paintbrush
Fluffy paintbrush
Decoupage
Gold crafting foil (also known as gold leaf)
Hot glue gun
Rhinestones

Tip
If you don’t want to use gold crafting foil, you can add gold details using metallic acrylic paint instead.
1. Make the clay bottles

Mold a ball of clay into an oval shape, about 1 to 1.5 in. long.

Roll the top half between your fingers to make the neck of the bottle.

Mold the bottom half into a rectangular shape. Use your fingers or flat surfaces, like the sides of tweezers or popsicle sticks, to shape it.

Repeat to make a second bottle.
2. Bake the clay

Using the cutting portion of the pliers, trim the eye pins so they're about 1/2 in. long.

Carefully insert one eye pin into the top of each bottle.
Bake at 275°F for 15 to 20 minutes, or as instructed by the clay's packaging. Let cool.
3. Embellish the bottles

Apply a thin layer of decoupage along the top of the bottle. Use the thin paintbrush for this step.

With the craft tweezers, gently apply pieces of gold leaf.

Gently brush away the excess with a fluffy craft brush or makeup brush. (If using a makeup brush, make sure it's clean, and use it only for crafting.) Let dry.

Glue a rhinestone to each bottle.
Tip
For this pair of champagne bottle earrings, we used rhinestone stars from the scrapbook section of the craft store. But you can use any shape you’d like, including circles or hearts, or even pearl embellishments. You’re also welcome to skip the embellishments completely and apply more gold leaf.
3. Add earring hooks

To complete your champagne-themed party jewelry, add an earring hook to each eye pin.
Earrings #3: Disco Balls
Things You'll Need
0.8 in. foam balls
Self-adhesive square rhinestones
Craft tweezers
Scissors
Jewelry pliers
Hot glue gun
2 mm. jump rings
2 eye pins
2 earring hooks
Silver chain

1. Embellish foam ball

Cut a strip of rhinestone trim to fit around the foam ball.

Hot glue rhinestone trim around the ball.

Fill out the top by adding shorter strips of rhinestone trim, hot gluing each one in place.

As you near the top, make the strips shorter and shorter. This will make it easier to work around the curves of the ball.

Continue until you have covered the rounded portion of the ball. Repeat on the other end, leaving a small gap on top.
2. Add jewelry parts

Trim an eye pin so it's about 0.5 to 0.75 in. long.

Carefully insert the eye pin into the top of the disco ball. Add a dot of hot glue to keep it in place.
Tip
Thread this DIY mini disco ball on to a long chain or beaded strand for an instant necklace!

Attach a strand of chain to the eye pin. The chain can be as long or short as you like. Attach the other end of the chain to an earring hook.

Repeat to make a second disco ball drop earring, and you've got yourself a pair of sparkly earrings—or New Year's gifts for the disco lover in your life!
How to Make Disco Ball Star Earrings
For an easy twist on this DIY, glue rhinestones to foam stars and add a stud earring blank to the back of each one. This version will work great as both New Year’s Eve and Christmas jewelry.
Happy New Year!