In home decorating, walls are the backdrop for your entire room's decor, and there is no longer any reason for them to be bland or lackluster. Wall painting techniques can add depth, warmth and texture to a room and really enhance the room's decorating scheme. Many techniques are very easy to do, though the result is so spectacular that a person who didn't know better might think it was achieved only by a highly skilled or artistic individual.
Color Washing
Video of the Day
Color washing produces a soft, muted blend of colors on the wall that are subtle, yet warming. The look is best achieved with satin finish paint in two similar colors. One may be a shade darker than the other, or they may be colors that fall right next to each other on the color wheel of the same intensity.
Video of the Day
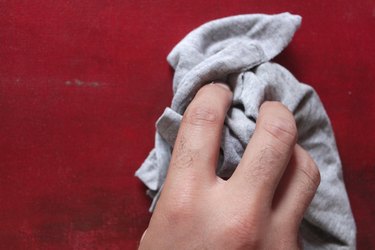
Paint the lighter of the two shades on the surface first using standard rollers and brushes, and allow to dry. Then dip a damp rag into the darker color and rub it on the wall in a swirling motion with even pressure. The swirls can overlap each other, varying the color to create various intensities, allowing some areas of the undercoat to show through.
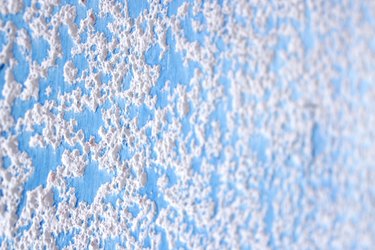
Sponging
Sponging is similar to color washing but gives a much deeper, more textured look and doesn't have the swirling patterns that is the hallmark of color washing. While a sea sponge is most commonly used, the same technique can be applied with a crumpled-up rag, newspaper, plastic bag, kitchen sponge or any number of materials for a varied but similar look.
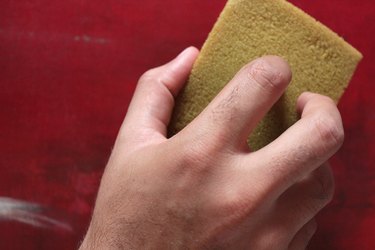
Choose two colors similar in shade. Usually, the base color is a flat finish and the sponged top coat is a satin finish, or mixed with 1 part glaze to 3 parts paint. Paint the base coat on the surface first with rollers and brushes and allow to dry. Then dampen a sea sponge, or whatever implement is chosen, dip it into the topcoat paint color and then dab lightly on a rag for blotting to remove excess paint.
Apply the paint to the wall by dabbing it on with the sponge, working one section at a time. You can pat the sponge on the wall randomly, more lightly in some areas, more heavily or overlapping in others. Each time you pat the wall with the sponge, move and turn it slightly to create a random pattern. The sponging can be as light or as heavy as you desire until you achieve the look you want.
Combing
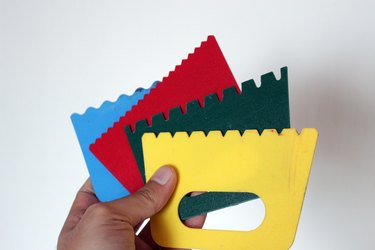
Combing scratches a nice lined texture to a painted surface that almost resembles wallpaper. This is achieved with a base coat of paint and a different colored glaze. Paint combs are available at most stores that sell paint and come in a variety of widths.
Apply the base coat to the wall and allow to dry. When working with glaze, the wall should be painted in sections, because the combing needs to be done while it is still very wet. Paint the glaze onto a section of the surface, and then drag the comb through the wet paint--only once--to create a trail of comb lines. If you are unhappy with the section, you can repaint it and try again.
You can drag the comb straight for long vertical or horizontal lines, wiggle it back and forth for wavy lines or swirl it in more complicated patterns if you desire. You can get very creative experimenting with and combining different combing patterns.
Leathering
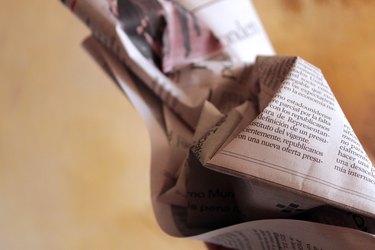
It's easy and inexpensive to achieve a leather look on walls with paint, and the results look startlingly authentic, especially when done in shades of brown. Achieve this look inexpensively with scrap paper, such as newspaper, brown paper bags or tissue gift-wrap paper.
Rip the papers into random sizes and shapes. Apply them to the walls with a wallpaper paste, slightly overlapping each other. Press firmly and smooth them out so that all air bubbles are removed; however, cracks or wrinkles are okay and will enhance the leathery look.
When the surface is covered with the paper scraps, allow to dry.Then paint over with a mixture of equal amounts of glaze and paint in the chosen color for the wall. Do as many coats as is necessary to achieve the level of coverage you desire.
Faux Bricks or Stone
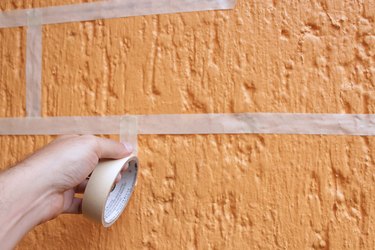
Any wall can be made to look as if there are exposed bricks or stones with just paint and a few rolls of tape.
Paint the wall with a base color which will become the "mortar" or "grout lines." Allow to dry for at least 24 hours so that the tape does not damage the surface. Use painter's tape to outline the shapes of the stones or bricks. If the desired look is stacked bricks or stones, use a level and ruler to ensure they are straight and even. Alternately, a more rustic stacked stone wall look can be achieved with random round and oval shapes.
After the taping is finished, paint the walls with the base color of the stones. Remove the tape before the paint dries to reveal the "mortar" lines beneath. Sponge on a mixture of 1 part glaze to 1 part of a slightly darker shade onto parts of each individual "stone" or "brick" to give them more depth and variation.