Bricks are one of the preferred methods of building walkways in yards, along with pavers and stones. However, not all pathways are completely level, and while some people prefer steps in their paths, others prefer their bricks to be laid in walkways on a slope. While this is possible, it does take time and effort, as well as a working knowledge of tools. While any do-it-yourselfer can accomplish this task, it is not for the faint of heart, as it requires significant manual labor and planning.
Step 1: Plan the Walkway on the Slope
Plan and lay out your chosen brick or paver walkway on a slope with wooden stakes, placing them every 18 inches or so along what will be the outside edges of your pathway. Use a tape measure to keep the width of the walkway uniform. After you have finished laying out the walkway, use spray paint to mark the outer edges of the walkway and remove the stakes.
Video of the Day
Step 2: Excavate the Walkway
Dig down to allow for at least 6 inches of crushed stone beneath the brick across the entire walkway. You can go as deep as 8 inches if you live in an area with hard freezes in the winter, but 6 inches is generally sufficient for most homes. Use a shovel, or rent a small excavator, to scoop out the dirt in the area of the pathway.
Step 3: Tamp the Soil
Smooth and tamp the soil with the vibrating compactor machine. If desired, lay landscape fabric over the path to prevent the layers of gravel and sand from sinking into the soil over time.
Step 4: Add Crushed Gravel
Add 2-3 inches of crushed gravel and pack it across the entire length of the pathway. Repeat the process until you have added your necessary 6 or 8 inches of tamped gravel, which serves as a base for the foundation and drainage for the bricks.
Step 5: Install Edging to the Walkway
Install edging material, such as embedded river rocks, bricks on end, pressure treated lumber or plastic edge restraints before adding a 2-inch layer of sand on top of the packed gravel. Smooth to even the sand before adding the bricks.
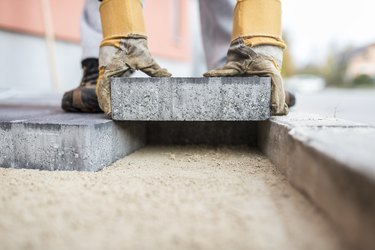
Step 6: Install the Bricks
Install your bricks over the sand in the desired pattern, such as a running bond or herringbone. Pound them in place with the rubber mallet. Use spacers in between the bricks if you want to retain joints, or install them tight against one another. Continue this process until you have filled in your entire walkway.
Step 7: Fill the Joints With Sand
Cover the entire surface with more sand and sweep it between the joints. Make sure that you fill all the joints in between the bricks as fully as possible to keep movement from occurring over time. Use the plate compactor to ensure that all of the bricks are securely in place within the bed of sand and gravel and add more sand as needed to fill in the joints.
Tip
All of your supplies and tools can be purchased or rented at your local home improvement store.
Things You'll Need
Tape measure
Wood stakes
Spray paint
Work gloves
Shovel
Excavator (optional)
Hand tamper or plate compactor
Landscape fabric (optional)
Crushed gravel
Coarse sand
Edging
Rubber mallet
Bricks
Spacers
Video of the Day