Things You'll Need
Prybar (to remove old roofing)
Tape measure
Reciprocal saw
Circular saw
2 by 6-inch and 2 by 4-inch framing lumber
Level
Dormer window
Hammer or air nailer
3-inch framing nails
Oriented strand board (OSB) sheathing
Metal flashing and drip edge
Roofing paper
Shingles
Exterior siding
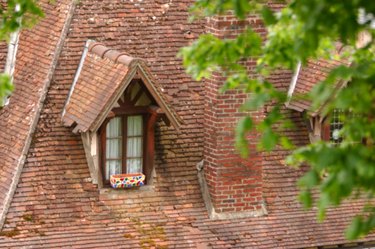
Dormers are upright window features installed on slanted roofs to add light or space to upper interior areas of a house. They are common additions to the Cape Cod style with its steeply pitched roofs. Most Cape Cod houses will have two or three dormers depending on the width of the house. Adding dormers to an existing Cape Cod house is a major task and should not be undertaken by somebody without construction tools and experience. An architect also should be consulted since the work will involve the structural integrity of the roof.
Adding Dormers to a Cape Cod House
Step 1
Design your dormers. Decide how many you want on your Cape Cod house, how you want them spaced and how high and wide you want them. Put your design on paper, perhaps even use a photograph of your house and cut-out dormer shapes to help you plan. An architect can provide the roof slope, rafter angles and other complex features. Also check local building codes to see what permits are required and what restrictions there might be -- some residential and historic districts have regulations on house additions.
Video of the Day
Step 2
Remove shingles from the dormer area then snap chalk lines on the sheathing boards to outline your dormer. Use a circular saw or reciprocal saw to cut the sheathing. Leave the overhang sheathing below your dormer. Cut 2-inch by 4-inch braces to fasten between the outsides of the rafters along your dormer edges and the corresponding rafters on the other roof slope; this will secure the roof. Cut off the rafters inside the dormer area from the ridge board to the top of your dormer, then nail a 2-inch by 6-inch header board between the two side rafters and to the ends of the rafters from the ridge board.
Step 3
Install a front lower header, a 2 by 6 nailed with joist hangers between the side rafters where the dormer front wall will be. Assemble the front wall inside the house with studs on the side, rough framing for the window, a top cross brace between the outside studs and short upright studs above the window rough frame to support roof joists. Extend the studs around the window rough frame below the 2 by 6 bottom header and nail a 2 by 4 across them to fasten into the old rafters on either side. Nail the front wall in place to the rafters and lower header. Make sure it is plumb.
Step 4
Add two 2 by 4 side boards on either side of the dormer, one nailed to the roof sloping up, the other from the top brace of the front wall to the old rafter. Cut studs to fit between those 2 by 4's, as many as needed for the length. Next cut and nail in a ridge board, from the front wall to the top header; extend it over the header. Then cut and nail in side rafters, from the ridge board over the dormer side walls; notch the rafters to fit to the wall top 2 by 4. Cut cross braces with mitered ends to fit between the rafters just below the ridge board. Then cut two short rafters to go between the old side rafters and the top header and two more to go between those rafters and the ridge board. Finally cut short rafters to go between the header board and the angled top rafters.
Step 5
Finish the framing by nailing 2 by 4's to the ends of the dormer rafters. Extend those beyond the front wall of the dormer and cut 2 by 4 facings to connect the gable peak -- the dormer side boards and the ridge board. Cut and nail in short 2 by 4's to mount these between the outside board and the dormer wall edge board.
Step 6
Complete the dormer by mounting the window with metal flashing at the edges. Then nail oriented strand board (OSB) to the new roof and walls. Nail metal flashing in the dormer valleys and metal drip edge on the dormer roof sides. Then cover the roof with roofing paper and shingles and add house siding to the dormer exterior walls. Replace any shingles that were removed below the dormer front wall.
Tip
Get a tarpaulin to cover your work area betwen sessions while the roof is open.
Warning
Be careful working on a roof. It helps to nail a scaffold board below the dormer front for extra support.
Video of the Day