Things You'll Need
Sewing kit
Baby-safe stain remover
Laundry detergent
Washing machine
Drying rack or clothes line
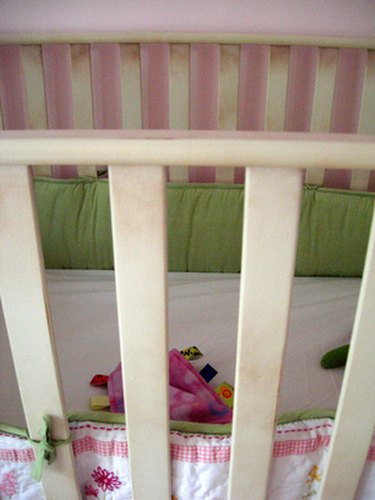
A crib bumper adds a decorative touch to a baby's bed and it also forms a protective barrier between the baby's head and the crib's wooden slats. Crib bumpers should be washed from time to time to keep them fresh. But be careful not to wash them too often, because they could lose their shape and become unsafe for your baby. Once per month or even every other month is enough.
Step 1
Check the bumper for rips or holes. Inspect the ties to make sure they are still firmly attached. Use a needle and thread to fix any loose ties or holes. Spray any stains on the bumper with a baby-safe stain remover. Allow the stain remover to sit on the stains for an hour or two before washing the bumper.
Video of the Day
Step 2
Fold the crib bumper in half. Wind the bumper carefully around the agitator so that it lies evenly inside the washing machine. This will keep the bumper from bunching up and causing the machine to become unbalanced during the spin cycle.
Step 3
Begin filling the washing machine with water by turning it on and setting it on the shortest wash cycle on your machine. Use either a warm or cold water cycle, depending on your preferences. Do not use hot water because the outer cover could shrink and warp the bumper. If the bumper shrinks, it will not fit properly and without a proper fit, a crib bumper is a safety hazard for the baby.
Step 4
Add laundry detergent according to the instructions on the packaging. Be sure to choose a baby-safe laundry detergent or a detergent that is labeled "free and clear." Regular detergents can be too harsh for your baby and many have strong perfumes that can upset the baby as well.
Step 5
Hang the crib bumper outside on a clothes line or inside on a drying rack to dry. The high heat of a dryer can shrink and warp the bumper.
Step 6
Reattach the bumper to the crib. Be sure each tie is tied properly and tightly. A loose fitting bumper leaves gaps that a baby could become trapped inside, causing suffocation.
Warning
Do not hang the bumper outside if there is a high pollen count. Pollen could land on the bumper and end up in the baby's crib.
Video of the Day