Things You'll Need
Scribe tool
Clamps
Circular saw
100-grit sanding belt
Belt sander
Walls aren't always straight. It's not uncommon for walls to have have dips, curves, bulges or angles. Cabinetmakers and countertop installers deal with them them all the time. They employ a tool that helps fix gaps created by uneven walls. Laminated or bare countertops can be flushed to the wall by scribing. The scribe tool looks like a compass. It transfers the line of the wall to the countertop where you can deal with it. Tiled, preformed or composite countertops can't be scribed.
Step 1
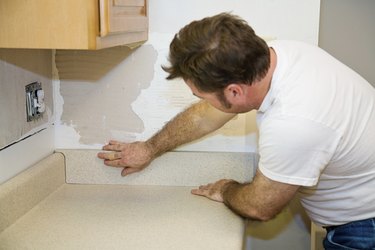
Place the countertop on the top of the cabinets. Slide it into position as if it were already installed. If the wall is uneven, you'll see a gap between the wall and the countertop.
Video of the Day
Step 2
Open the scribe tool, which looks like a small compass. One leg has a pencil. The other side has a flat arm. The two legs are held together with a wing nut. Unscrew the wing nut.
Step 3
Place the scribe tool vertically with the pencil resting on the countertop and the flat arm against the wall. Separate the pencil from the flat arm, opening the scribe tool so that the pencil spans the gap. Tighten the wing nut.
Step 4
Slide the scribe tool along the wall the length of the contact point between the wall and the countertop. This allows the pencil to transfer the line of the wall to the top of the countertop.
Step 5
Pivot or slide the countertop to overhang the scribed edge over the cabinets. Optionally, place the countertop across two sawhorses. Clamp the countertop to the sawhorses or cabinets to secure it.
Step 6
Set the blade of a circular saw to the depth of the plywood or particleboard if you're working with material that's not yet been covered with laminate. Place a 100-grit sanding belt on a belt sander if the countertop is laminated.
Step 7
Cut the countertop off at the scribed line if you're working with the circular saw. Leave the pencil line on the countertop, cutting along the side of the line nearest the wall. Sand the countertop to the line using the belt sander. Remove the clamps. Slide the countertop back into place. Check the gap. Reset the scribe tool if necessary and repeat the steps if needed.
Step 8
Sand the countertop to the line with the belt sander if you're working with a laminated countertop.
Tip
A compass will work as a scribe tool if you don't have one. Scribing, cutting and flushing the countertop to the wall may not be necessary if you plan on adding a backsplash. This works well for tiled or composite countertops. Laminate or tile the face and top edge of a 3/4-inch-by-5-inch piece of particleboard or plywood. Use a solid backsplash for composite countertops. Attach the backsplash to the wall to hide the gap created by uneven walls. Add color-matched silicon filler to the gap on top of the backsplash or, optionally, a thin piece of molding that bends to cover the gap.
Warning
Wear eye protection. Use caution when operating a circular saw. Check the guard on the saw so that it swivels up and down freely before using the saw.
Video of the Day