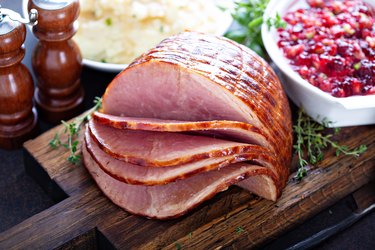
What's your favorite part of a glazed ham? Is it the moist, tender meat in the middle or the rich, tasty crust? Whatever your preference, a ham scored with an attractive diamond pattern and coated in a delicious glaze is an impressive sight at any dinner table.
Prepare to Score Your Ham
Video of the Day
To score ham, you need a sharp, pointed knife. A dull knife leaves an unattractive, ragged edge, and it may not be sharp enough to remove the ham rind. Dull knives are also dangerous to work with because they can slip and cause you to cut yourself.
Video of the Day
You need a firm, clean surface on which to place the ham while you're working on it, and if you'd like to push cloves into your scored ham, a wooden skewer may come in handy. Other items you'll need include a roasting pan and the marinade or glaze ingredients for your recipe.
Remove the Ham Rind
The rind is the thick, tough skin on the outside of a ham joint. Beneath the rind, lies the juicy fat that will crisp and brown when you bake your ham. The trick to successfully removing a ham rind is to take off only the rind and leave behind the fat.
Cut the rind first at the knuckle end of the ham, the part of the joint also called the shank or hock. Hold the knife at an upright angle and firmly push in the tip about 4 inches from the end of the ham. As soon as you feel the knife slip under the rind, stop pushing.
For appearance's sake, try to avoid cutting all the way through the fat and piercing the meat. As the ham cooks, it shrinks, and places where the meat has been cut will open up.
Now you must cut all the way around the ham, turning over the joint to cut the underside. You can cut the rind in a simple straight line, or you could create an attractive zigzag pattern. Whichever pattern you choose, push the knife in and out in a gentle sawing motion. If the knife is sharp, the rind should cut smoothly.
Next, cut a straight line from the knuckle to the thick end along the base of the ham. Turn the ham over so that the rounded side is on the bottom. Make a shallow cut, no deeper than the cut around the knuckle end, and draw the knife along the underside of the ham. Remember, you don't want to cut deeply into that juicy fat.
Place the ham on its flat base again; next, turn your attention to the thick end of the ham. It's here that you're going to begin to slip the rind away from the fat. Push in the knife tip horizontally at the end of the ham, so it slips between the rind and the white fat. Slide the knife around the rind, maintaining the same position above the fat.
Now the crucial moment has arrived. You're going to remove the entire rind while also leaving behind an even layer of fat. You can do this using the knife or your fingers, but don't use both at the same time, or you might remove more than the rind.
Push your clean fingers or a knife under the rind and gently and gradually ease it away from the fat. Work your way around the ham, moving downward toward the knuckle end. Eventually, the rind will separate entirely, and you can lift it away in one piece.
Tip
Don’t worry if the remaining fat layer is a little uneven. When the fat is crispy and glazed, minor imperfections won’t be noticeable. Wrap up the rind in plastic wrap or a damp tea towel and pop it into the fridge. Later, you can use the rind to cover any leftover meat so that it remains moist.
How to Score a Ham
Just as when you were removing the rind, your goal while scoring is to cut only the fat and avoid slicing into the meat. Cut meat opens when it's heated in the oven, leaving uneven gashes on the surface of the ham.
You can use the same knife you used to remove the rind to score the ham. Place the ham rounded-side upward on a firm surface. You're going to create a diamond pattern across the upper surface. Choose one end of the ham to begin without worrying about which end it is.
Push the knife tip into the fat at your chosen end and make a diagonal cut across the ham over the surface and to the other side. Make a second cut parallel to the first one, about an inch from it. Continue to make parallel cuts the same distance apart until the fat is covered by cuts that all run in the same direction.
Spin the ham around 180 degrees horizontally so that the cuts you made are now facing in the opposite direction. Starting at one end of the ham, make a second row of cuts that are also 1 inch apart. This second row of cuts crosses the first row to create a diamond pattern.
There's no rule against creating a different pattern on your ham if you prefer it. However, most cooks use a diamond pattern since that type of cut helps the glaze stick and exposes the fat evenly to heat while the ham is baking, resulting in a rich, brown crust. Besides, the diamond effect looks pretty!
Insert Cloves Into the Scored Ham
Cloves are deliciously aromatic, adding to the heavenly smell when you take your ham out of the oven. You're probably familiar with the image of a freshly roasted ham covered in evenly spaced cloves in an attractive pattern. As well as creating a decorative effect, the whole cloves in a scored ham help prevent the fat from separating from the meat.
Again, no rule says you have to insert cloves in your ham; the fat will crisp and brown nicely without them. If you decide you want cloves, use one clove per diamond on the scored ham. You can use your fingertips to push in the cloves, but a wooden skewer makes the job easier.
Push the sharp end of a wooden skewer into the center of a diamond, piercing the fat to roughly the depth of the long part of the clove. Remove the skewer and insert a clove in the hole, repeating until you've covered the whole surface of the ham.
If you're planning to brush a marinade over the ham, apply it first to avoid dislodging the cloves you've so carefully pushed into the fat. But if your recipe calls for adding the marinade while the ham is cooking, insert the cloves after scoring.
Marinate Your Ham
When you buy a ham, whether it's bone-in or boneless, the meat is already cooked. Consequently, when you bake ham in an oven, it's simply to heat up the pork. Another reason for baking a ham is to caramelize the marinade and create that delicious outer layer.
Some tasty marinade ingredients for glazing a ham include brown sugar, mustard, golden syrup, balsamic vinegar, orange or pineapple juice, honey, and, if you're feeling especially indulgent, brandy. These flavors bring out the sweetness of the ham or provide subtle spicy or sour contrasts.
Sweet marinade ingredients such as sugar, honey, syrup and fruit juice also add a mouthwatering caramel taste when they're heated sufficiently to turn a rich toffee-brown. Yet sugary ingredients can burn easily too, which means you mustn't forget about a marinated ham baking in your oven.
The best time to add a marinade or glaze depends on the ingredients you choose, so read and follow the recipe instructions carefully. Adding the marinade or glaze before you bake your ham gives it time to penetrate the fat and meat. Applying a marinade to a cold ham also saves the trouble of lifting a hot, heavy piece of meat to add marinade as it's baking in the oven.
If you're adding the marinade before cooking, brush the liquid into the scored ham with a pastry brush, covering the entire surface. Work the marinade into the cuts, and leave the ham for the time stated on your recipe before you place the meat in the oven.
Bake Your Scored Ham
Bake your scored ham according to your recipe's instructions. Sit the ham on a wire rack in your roasting pan so that it cooks evenly and to help prevent it from burning. Alternatively, pour a small amount of water into the pan, enough to cover the pan's base, which also helps to avoid a burnt bottom on your ham.
Some recipes call for basting the ham in its fat and glaze while it's baking. Put on oven gloves to remove the hot pan from the oven and place it on a heatproof surface. Lift one corner of the pan to tip it gently so that the liquid in the base runs into the opposite corner. Suck up the liquid in a baster or scoop it up with a spoon, and squirt or pour it over the hot ham before returning the ham to the oven.
Occasionally, the marinade ingredients don't caramelize to the desired, slightly charred appearance when the ham's baking time is up. You can get around this problem by broiling the baked ham for a few minutes after you bake it. Set your oven to its broil setting and broil the ham for 3 to 4 minutes. Keep a close eye on the meat to prevent it from burning.
Rest the Ham
It might seem strange, but your ham — like other meats — will taste better if it rests before you serve it. After you take the meat out of the oven, place it on a heatproof surface and wait at least 20 minutes before carving it. Waiting this little bit of extra time results in juicier meat — providing you can persuade your family or guests to be patient.
Store Your Ham
In the unlikely event you have leftovers from your succulent baked and glazed ham, you can store them in the refrigerator or freezer. Cooked ham remains fresh in a refrigerator for as long as a week to six months in a freezer. You can use leftover ham in casseroles, soups and sandwiches.
To store the leftover meat in a refrigerator, cover it with the rind you removed, as mentioned previously. Alternatively, you can use plastic wrap to help prevent your juicy ham from drying out. For freezer storage, put the ham into a freezer-proof container. Write the date on the container lid so you'll know how long it's been frozen.