Things You'll Need
2 wrenches
Paper towels
Copper tubing cutter
Emery cloth
New ferrule
Pipe joint compound
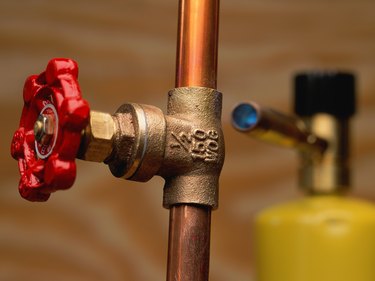
Compression fittings for copper water pipes usually connect appliances that will eventually need replacing, such as toilets or refrigerators. They are easy to install and to remove. They work by compressing a brass ferrule against both the copper pipe and the inside walls of the fitting. Occasionally the fittings leak because they were not properly tightened in the first place. To fix a leak, first try carefully tightening the nut on the fitting. If that doesn't work, you can replace the ferrule to make a new seal.
Tighten the Nut
Step 1
Hold the base of the compression fitting with one wrench and loosen the nut one-quarter of a turn with the other wrench. Then tighten the nut one-half of a turn. Loosening the nut first breaks loose any corrosion and makes tightening it easier.
Video of the Day
Step 2
Wipe the fitting dry with the paper towel.
Step 3
Watch the fitting closely to see if the leaking has stopped. If leaking or seeping continues, continue tightening the fitting one-quarter of a turn at a time until the leaking stops. If the leak does not stop after five quarter turns, replace the ferrule.
Replace the Ferrule
Step 1
Shut off the water to the fitting. Hold the fitting with one wrench to stabilize it, and remove the nut with the other wrench. Slide the nut up the copper tubing out of the way. Pull the copper tubing out of the body of the fitting.
Step 2
Use the copper tubing cutter to cut the tubing to remove the section with the old ferrule. Cut it as close to the ferrule as you can. Clean the copper tubing with emery cloth to remove any corrosion or dirt, and then slide the new ferrule onto the tubing. Make sure the copper tubing is not bent, dented or flattened where the ferrule will fit.
Step 3
Apply pipe joint compound to the ferrule and the male threads of the fitting. Insert the tubing and ferrule all the way into the connector body. Screw on the nut and tighten it as much as you can with your hand. Make sure the tubing does not slip out as you tighten it.
Step 4
Hold the connector body with one wrench and tighten the nut with the other. When you feel resistance from the nut, tighten it only one-half of a turn more.
Step 5
Turn the water back on to the fitting. If it leaks, tighten the nut one-quarter of a turn at a time until the leaking stops.
Tip
If your copper tubing is bent or crushed and you can’t find a straight section close enough to your fitting, you may have to replace the copper tubing.
Avoid temporary fixes like wrapping it with tape. They may work for a while but will probably leak again.
Warning
Do not over tighten the nut on the fitting. Over tightening can crush the copper tubing or crack the nut.
Video of the Day