Things You'll Need
Sponge
Spray bottle
Sculpting tools
Smoothing oil
Isopropyl alcohol
Whether you sculpt figures, busts or abstract compositions, different types of clay will require different smoothing techniques. Various tools, from ones you purchase to items in the home, can be used in the smoothing process.
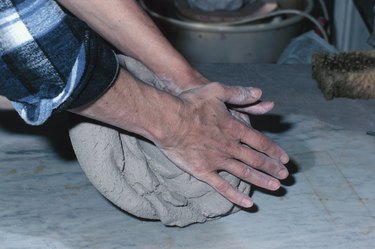
Step 1
Start by smoothing all types of clay with fingertips. Smooth small portions of the sculpture as you work. This process must be done continuously and cannot wait until you are finished with the sculpture.
Video of the Day
Step 2
Dampen fingertips in a clean bowl of water when working to keep the clay moist. Glide fingertips over the sculpture to smooth out any creases or redefine details after adding a new section to a sculpture made with water-based clay. Repeatedly dampen fingertips so that they don't become sticky or dry. Alternately, dip a pottery sponge into a dish of clean water or frequently spritz the sculpture with water. Squeeze out any excess and gently apply to the surface of the sculpture.
Step 3
Work with sculpting tools such as a "wipe-out" tool which has a somewhat flexible plastic or rubber tip. Place the tool on the area that needs smoothing and apply gentle pressure. Brush the tip over the area to blend it smooth. The wipe-out tool is helpful to smooth and seal seams when adhering two clay pieces.
Step 4
Scratch the surface area delicately by first using a sculpting rake tool which comes in different sizes or an ordinary fork. This method will remove any bumps, cracks or holes that have formed on the clay's surface while sculpting. After raking, even out the troubled area again with a combination of fingertips, a flexible-tipped sculpting tool or even the flat side of a Popsicle stick. Repeat this process until the section is completely smoothed out as desired.
Step 5
Use smoothing or mineral oil for oil-based clays such as polymer, Chavant or Plasticine. Place a single drop of fingertips and move slowly in one direction along the clay's surface. Use a small paint brush or cotton-tipped swab to reach crevices or recessed areas. This process blends the clay to provide a more workable surface.
Step 6
Apply isopropyl alcohol on a clean 100-percent-cotton rag or soft pottery sponge to a specific area of oil-based clay sculpture. The strength of the alcohol, which is 70 to 90 percent, determines how aggressively the sculptures edges will soften and fingerprints will fade. It also can be applied to seal seams. Allow the alcohol to dissipate. Once it does, the clay will firm and the sculpture will retain a smooth surface.
Tip
Purchase sculpting tools singularly or in sets from basic to advanced. Craft your own tools from odds and ends, handyman tools or paintbrush handles. Substitute purchased tools with household items such as knitting needles, utensils and even rubber spatulas, toothpicks, dowels, metal tubing and chopsticks. Tool selection ultimately depends on the artist and the project. Decide what methods will smooth your clay sculpture to create the effect you want. Small cut sponges and scouring pads or fine hair and camel-hair paintbrush dipped in lighter fluid is another smoothing technique for oil-based clays.
Warning
If using utensils to work with the clay, do not reuse for food. Only apply a small amount of lighter fluid to the sculpture or it can melt the clay. Use caution when working with lighter fluid since it is highly inflammable.
Video of the Day
- Sculpture: Principles and Practice; Louis Slobodkin; 1973; Dover Publications
- Creating Lifelike Figures in Polymer Clay: Tools and Techniques for Sculpting Realistic Figures; Katherine Dewey; 2008; Watson-Guptill
- Creative Ways with Polymer; Dotty McMillan; 2002; Sterling
- Sculpture.org: ISC resource directory