Things You'll Need
Tape measure
Level
Drill
1/4-inch wood bit
Countersink bit
3/16-inch mason's bit
Screw tip
3-inch concrete screws
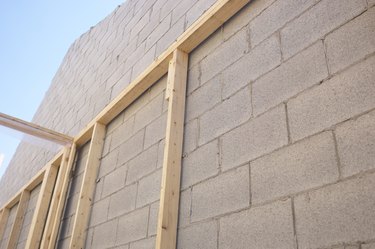
Ledger boards are used to make joints between lumber structural elements and other materials. A ledger is typically a 2-by-4 or larger piece of lumber attached to a wall or other surface with the use of fasteners such as nails or screws. This wood strip allows other pieces to be joined to the wall with relative ease. When working with cinder block, the best fasteners available are double-threaded concrete screws. You will need a drill and 3/16 inch mason's bit.
Step 1
Locate the correct position for the ledger. Make sure to measure twice before boring holes in a cinder block wall. Mark the two outside corners of the ledger's position and use a level to insure that it is straight. You can do this by holding the ledger in position and resting the level on top of, for horizontal, or alongside, for vertical, the ledger board.
Video of the Day
Step 2
Set your ledger board on a sturdy level surface. Use a ¼-inch wood bit to drill pilot holes for the fasteners. Put one hole centered 2 to 3 inches from each end and at least one hole in the center of the board. Drill more holes depending on the length and width of the ledger. You will need at least one every 20 inches. For boards wider than 2-by-4, make at least two rows of holes.
Step 3
Use a countersink bit to countersink each hole to allow the screws to run flush with the surface of the board. This will allow the concrete screws to be fully tightened.
Step 4
Hold the ledger in place and use the 3/16-inch mason's bit to drill through each of your pilot holes into the block surface 1/8 of an inch. These divots will serve to mark the pilot holes in the block.
Step 5
Set your ledger board aside and use the mason's bit to drill a hole through the block in each location that you marked the surface. Blow the dust from the holes.
Step 6
Place the ledger board in position and line up the pilot holes. Starting at one corner and working your way across, use the drill with a number 1 Phillips tip to drive a 3-inch concrete screw into each hole. Leave them just a little loose to allow room for the other screws to line up. Tighten all screws securely after they are all in place. Do not overtighten.
Video of the Day