
Making a boat with paper isn't as complicated as you might think. In fact, the key to making a paper boat that floats is to enlist the help of a little clear acrylic sealer. This, paired with lightweight paper, will ensure that your paper boat stays light and watertight. Construction paper, printer paper or newspaper will work for this project.
Ready to dive in and embrace your inner (paper) boat captain? Round up materials and follow our step-by-step tutorial to learn how to make a paper boat with square paper.
Video of the Day
Video: How to Make a Paper Boat That Holds Weight
Things You'll Need
Construction paper, printer paper or newspaper
Scissors
Clear acrylic sealer
How to make a Paper Boat:
1. Cut paper into square shape
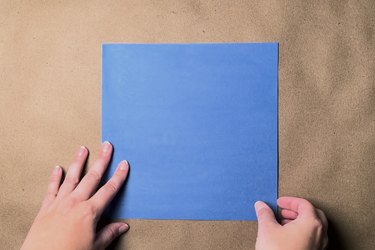
Cut a piece of construction paper, printer paper or newspaper into an 8.5 by 8.5-in. square. (You can make the paper smaller or larger depending on the size of the origami boat you want to make, but we'll be using those dimensions for this tutorial.)
2. Fold paper into smaller square

Fold bottom end of paper square up to the top, creating a crease in the middle. Next, fold right side of paper over to the left side, creating a crease in the middle again. Your sheet of paper should now be a square measuring 4.25 by 4.25 in. in size.
3. Fold paper into even smaller triangle
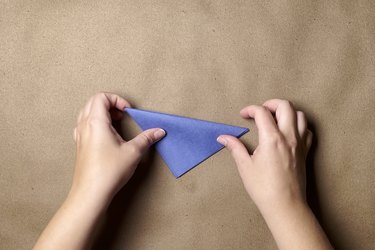
Tilt square so you have a diamond shape with a single fold on bottom right side and two folds on bottom left side. Take one of four flaps of paper at top of diamond and fold it downward, creasing it in the middle so it lays flat. Next, flip diamond around to other side and fold remaining three flaps down all at once, making a crease in middle again. The paper should now resemble a triangle.
4. Fold paper triangle into diamond shape

Hold triangle with point facing downward and side with three flaps facing toward you. Pull two sections apart so there's a space between side with three flaps and side with one flap. Then, push opposite ends together. This will turn triangle into a diamond.
5. Turn diamond into paper boat

Turn diamond so side with more paper is on left and side with less paper is on right. Carefully pull two flaps away from each other to left and right so paper opens to reveal an inner triangle. Pull until you have a straight line at bottom edge, which is now bottom of boat.
6. Seal paper boat
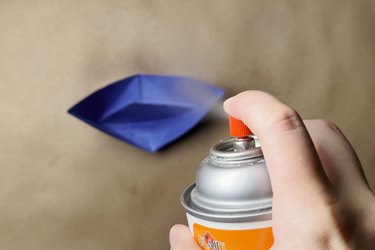
Seal completed paper boat with clear acrylic sealer, making sure to cover bottom of boat with a couple of coats. Once that dries, you're ready to set sail! Your boat should now be able to hold some weight too—try adding a few pennies and see.
And now you know how to make a paper boat! Who knew paper boat origami was that simple? Now you or your kids can have fun racing DIY paper boats whenever inspiration strikes.