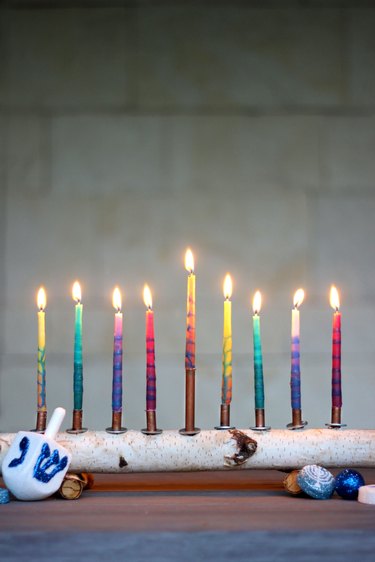
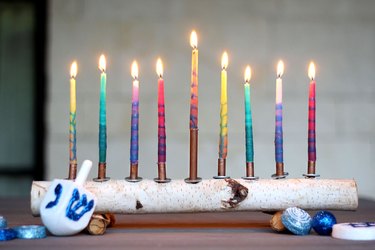
Although the lighting of the menorah candles has been a Hanukkah tradition for centuries, styles of actual menorahs vary wildly, and they are not necessarily so traditional. This DIY menorah made from a birch branch and copper tubing combines rustic charm with an industrial aesthetic that will be sure to light up your Hanukkah celebration.
Video of the Day
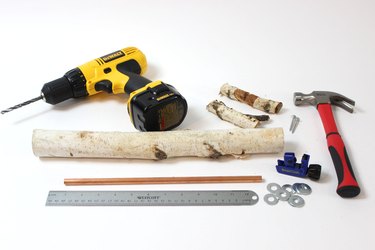
Things You'll Need
1/4-inch copper tube
Pen
Ruler
Tube cutter
Birch branch, about 16 inches
Two smaller birch branches, about 6 inches
Drill with 3/8-inch bit
Nails
Hammer
5/16-inch washers
Hanukkah candles
Step 1: Mark the Copper Tube
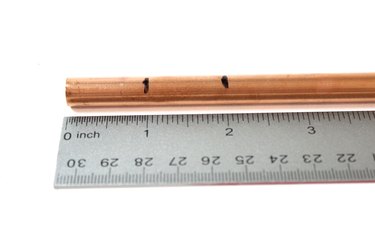
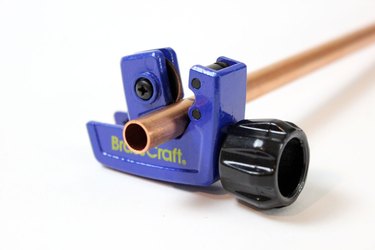
The actual candle holders of the menorah will be created from 1/4-inch copper tubing, which you can find in the plumbing aisle of home improvement stores. Using a pen and a ruler, mark the copper tubing at 1-inch intervals so you have eight 1-inch sections and one 3-inch section.
Video of the Day
Step 2: Cut the Copper Tubing
Using a tube cutter, which you can usually find in the same aisle as the copper tubing, cut the copper at the points that you marked so you have nine pieces — eight that are 1-inch and one that is 3 inches. If you've never used a tube cutter, it's fairly easy to maneuver. Place the copper tube in the cutter, tighten the screw and spin the cutter. The blade in the spinning cutter carves into the metal until the piece is loose enough for you to snap off.
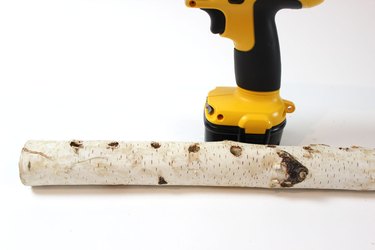
Step 3: Drill Holes in the Large Branch
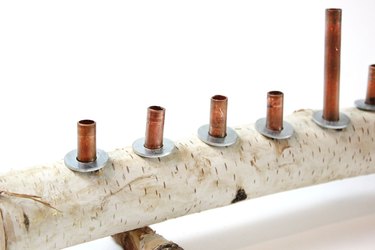
If you don't have birch branches in your yard, you can usually purchase them in bunches at crafts stores. At my local store, standard birch branches are 16 inches long, which is a good size for the menorah. Using a power drill with a 3/8-inch bit, drill nine holes spaced about 1 1/2 inches apart. The 3/8-inch bit will create holes that are perfect for the 1/4-inch copper tube sections.
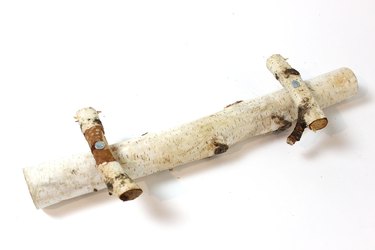
Step 4: Attach the Legs
The two smaller birch branches will be the legs of the menorah supporting the longer branch. Turn the longer branch upside down so the holes you drilled are on the bottom. Then nail the two smaller branches about 4 inches from the end of the longer branch at a perpendicular angle.
Step 5: Insert the Copper Sections
Place the nine copper sections you've cut into the nine holes you drilled, with the longer 3-inch copper piece in the middle position for the chamash candle. The copper pieces should fit snugly in the holes. If any are loose, use a hammer to gently lock them into place.
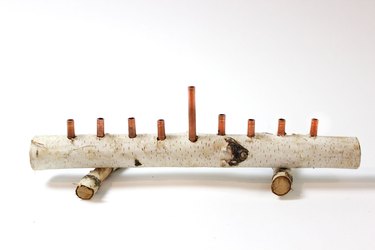
Step 6: Add Metal Washers
To prevent candle wax from dripping onto the branch, slide a metal washer through each copper piece. Look for metal washers with a 5/16" opening, which will slide easily through the 1/4-inch tubes. The washers will act as bobeches, also known as drip cup rings, that collect any drips from your candles.
Step 7: Insert Candles on Appropriate Days
Place candles in the copper holders each day according to tradition. If your candles are thicker than the openings, shave off a little from the bottoms before inserting them.