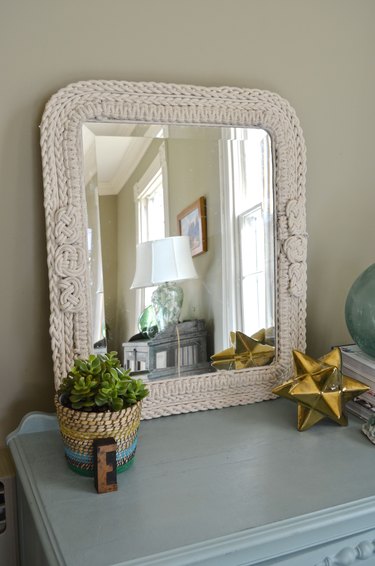
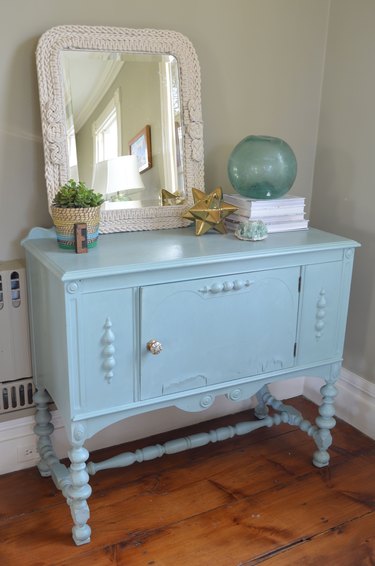
Turn a plain thrift store mirror into an ornate wall hanging with ropes and an arsenal of sailor's knots. The eclectic texture combined with a neutral color palette means this do-it-yourself roped frame can hang in any room whether casual or more formal.
Things You'll Need
60 meters of 6 millimeter cotton rope
Tape (optional)
1 mirror (the one used in this project measures 16-inches x 20-inches)
1 piece of 1/2-inch plywood cut to 22-inches x 26-inches
Off-white spray paint
Liquid Nails adhesive
Hot glue gun
24 brad nails
Hammer
Jigsaw (optional)
Picture hanging hardware (2 D-rings, 2 screws, and 50-pound wire)
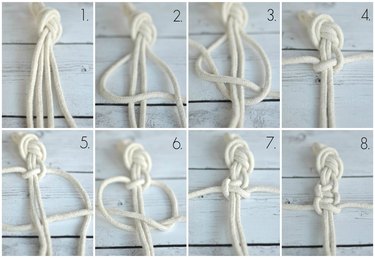
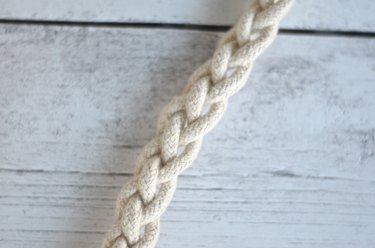
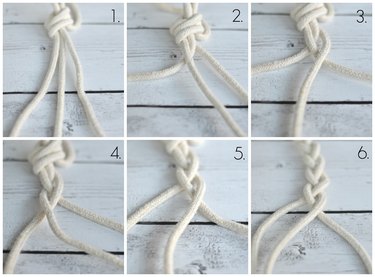
Step 1: Weave a Macrame Braid
Cut two pieces of rope long enough to wrap around the circumference of the mirror. For this project, we used approximately 80 inches of rope. Cut two more lengths of rope to 4 feet long each. Gather the four pieces of rope and make a knot at the end. (See 1) Take the left-hand strand of rope and bring it over the pair of long strands and under the right-hand length of rope. (See 2) Bring the right-hand length of rope under the pair of long strands and then up through the 'elbow' of the left-hand rope. (See 3) Pull tight. (See 4) Bring the left-hand length of rope under the pair of long strands and over the right-hand rope. (See 5) The right-hand rope will go over the pair of long strands and then down through the 'elbow' of the left-hand rope. (See 6) Pull tight. (See 7.)
Video of the Day
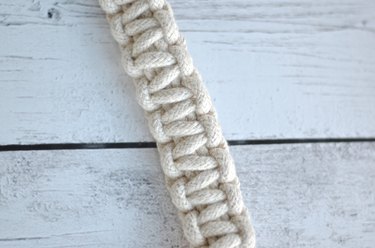
Step 2: Continue with the Macrame Braid
Repeat the above macrame weaving pattern until you run out of the left and right weaving strands. Cut two more lengths of 4-foot rope and repeat Step 1. Continue until the length of macrame is long enough to stretch the circumference of the mirror (80 inches in this example).
Tip
Use tape to hold the ends in place when adding each new section of macrame.
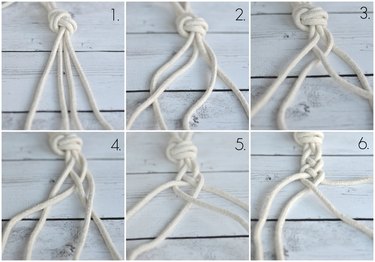
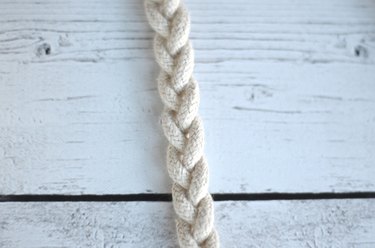
Step 3: Weave a Four-Strand Braid
Cut four lengths of rope approximately 160 inches long each. Gather the four pieces of rope and make a knot at the end. (See 1) Bring the second strand over the first strand. Bring the fourth strand over the third strand. (See 2). Bring the newly arranged second strand over the third strand. (See 3)
Tip
Wrap the excess rope into bundles to make it easier to weave with.
Step 4: Finish the Four-Strand Braid
Continue until the braid is long enough to stretch the circumference of the mirror (at least 80 inches in this example.) (See 4 and 5 above.)
Step 5: Weave a Traditional Braid
Cut three lengths of rope approximately 160 inches long each. Gather the three ropes and make a knot at the end. (See 1) Bring the left-hand strand over and into the middle of the two remaining ropes. (See 2) Bring the right-hand strand over and into the middle of the two remaining ropes. (See 3)
Step 6: Finish the Traditional Braid
Continue until the braid is long enough to stretch the circumference of the mirror (at least 80 inches in this example.)
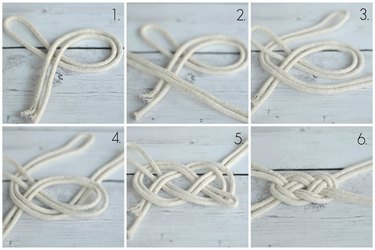
Step 7: Make a Figure-8 Knot
Cut two lengths of rope approximately 36 inches long each. Fold over the first length of rope and create a loop. (See 1) Fold over the second length of rope and bring it over one end and under the other end of the first rope. Tuck the tail of the second length of rope under the loop formed by the first length of rope. (Step 3) Bring the end of the second length under the loop formed by the first rope. (See 4) Take the end of the second length of rope and weave it over the first length of rope, under the tail of the second length, and over the top of the first length of rope. (See 5) Pull tight, (See 6) trim the ends and secure with a dab of hot glue underneath. Make four figure-8 knots.
Tip
Use the hot glue gun to help secure the ends of the lengths of rope.
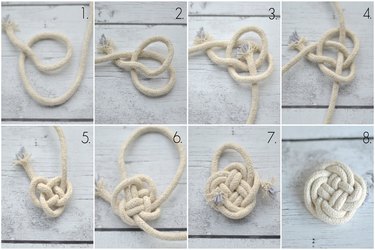
Step 8: Make an Intricate Clover Knot
Start with one length of rope about 3 feet long and make a loop with one end. (See 1) Take the right end of rope and bring it under the loop and over the left-hand tail of rope. (See 2) Bring this same end of rope and weave it under, over, under and over the loop and rope tail. (See 3 and 4) Pull slightly tight. (See 5) Follow the pattern of the first rope with the remaining end of rope to double up on each rope line. (See 6 and 7) Pull tight, trim the ends and secure with a dab of hot glue underneath. (See 8) Make two clover knots.
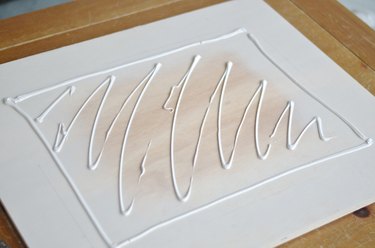
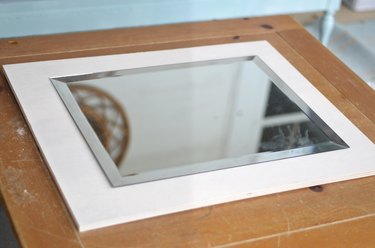
Step 9: Glue the Mirror onto the Plywood
Give the wood a light coat of off-white spray paint and apply the Liquid Nails in order to glue the mirror onto the plywood. Center the mirror, leaving 3 inches all around.
Tip
Gather some heavy books to weigh down your mirror while the glue is setting overnight.
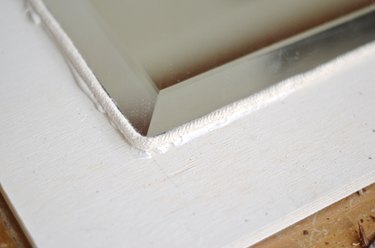
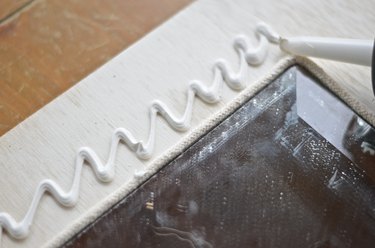
Step 10: Begin to Add the Rope to the Frame
Apply a bead of Liquid Nails around the edge of the mirror and glue down a single strand of rope (approximately 75 inches of rope).
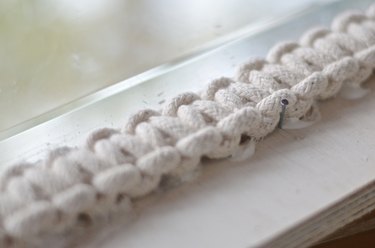
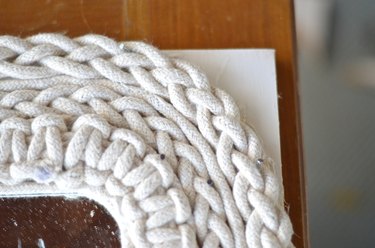
Step 11: Glue the Macrame onto the Frame
Glue the thickest macrame length around the mirror. Place the end of the macrame on the middle of one side. Apply a liberal amount of Liquid Nails and slowly press the macrame down as it wraps around the mirror. If needed, use the hot glue gun to help hold the macrame in place while the Liquid Nails completely sets (overnight).
Tip
Small brad nails are helpful to keep the various braids in place and tight against each other around the mirror. Gently tap them in place with a hammer and leave in place until the glue has set overnight. Remove when the glue has dried.
Step 12: Glue the Traditional Braid onto the Frame
Repeat Step 11 with the simple braid. Start at the same place on the edge of the mirror. These rough ends will be covered up later so it is important that they are aligned. Glue one single strand of rope around the braided length.
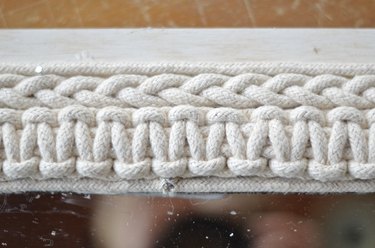
Step 13: Glue the Four-Strand Braid onto the Frame
Glue the final intricate braid around the mirror as in Steps 11 and 12.
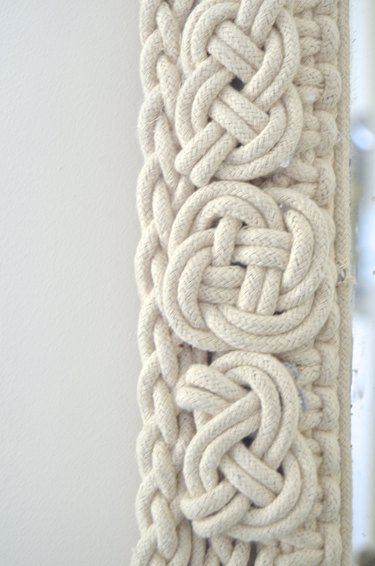
Step 14: Cover the Raw Ends of Braids with Knots
With the hot glue gun, glue on the figure-8 knots and the clover knots to conceal the exposed edges of the various braids.
Step 15: Trim Exposed Plywood Corners
Optional: With the jigsaw, trim the exposed corners of the wood. If a jigsaw is unavailable, then cover the exposed wood with more rope.
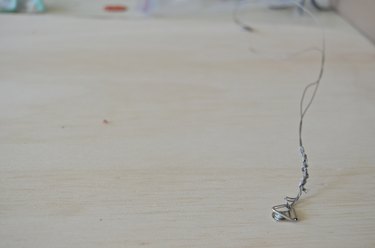
Step 16: Optional: Attach Mounting Hardware
Turn the mirror over and screw in hanging D-rings and wrap the hanging wire between them.
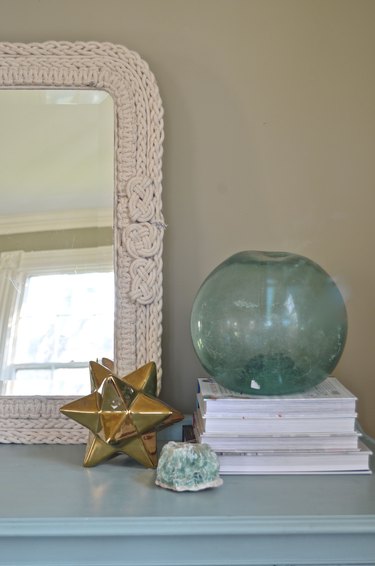
The texture and detail of the rope frame will stand out in any room. Because of the neutral color of the rope, this mirror complements most decor.
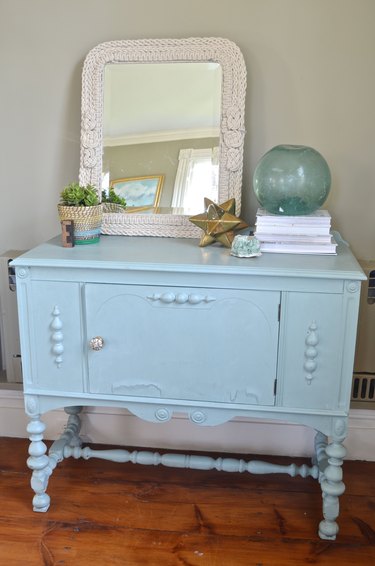
The mirror can be displayed horizontally or vertically. The decorative knots look just as chic on either side of the frame or turned to be on the top and bottom. Neutral texture at its best.
Video of the Day