How to clean tarnished silver: when baking soda is safe
How to clean tarnished silver depends less on how dark a piece looks and more on what that piece actually is. The foil-and-baking-soda trick that keeps circulating in kitchen hacks is real chemistry, not an urban legend. Tarnish is a dark silver-sulfide film, and cleaning silver with baking soda and aluminum foil works by setting off an electrochemical reaction that promises to make tarnished silver shine again in minutes (Antique Identifier Online, earlier this year). That speed is also the problem. The same reaction that clears a dull spoon can strip decades of aged patina, or intentional darkening, off a piece where that surface is the point rather than the flaw.
This guide sorts out which silver can reasonably go near that reaction and which pieces shouldn't. The short version: a conventional, nonabrasive silver polish handles plain, modern flatware. Skip the foil bath on antiques, plated pieces, engraved or detailed silver, jewelry, and anything you can't confidently identify. What follows covers how to tell the difference, what the chemistry can and can't promise, and what to do instead for pieces that don't qualify.
How to clean tarnished silver safely: identify the piece first
Video of the Day
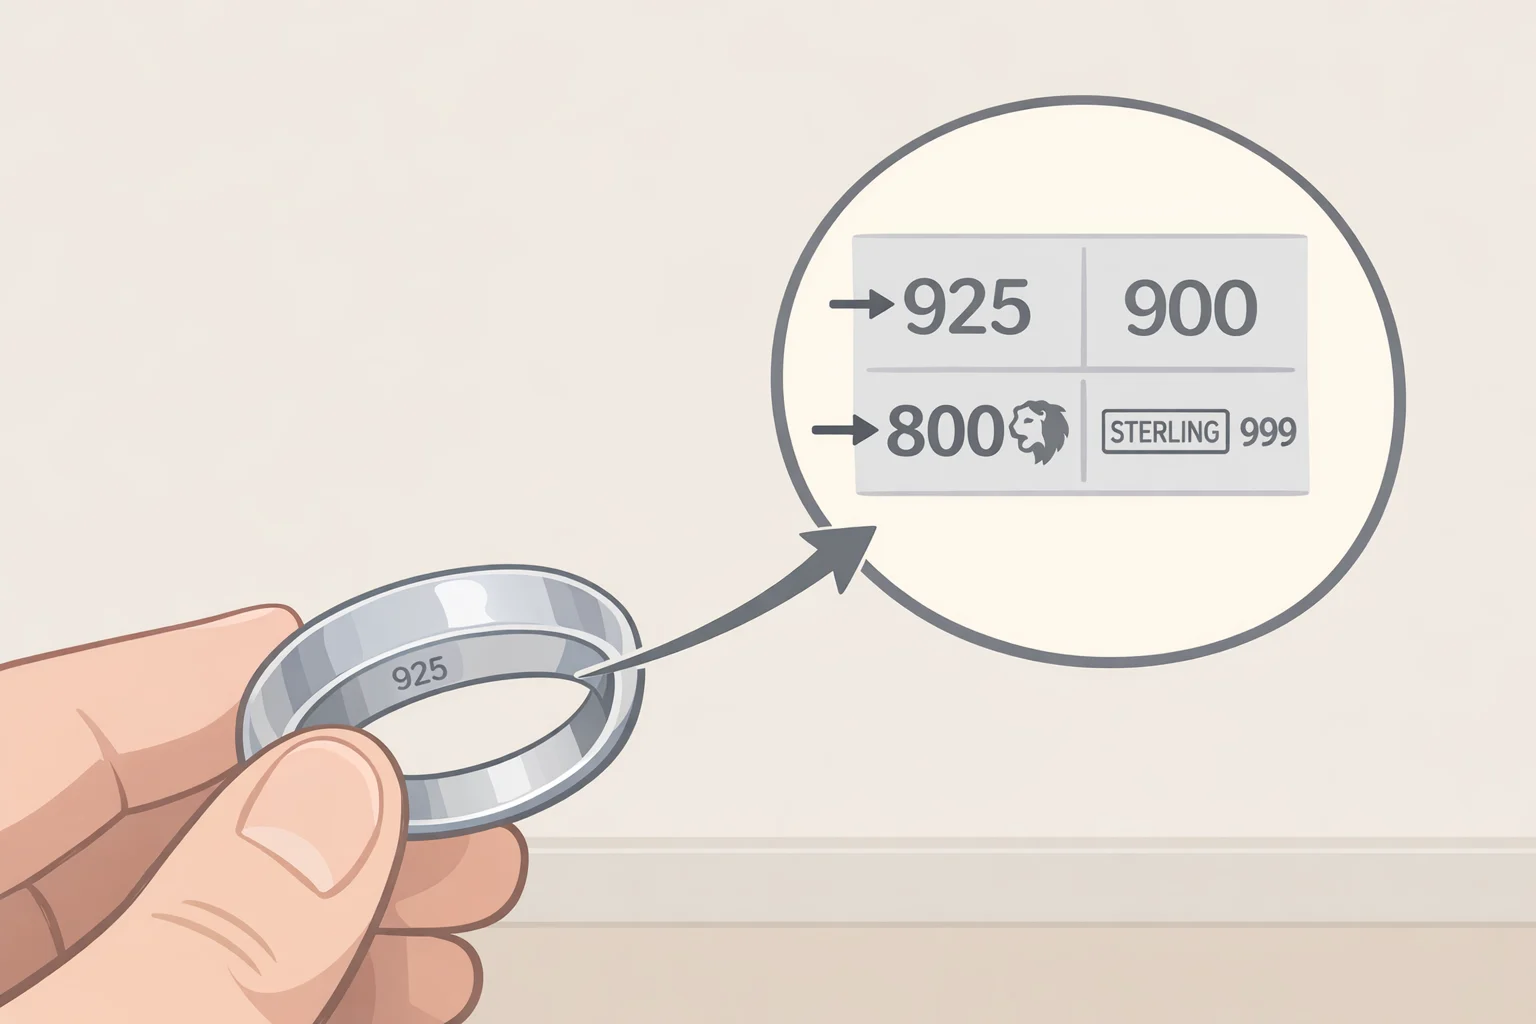
Before reaching for foil or polish, figure out what's in front of you. A stamp reading "925," "Sterling," or "900" indicates a silver standard, sterling or coin silver, but it says nothing about the item's age, maker, or value (Antique Identifier Online). Treat the mark as a reason to slow down, not a green light.
If a piece carries no purity mark at all, it's more likely plated than solid, though wear can also erase old markings entirely. When a mark is missing, worn, illegible, or simply unfamiliar, that's a job for an appraiser rather than a guess. Misreading plate for solid sterling, or the reverse, is exactly the mistake that leads to bad cleaning decisions.
Run through this before you clean anything:
- Reasonable to consider a chemical bath: modern, mass-produced sterling flatware with no engraving, gilding, or set stones, and no known age (Antique Identifier Online). This guide adds one more filter of its own: if a piece has sentimental value beyond its market price, treat it like the categories below regardless of what the hallmark says.
- Skip the bath entirely: antique sterling, coin silver, Sheffield plate, anything with applied decorative elements, plated silver, jewelry, and anything you can't identify (Antique Identifier Online). Jewelry belongs on this list as this guide's own recommendation.
One caveat worth flagging on that jewelry rule: the cited source is more tentative than the checklist above, suggesting that contemporary silver jewelry without intentionally darkened crevices, or basic utility flatware without historical attribution, could reasonably be risked (Antique Identifier Online). That's the source's own hedge, not a recommendation this guide is making. Given how little jewelry-specific guidance exists on settings, adhesives, and finishes, treating jewelry as off-limits for immersion is the safer default here.
If a piece doesn't clearly land in the first category, stop. Photograph any hallmarks or decorative detail, skip immersion and polishing, and follow the antiques guidance further down.
Dark recesses on engraved or repoussé silver often aren't grime. They're intentional, factory-applied oxidation, sometimes described as niello or antiquing, used to define a pattern rather than sit on top of it (Antique Identifier Online). Appraisers and auction specialists look for that original surface patina specifically as evidence of age and authenticity, according to the same source. Stripping it can remove the very evidence that establishes a piece's age or authenticity, not just its shine.
Video of the Day
What the baking soda and foil method actually does
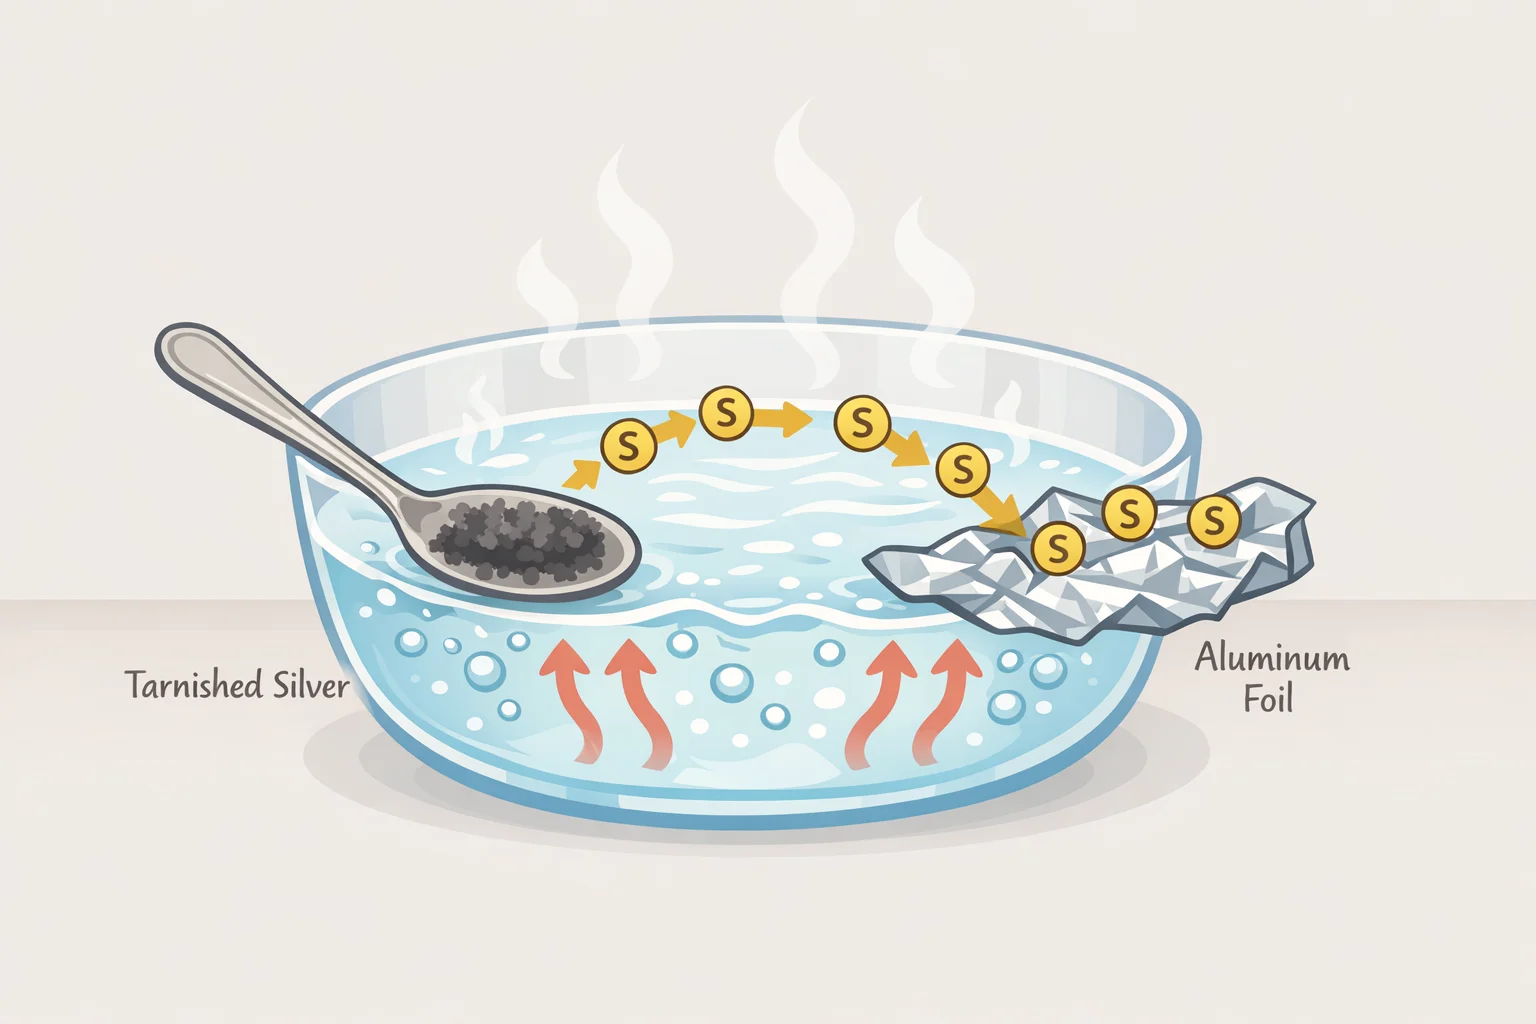
Both sources describe a related electrochemical mechanism: aluminum acts as an anode in a hot, alkaline bath, and sulfur transfers from silver to foil through direct contact (Antique Identifier Online; Temple Chemistry Demonstrated, nearly 2 years ago). But the version that spreads online isn't quite the version chemistry departments demonstrate. Temple's documented setup swaps in sodium carbonate for the baking soda most viral posts call for, run in an aluminum pan with hot water (Temple Chemistry Demonstrated). Baking soda is commonly described as having a pH around 8.3 (Antique Identifier Online), and nothing in the sources reviewed here confirms that a baking-soda mixture behaves identically to Temple's sodium-carbonate version.
Neither source hands over a standardized consumer recipe with verified proportions and soak times for the baking-soda version specifically. The reaction does produce hydrogen sulfide as a byproduct, which also explains the smell (Temple Chemistry Demonstrated).
Because that gap exists, this guide recommends the wash-and-polish routine below over improvising a bath, for anything beyond plain, modern flatware. Damage tends to trace less to the chemical reaction itself and more to what happens around it: repeated use can gradually wear down the fine lines of a hallmark, and scrubbing a piece while it's still softened by the hot solution is the more common cause of blurred maker's marks (Antique Identifier Online). The chemical treatment can also strip patina and pit sterling surfaces outright (Antique Identifier Online).
The safer way to remove tarnish from silver flatware
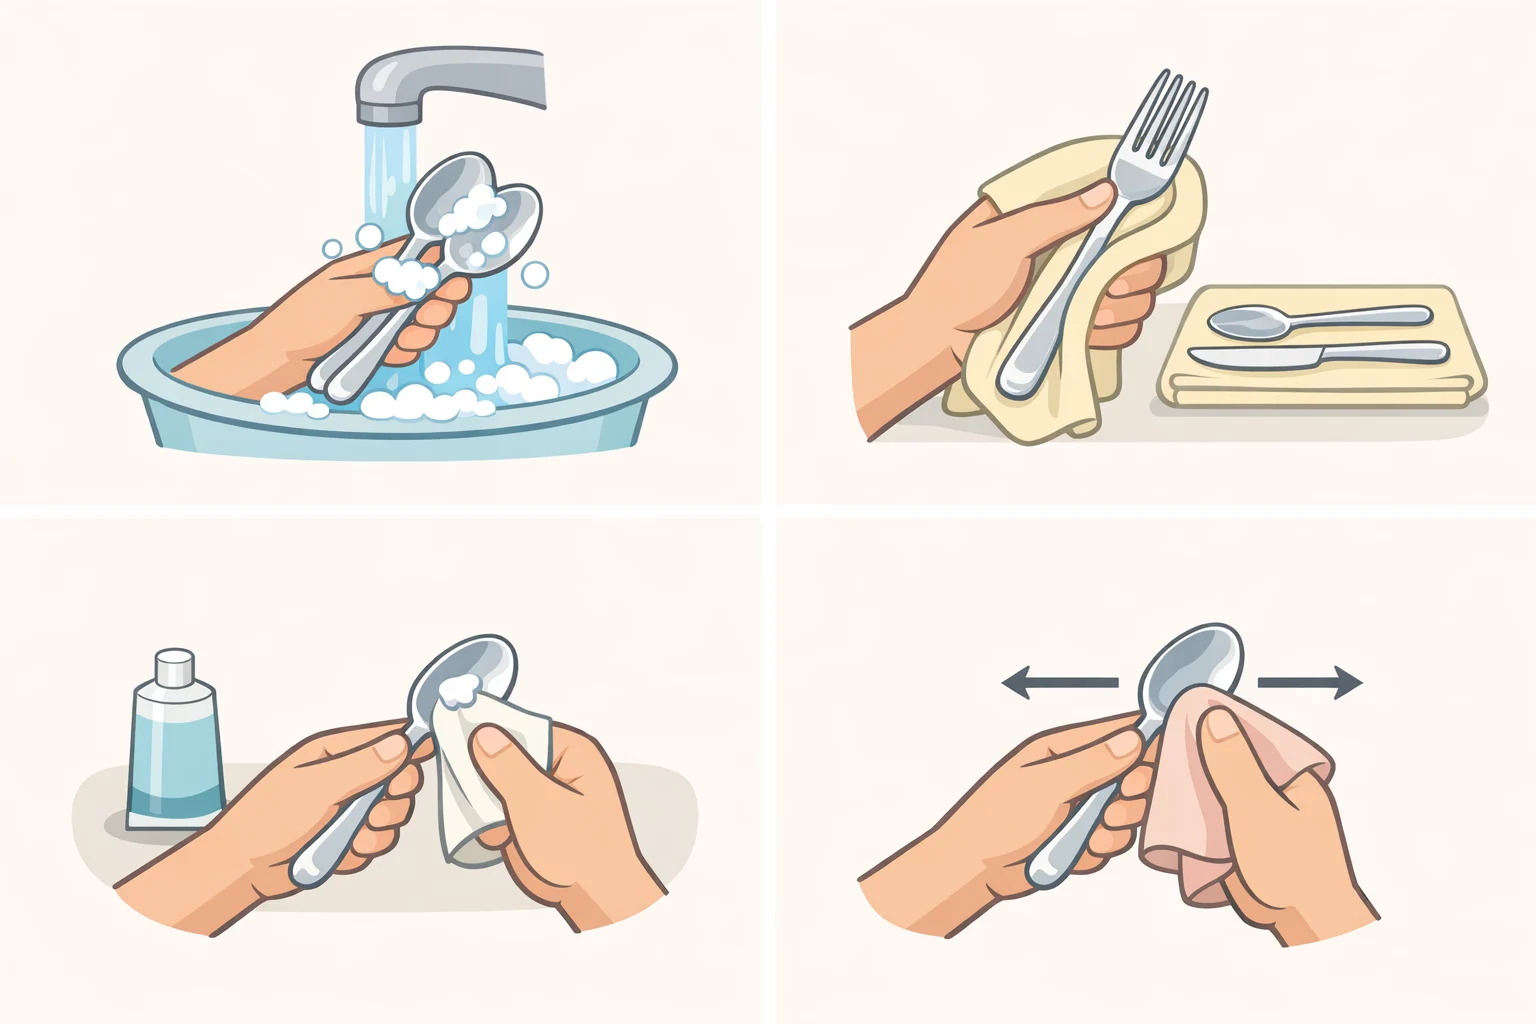
For everyday sterling that passed the checklist above, here's the routine the cited source recommends:
- Wash the piece in warm water with a mild, phosphate-free dish soap (Antique Identifier Online).
- Dry it immediately with a soft cotton cloth rather than letting it air-dry (Antique Identifier Online).
- If tarnish remains, apply a trusted, nonabrasive silver cream or liquid polish, such as Wright's or Hagerty, following the manufacturer's directions (Antique Identifier Online).
- Rub in straight lines, not circles, with a soft cloth or sponge, and polish sparingly, only where it's needed (Antique Identifier Online).
- Leave dark decorative crevices alone. That oxidation is often intentional, not grime waiting to come off (Antique Identifier Online).
- Remove any residue according to the product's instructions and dry the piece thoroughly. If the surface reacts in a way you don't expect, stop and check the manufacturer's guidance rather than keep rubbing.
This is a less aggressive alternative to an improvised bath, and for plain flatware it's a safe way to clean silver without gambling on an unverified recipe, one you can repeat without needing to relitigate this decision every few months.
Why plated silver, jewelry, and antiques need a different approach
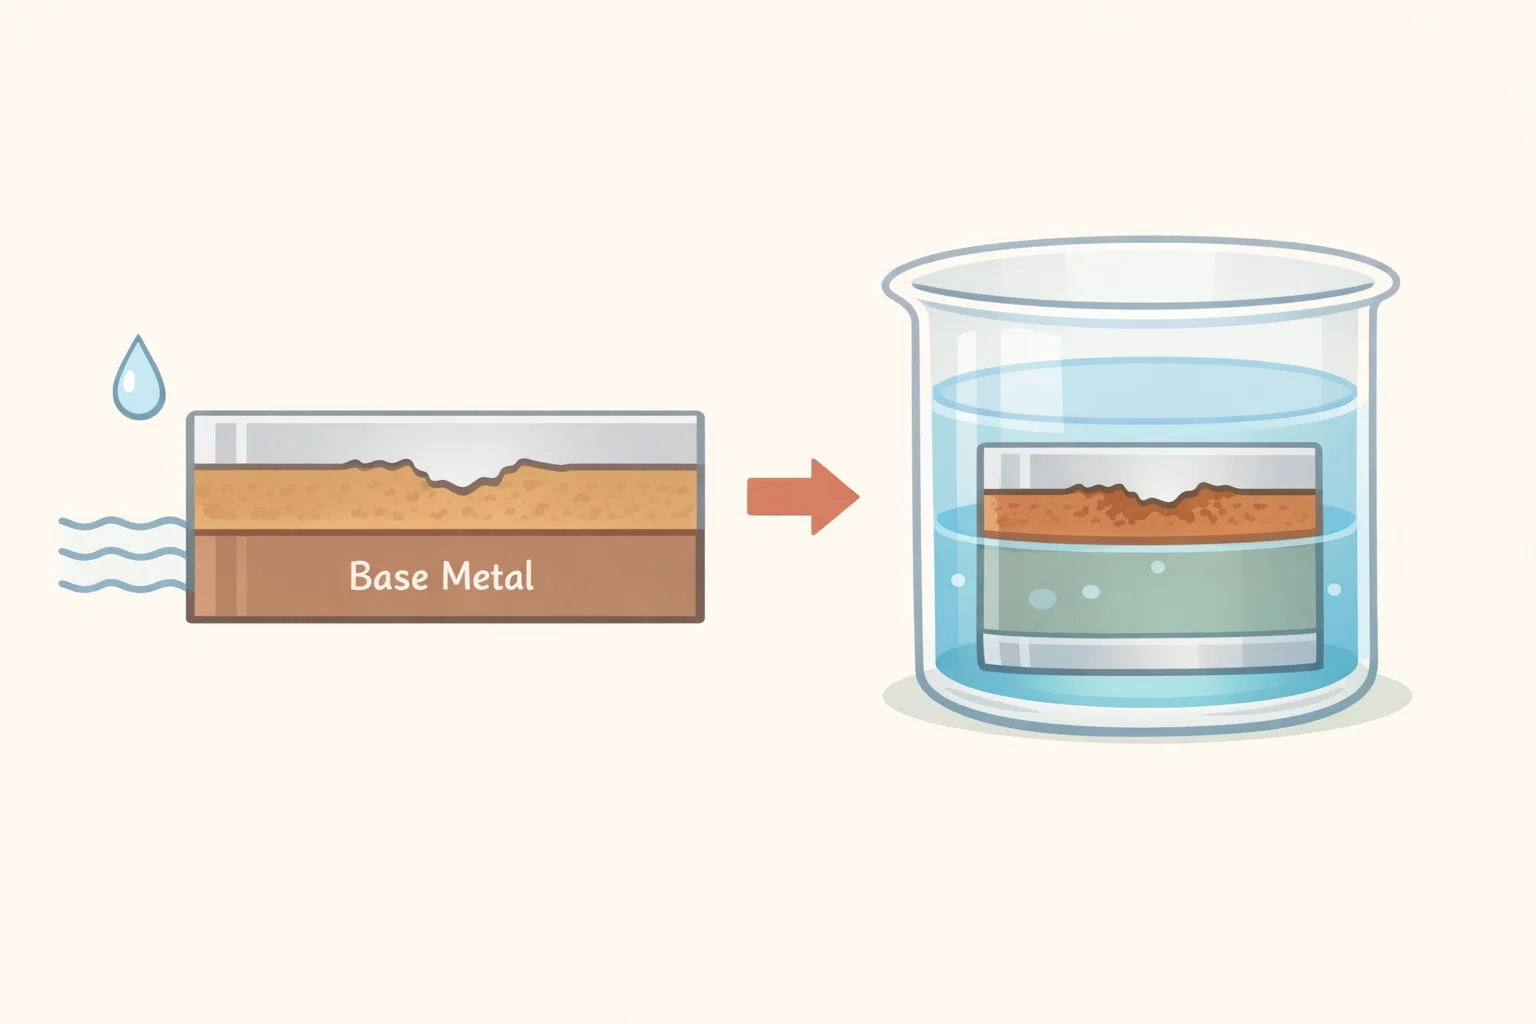
Plated silver should skip immersion entirely. The same electrochemical process that pulls sulfur off solid sterling can eat through the thin silver layer on plated pieces, exposing the copper or brass base underneath. Once that happens, the piece may need professional re-plating, and its value can drop accordingly (Antique Identifier Online).
Jewelry's caution is covered above: nothing in the sources reviewed here offers a jewelry-specific protocol for glued stones, oxidized finishes, or unfamiliar construction. As general caution rather than sourced guidance, check with a jeweler before immersing anything set with stones or built with adhesives.
For antiques, coin silver, Sheffield plate, or anything made before roughly 1920, the cited source recommends a soft, untreated cotton cloth used dry, for loose dust and surface grime, with no water or chemicals involved. That's the safest way to clean antique silver without touching whatever's underneath (Antique Identifier Online). For light tarnish on a piece with a finish you're confident about, the same source describes a small amount of Renaissance Wax on a cotton swab, applied and buffed off gently, as a step conservators commonly accept. Skip it if there's any doubt about the construction. The cited guidance also recommends avoiding liquid dips, abrasive pastes, ultrasonic cleaners, and the foil bath for this category, and it states that a professional conservator would not use the electrochemical method on anything predating 1920, given the risk of stripping patina that helps confirm a piece's history (Antique Identifier Online).
Getting this wrong can carry a real cost. Antique Identifier Online reports one case at a regional auction house where a George III silver salver's estimated value dropped 40 percent after the consignor had it cleaned with a commercial dip before submission (Antique Identifier Online). The same source generalizes that aggressive cleaning on antique silver almost always reduces value, though the size of that effect varies by piece.
If a piece has loose stones, a peeling or sticky finish, or heavy corrosion, treat that as a signal to consult a conservator or jeweler rather than clean it yourself.
What professional conservators do differently
Professional conservation treatment looks nothing like a kitchen bath. The Smithsonian's National Air and Space Museum offers a sense of that patience at museum scale. Conservators treating corrosion in the metal seams of the "Ad Astra" sculpture removed crust from 45 seams by hand, some of which took as long as three days to clean, with the full seam-polishing pass taking about two months of teamwork (Conserving Ad Astra, last year). Work started in 2024 and included two separate polishing passes, moving to a finer grit on the second round to bring the surface close to a mirror finish.
That's the real gap between a kitchen sink and a conservation lab: professionals spend days by hand on a single seam, using controlled methods that a mixing bowl and some foil simply can't replicate.
Preventing tarnish instead of making this decision again
For everyday flatware, the wash-and-polish routine above doubles as prevention. Wash after use, dry with a soft cloth rather than letting pieces sit, and polish sparingly, in straight lines, only when it's actually needed (Antique Identifier Online).
For antiques and anything decorative, skip water and soap as routine maintenance, and leave dark decorative crevices alone. That oxidation may be intentional and shouldn't be removed without knowing what the finish actually is (Antique Identifier Online).
For jewelry, the caution from earlier carries over to storage and upkeep: skip any at-home bath regardless of how tarnished a piece looks. Nothing in the sources reviewed here establishes a safe protocol for jewelry's mix of settings, adhesives, and finishes.
Conclusion
Reserve the foil bath, if at all, for plain modern flatware that clears every item on the checklist above, and even then, use a tested commercial product rather than an improvised ratio; no source reviewed here supplies a verified household recipe. For anything plated, engraved, stone-set, antique, historically attributed, or simply of uncertain age, treat a bright mirror finish as a caution sign rather than a goal. It can mean the surface evidence a piece was valued for is now gone.
When a piece is uncertain or irreplaceable, the safer approach is the one conservators already follow: intervene as little as possible, and ask before you clean.