Frozen peanut butter bars: layers, swaps, and storage tips
This guide walks through building frozen peanut butter bars from an 8x8 pan: salty pretzel crust, blended peanut butter filling, dark chocolate shell. By the end, you'll know what each layer contributes structurally, which ingredient choices affect freeze texture, and how to slice the bars without shattering the chocolate.
The core method takes about 20 minutes of hands-on work. The freezer handles the rest.
Prerequisites: An 8x8 inch baking pan, parchment paper with enough overhang to lift the slab out later, a blender or food processor for the filling, a microwave-safe bowl for the chocolate, and a sharp knife. Clear flat freezer space before you start it's required, not optional.
What you need: ingredients at a glance
Video of the Day
The pan-bar version uses two distinct layers before the chocolate goes on. Here's what to have ready (Rachael's Good Eats, this month):
Pretzel crust:
- 1 to 1.5 cups crushed pretzels (gluten-free if needed)
- 2 to 3 tablespoons peanut butter
- 1 to 2 tablespoons melted coconut oil
- 1 tablespoon maple syrup
- Pinch of salt
Peanut butter filling:
- 1 cup cottage cheese (or thick Greek yogurt)
- 1/2 cup peanut butter
- 1 scoop vanilla protein powder (optional)
- 2 tablespoons maple syrup
- Splash of milk, added as needed
- 1/2 teaspoon vanilla extract
- Pinch of salt
Chocolate shell:
- 1 cup dark chocolate, roughly chopped from a bar (around 60% cacao)
- 1 tablespoon coconut oil
- Crushed pretzels for topping
These quantities are working approximations drawn from the source recipes. Exact amounts vary by batch size and sweetness preference, so taste and adjust the filling before it freezes.
Video of the Day
Why each layer exists: ingredients and what they're actually doing
Swapping an ingredient without knowing its structural job is the fastest route to a bar that's soft, icy, or falling apart. Here's what each component contributes.
The base: structure and contrast. The crust is crushed pretzels mixed with peanut butter, melted coconut oil, maple syrup, and salt. The pretzel base delivers salty, crunchy contrast that anchors the bar, per Rachael's Good Eats, published this month. The fat from peanut butter and coconut oil binds the crumbs and holds the crust's shape once frozen. Press it firmly into the pan with the bottom of a measuring cup. A loose crust crumbles under the knife.
The filling: creaminess and protein. Blending cottage cheese with peanut butter produces a smooth, protein-dense result the curds disappear entirely in the blender. Per Rachael's Good Eats, peanut butter contributes healthy fats and plant-based protein while cottage cheese adds creaminess without making the filling taste heavy. The yogurt-and-peanut-butter path skips the blender entirely. Thicker yogurts yield a firmer, creamier bar after freezing; thinner varieties can leave the filling slightly icy, as Cooked & Loved confirmed this month. Greek yogurt for a denser result; coconut yogurt for dairy-free, which also firms well.
The shell: snap and sweetness balance. Dark chocolate melted with a small amount of coconut oil sets firm in the freezer and produces a crackly contrast that defines the eating experience. Use bittersweet chocolate around 60% cacao it tempers the sweetness in a way milk chocolate can't. Serious Eats noted last year that chopped bar chocolate melts more evenly than chips, producing a glossier, more uniform coating. Coconut oil thins the melt just enough to pour and spread before it sets.
A note on protein powder. Adding a scoop to the filling is a straightforward way to boost protein. One caveat on longer storage: a 2025 study in the Journal of Food Science tracked hardening in purpose-formulated high-protein bars stored at elevated temperatures to accelerate aging conditions quite different from a home freezer. Over six weeks, all bar types hardened, with pea protein bars becoming roughly 7.2x firmer, whey about 5.4x, and rice protein the most stable at 4.4x (Journal of Food Science, 2025). That study doesn't translate directly to a frozen home recipe, but if extended storage with protein powder is the plan, rice protein may hold texture better than pea or whey based on that directional finding.
How to make frozen peanut butter pretzel bars: step by step
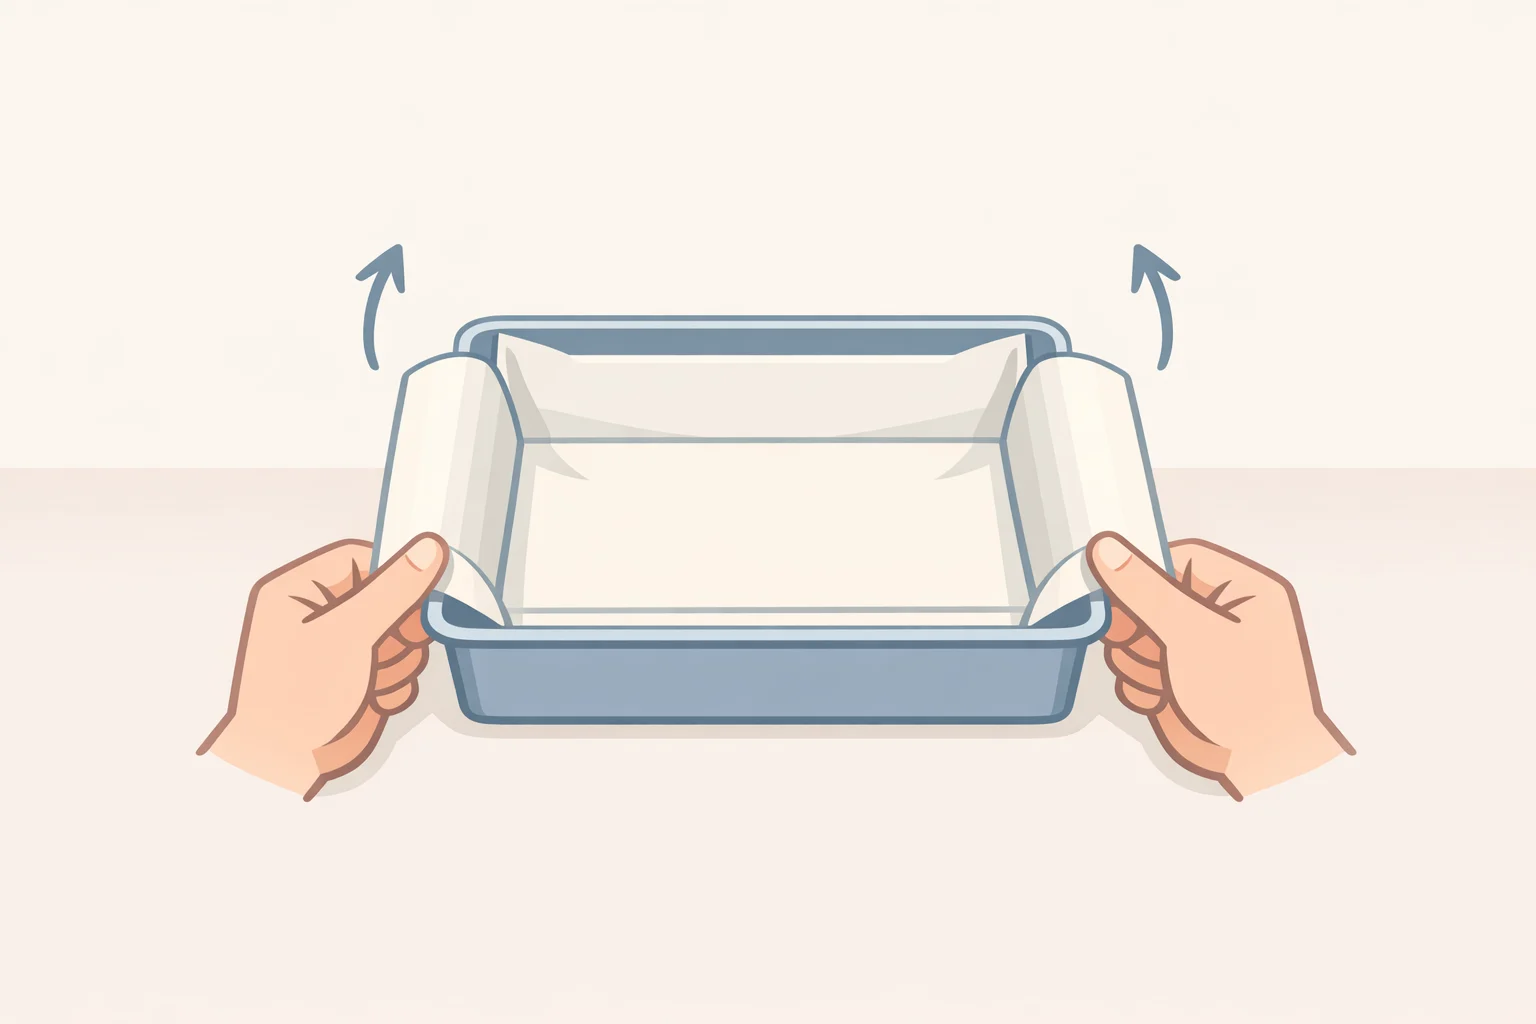
Step 1: Prepare the pan. Line an 8x8 inch pan with parchment, leaving overhang on two opposite sides. These become handles for lifting the slab out cleanly. Skip this and you'll be chiseling bars out later.
Step 2: Make and press the crust. Combine crushed pretzels, peanut butter, melted coconut oil, maple syrup, and salt. Mix until the crumbs hold together when pressed. Transfer to the pan and press firmly into an even layer; the bottom of a measuring cup works well here. The crust should hold a pressed shape without crumbling. Place in the freezer while you make the filling (Rachael's Good Eats, this month).
Step 3: Blend the filling. Add peanut butter, cottage cheese (or thick Greek yogurt), vanilla protein powder if using, maple syrup, a splash of milk, vanilla extract, and salt to a blender. Process until completely smooth: no visible curds, no graininess. Add milk a tablespoon at a time if the mixture is too thick to pour. Taste and adjust sweetness before it freezes (Rachael's Good Eats, this month).
Step 4: Freeze the filling in stages. Pour the filling over the crust, smooth the surface, and return the pan to the freezer. Freeze for 45 to 60 minutes, until mostly firm to the touch but not fully solid. This staged freeze matters: pouring warm chocolate over soft filling causes the layers to bleed together and the chocolate to sink rather than sit on top (Rachael's Good Eats, this month).
Step 5: Make the chocolate shell. Melt dark chocolate with a small amount of coconut oil in a microwave-safe bowl in 30 to 45 second bursts, stirring thoroughly between each one until glossy and smooth. Let it cool for 2 to 3 minutes before pouring. Too hot and it partially thaws the filling; too cool and it starts setting before you can spread it.
Step 6: Pour, top, and return to freezer. Pour the chocolate over the partially frozen filling and spread it quickly to the edges. Scatter crushed pretzels over the surface immediately the cold filling pulls heat from the chocolate fast, so don't wait. Return the pan to the freezer for at least 1.5 to 2 hours, or overnight for best results (Rachael's Good Eats, this month).
Step 7: Slice without shattering the shell. Pull the pan from the freezer and let it rest at room temperature for 5 to 10 minutes. Run a sharp knife under hot water, dry it, and lightly score the chocolate surface into a 3x3 grid before pressing through fully. Warm and wipe the knife between each cut. Cutting cold chocolate without scoring or warming the knife causes it to shatter rather than slice (Rachael's Good Eats, this month). Serve straight from the freezer for maximum snap, or let bars sit 2 to 3 minutes on the counter for a slightly creamier center.
Format choice and safe swaps
Pan bars vs. stick bars. The pretzel-pan method produces 9 squares with about 20 minutes of prep and roughly 2.5 hours of freeze time, overnight preferred (Rachael's Good Eats, this month). The yogurt popsicle-mold format yogurt blended with peanut butter and honey, frozen in individual molds on sticks, then dipped in chocolate yields 12 lighter bars with 15 minutes of prep and at least 4 hours of freeze time (Cooked & Loved, this month). A silicone mold releases cleanly; small paper cups with wooden sticks work as a substitute. Choose pan bars for batch efficiency and make-ahead convenience. Choose the mold format if you want something closer to a summer frozen treat on a stick.
Substitutions and their structural consequences. These swaps work, but each one changes something:
- Nut-free: Swap peanut butter for sunflower seed butter in equal measure. Cooked & Loved confirms the swap works; verify your chocolate is also nut-free.
- Dairy-free: Coconut yogurt in place of Greek yogurt firms well after freezing, and coconut oil is already in the recipe. Brand consistency varies, so minor adjustments may be needed.
- White chocolate instead of dark: Sweeter and less bitter, white chocolate pairs well with a granola topping instead of pretzels. It won't balance sweetness the way bittersweet dark does, so pull back on sweetener in the filling if you go this direction (SpamellaB, April 2025).
- Gluten-free: Swap regular pretzels for gluten-free pretzels; the rest of the recipe is naturally gluten-free as written (Rachael's Good Eats, this month).
How to store frozen peanut butter bars
Store finished bars in an airtight container in the freezer with a sheet of parchment between layers to prevent them from fusing together. Shelf life ranges from a few weeks to up to a month, depending on formulation, how airtight the container is, and how often it's opened. Two to three weeks is a reliable target for best texture (Rachael's Good Eats, this month; Cooked & Loved, this month).
A few practical points:
- These are a freezer food, not a counter snack. Fat-rich peanut butter bars soften and turn oily after roughly two hours out of cold storage serve them cold and return leftovers promptly (Tasty Recipe Haven, last December).
- Condensation on the chocolate shell when bars come out of the freezer is normal temperature differential, nothing more. It won't affect flavor or texture (Cooked & Loved, this month).
- Make a double batch. Since the bars must freeze anyway, doubling costs almost no additional effort and keeps a stash ready to go (Cooked & Loved, this month).
What to do next
Make the pretzel-pan version once and nail the slicing technique. Once that's familiar, pick one variable to change: white chocolate and granola if you want something sweeter on top, coconut yogurt if you're skipping dairy. Each swap changes one thing about the result which is exactly how you learn what the recipe is actually doing.