How to Make Canned Refried Beans Taste Better: Whip & Bake
Four ingredients, a hand mixer, and about 15 minutes. That's what it takes to make canned refried beans taste better not "acceptable," but genuinely creamy, seasoned, and finished with melted cheese. The method works as a plated side or a scoopable dip, and it skips soaking, simmering, or standing over a stove.
Preheat the oven to 400°F before you open the can. Everything else falls into place from there.
What you need
Video of the Day
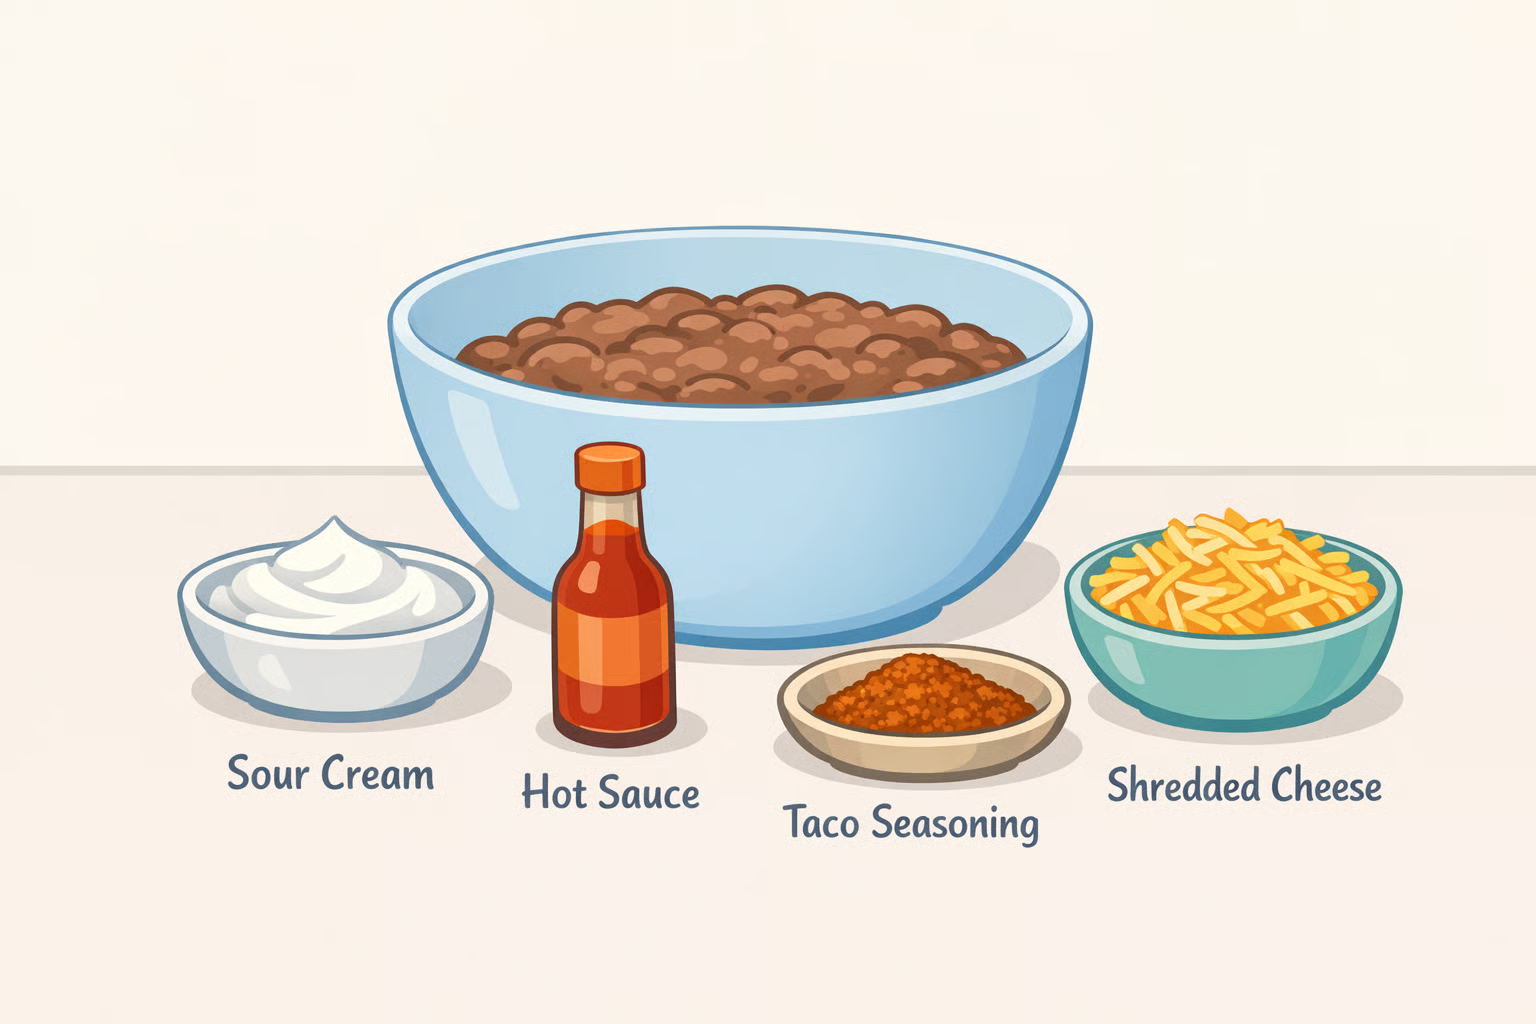
Ingredients (Lauren Fit Foodie):
- 1 can (16 oz) refried beans
- ½ cup light sour cream
- 2 tablespoons hot sauce (the recipe used Taco Bell mild)
- 2 teaspoons taco seasoning
- 1.5 oz Monterey Jack cheese, freshly shredded (about ⅓ cup)
Equipment: A large bowl, a hand mixer or sturdy whisk, and an oven-safe baking dish.
Sodium before you start: The finished dish runs about 382mg of sodium per ⅓-cup serving, and that's before any salt you add (Lauren Fit Foodie). Canned refried beans already carry significant sodium from preservation, and taco seasoning adds more (Cooking with Anadi). Taste before reaching for the salt shaker. Reduced-sodium taco seasoning is worth using if that matters to you.
Video of the Day
Why these ingredients work
Every item on that list is doing a specific job.
Sour cream loosens the dense, paste-like texture of canned beans and introduces fat that makes the finished dish taste creamy rather than stodgy. It also contributes mild acidity that brightens the overall flavor without announcing itself.
Hot sauce adds layered acid and depth. Two tablespoons of a mild sauce is what pulls the seasoning together not what makes the beans spicy. Don't skip it thinking you're avoiding heat; you're actually losing flavor.
Taco seasoning supplies the cumin, chili, and garlic that canned beans are missing. As Cooking with Anadi notes, seasoning goes a long way with beans even a small amount shifts the flavor noticeably. Cumin in particular is what separates "warmed up beans" from something that reads as intentional.
Freshly shredded Monterey Jack melts more smoothly than pre-bagged cheese. Bagged shredded cheese contains anti-caking agents that can affect the melt; shredding a block takes about 30 seconds and sidesteps the issue.
Substitutions worth knowing:
- No sour cream: plain Greek yogurt is a reasonable stand-in, though the result will be tangier.
- No Monterey Jack: mild cheddar or pepper jack melt comparably. Crumbled queso fresco added after baking produces a different but equally good finish.
One optional addition that meaningfully changes the result: Sauté diced onion and minced garlic in a bit of oil until soft, then fold them into the bean mixture before whipping. Layering in sautéed aromatics adds depth that taco seasoning powder alone can't replicate according to Cooking with Anadi, building flavor through sautéed garlic and onions makes a real difference in the finished taste. The beans end up tasting cooked rather than assembled. If the oven is already preheating, prep the aromatics during that window and the time cost nearly disappears.
How to make canned refried beans taste better: the whip-and-bake steps
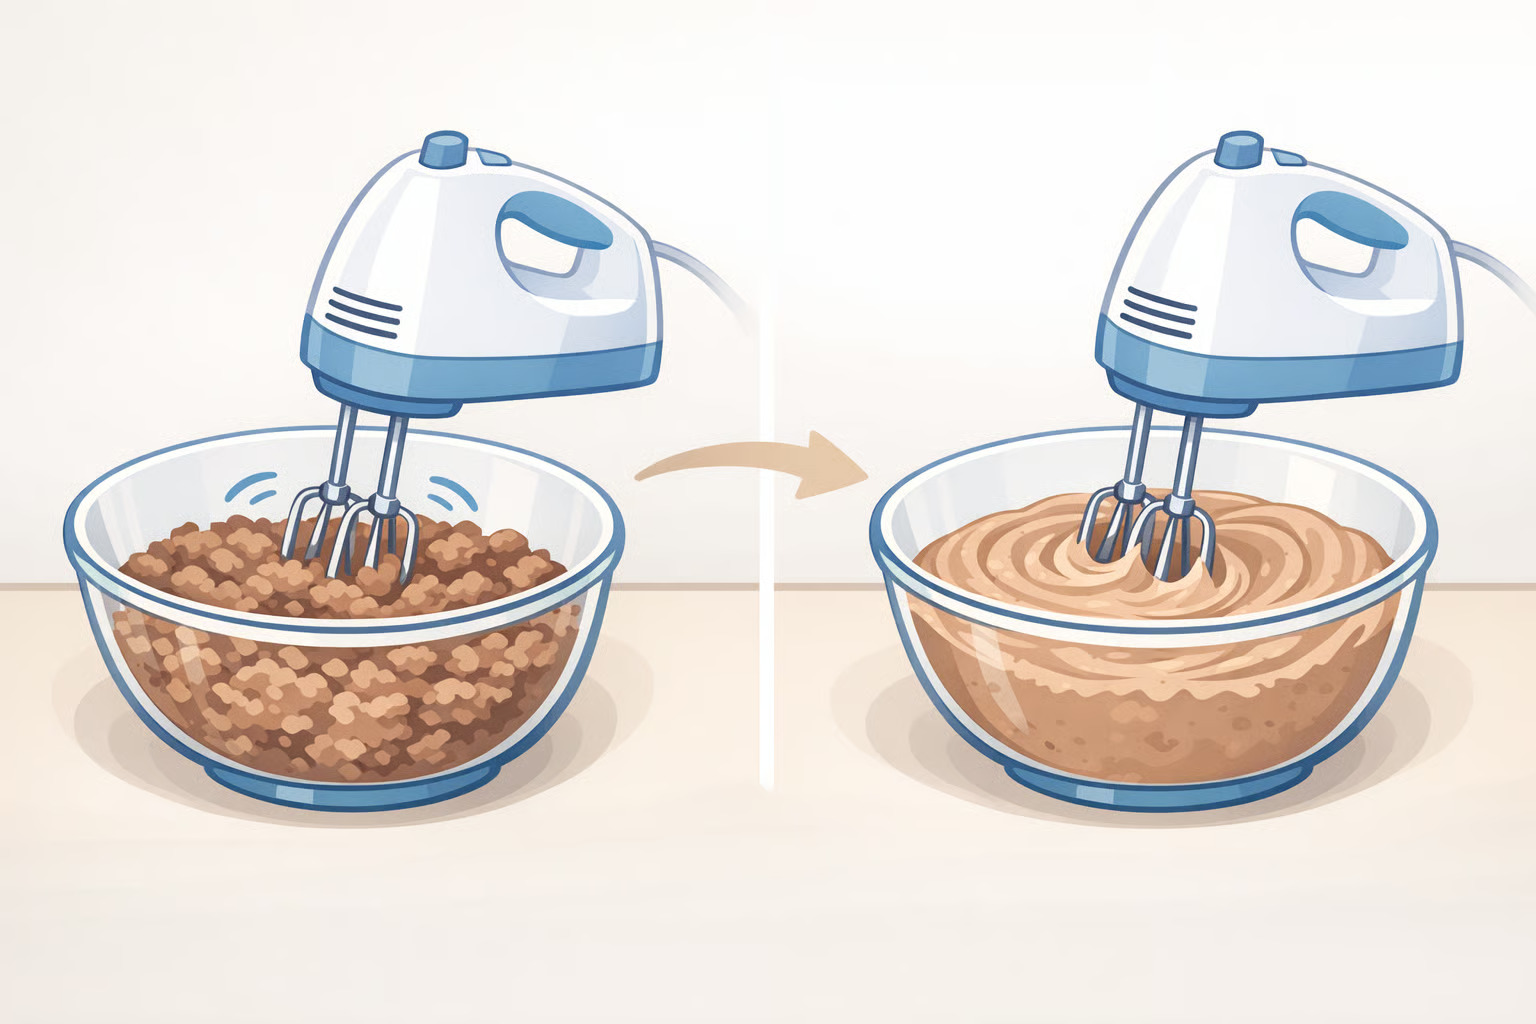
Step 1: Mix the beans with sour cream, hot sauce, and seasoning.
Add the full can of refried beans, ½ cup sour cream, 2 tablespoons hot sauce, and 2 teaspoons taco seasoning to a large bowl. The mixture will look lumpy and uneven. That's the starting point (Lauren Fit Foodie).
Step 2: Whip until creamy.
Use a hand mixer on medium speed until the ingredients are fully combined and no streaks of sour cream remain (Lauren Fit Foodie). The beans should look visibly lighter and fluffier than when you started that's the aeration working. Stop at uniformity; mixing past it turns the texture gummy.
No hand mixer: A sturdy whisk does the job with 2 to 3 minutes of vigorous mixing. A fork will loosen the beans but won't get you the same smooth, aerated result still better than straight from the can, but noticeably denser.
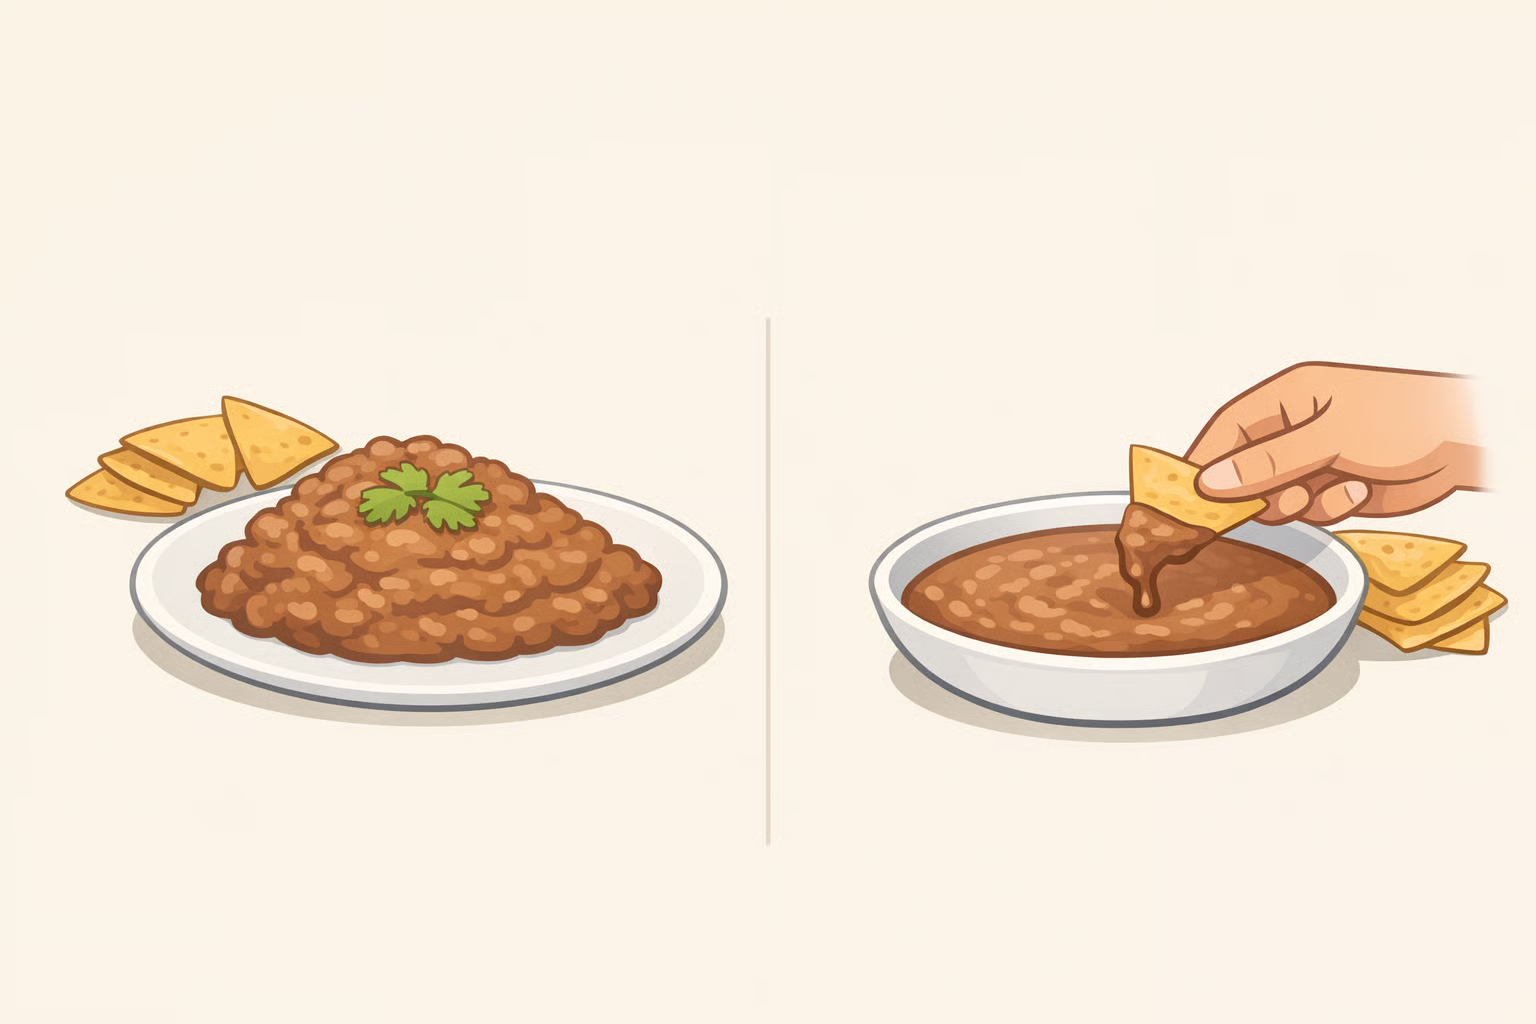
Consistency check: After whipping, the mixture should be spreadable and relaxed, not stiff. If it holds its shape rigidly, stir in chicken broth or water one tablespoon at a time until it loosens. For a side dish, keep it on the thicker end so it holds its shape on a plate. For a dip, thin it slightly before baking so it stays easily scoopable once the cheese sets on top.
Step 3: Transfer to a baking dish and add cheese.
Spread the whipped bean mixture evenly into an oven-safe dish and scatter the shredded Monterey Jack over the surface (Lauren Fit Foodie). An 8x8 dish works well for one can. Dish shape matters: a smaller, deeper dish produces thicker beans that scoop cleanly with a chip; a wider, shallower dish gives a thinner layer that works better as a plated side.
Step 4: Bake until the cheese is melted.
Bake at 400°F for 6 to 8 minutes, until the cheese is fully melted and the beans are warmed through (Lauren Fit Foodie). Pull the dish when the cheese looks molten you're not trying to brown the top.
How to tell it's done: No visible unmelted shreds of cheese, and the edges of the bean layer should look slightly raised and bubbling. If the cheese has melted but the center still looks dense and cool, give it one more minute. The more common error is running it too long; the edges dry out before the center finishes if the timing slips.
Microwave fallback: Microwave the whipped bean mixture in one-minute intervals, stirring between each, until heated through. Add cheese and microwave for an additional 30 seconds (Lauren Fit Foodie). You lose a bit of edge texture compared to the oven, but it's a practical trade when cleanup matters or the oven is occupied.
Yield: One 16-oz can produces roughly 2 cups of finished beans (Cooking with Anadi). At about ⅓ cup per serving, that's 4 to 6 portions as a side or 3 to 4 as a dip.
Scaling up and dish format
The recipe scales directly. Double the ingredients, use a 9x13 dish, and check at the 6-minute mark the same as a single batch. The oven time is determined by cheese melt and bean warmth, not volume, so keep an eye on it rather than extending time automatically.
Dish format is worth thinking through before you spread the beans. The two formats have different ideal textures, and adjusting at the mixing stage is far easier than trying to fix it after baking:
- For a side dish, keep the mixture on the thicker end. It should hold its shape when spooned onto a plate without spreading into a puddle. Serve alongside tacos, quesadillas, grilled chicken, or anything else on the table.
- For a layered dip, thin the mixture slightly before baking so it stays scoopable after the cheese sets. The whipped bean base is already the right consistency for the bottom layer of a seven-layer dip. Add guacamole, sour cream, pico de gallo, shredded cheese, and jalapeños directly on top and serve from the dish with tortilla chips. The base is ready; the toppings go on cold.
A practical note on batch cooking: making a full can when you only need half for dinner isn't waste. The leftover base becomes the dip the next day, or the bottom layer of a dish you'd otherwise assemble from scratch. Same effort, two uses.
Storage and reheating
Refrigerate cooled leftovers in an airtight container for up to 3 to 4 days (Lauren Fit Foodie). For longer storage, freeze in a sealed freezer-safe container for up to 3 months. Cool completely before freezing, and thaw overnight in the refrigerator before reheating (Lauren Fit Foodie).
Refrigerated beans tighten considerably overnight. Before reheating, stir in a small splash of broth or milk to bring the creamy texture back (Lauren Fit Foodie). Then reheat in 30-second microwave intervals, stirring between each pass (Cooking with Anadi). Longer uninterrupted cycles dry the edges before the center warms through.
One reheating note worth flagging: the liquid you stir in before reheating is not optional if you want the original texture back. Skipping it and just microwaving produces noticeably drier beans. A tablespoon of broth is usually enough for a single portion.
Oven vs. microwave: when to use each
Both methods produce finished beans. The oven delivers a slightly better result at the edges, where the beans near the sides of the dish get a faint set that gives the dish a finished appearance. The microwave gets you close, with less cleanup and no preheating time.
Use the oven when the dish is going straight to the table and presentation matters even slightly. Use the microwave when you're reheating leftovers, making a smaller portion, or the oven is already running something else.
The real decision isn't about quality it's about what else is happening in the kitchen. Both are worth knowing.
What you end up with
Warm beans on a stove are still beans from a can. What this method produces is different in specific ways: a lighter, aerated texture from the whipping, integrated seasoning rather than a coating on the surface, and cheese melted throughout rather than dropped on top.
That's the practical answer to how to make canned refried beans taste better not a technique overhaul, just the right three additions at the mixing stage before any heat touches the pan. The whole thing takes under 15 minutes and adapts at the bowl, before baking, depending on whether it's heading to the plate or the chip bowl.