Things You'll Need
Fabric
Matching thread
Hook-and-eye closures or satin-covered buttons
Scissors
Sewing machine
Needle
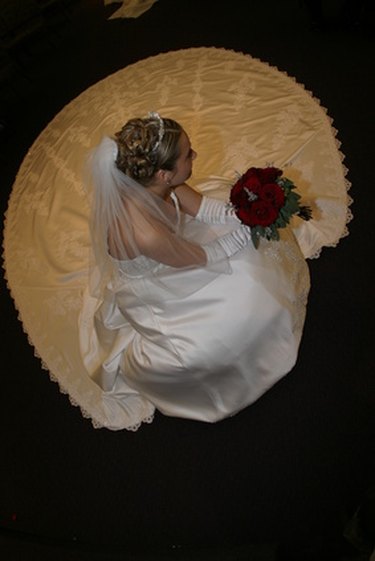
The cascading drapery of a train adds a dramatic finish to formal wedding gowns. While many traditional gowns include trains built into the fabric of the dress with a bustle hook, many brides who have chosen a vintage gown or more contemporary style may want to add this feature. With a little design sense and some basic sewing skills, a custom train can be crafted and added to most dresses.
Step 1
Choose a train length and style. Trains range from the discreet brush and court lengths, which barely trail behind the gown, to regal cathedral and royal lengths, which can extend as much as 10 feet behind the gown's waist. A popular choice is the chapel style, which trails around 5 feet from the waist. Trains can be a subtle extension of the dress or a distinctive flare that encircles the bride.
Video of the Day
Step 2
Purchase material from a specialty fabric or craft store. If possible, bring your dress or a fabric swatch to the store to choose a complementary color and texture. Tulle and lace are good lightweight choices for outdoor weddings, while heavier satin is appropriate for more formal gowns. Buy enough fabric to make up the desired length and width of your train plus 1 foot for sewing slack. Also purchase a set of white hook-and-eye closures or satin-covered buttons and button loops.
Step 3
Cut the fabric into a teardrop or flared shape, depending on the style of train you want. For more dramatic trains, gather the fabric at the attachable end into folds and stitch to hold in place. Keep in mind that attachable trains should not be so heavy that they risk tearing at the clasps, or so thick that they will stick out in an unflattering way.
Step 4
Sew a 1/2-inch hem on each side of the train with a sewing machine for a polished final look.
Step 5
Determine the best place to attach the train to your gown. For dresses with a gathered waist, this will be right at the hemline below the bodice or at mid-back for empire-waisted gowns. Close-fitted mermaid silhouettes are suitable for a train that attaches below the hips, ideally at the seam of any ruffles or embellishing material. For more contemporary sheath or column dresses, a train can attach to the top edge or the back of the bodice for a Watteau style train. If your dress has no waistline hem, consider attaching the train beneath a midsection sash or wide ribbon.
Step 6
Sew a row of eye closures or button loops to the top hem of the train with a neeedle and thread. Measure their distance, and sew a matching set of hooks or satin-covered buttons to the spot on your dress where the train will be placed. Hook or button your new train securely into place.
Tip
An advantage of attachable trains is that they can be removed after the ceremony and photos for ease of dancing and movement, with no need for a bustle.
Video of the Day