Building a wooden go kart can be a fun family activity. You can work on a store-bought kit and assemble the different parts according to manufacturer's instructions, or you can start from scratch -- planning, designing and fashioning the parts yourself. The project will allow children to explore their creative side, and also give them a sense of achievement as they work side by side with adults. A simple wooden go kart can be built in as little as two hours if you have woodworking experience. Take all necessary safety measures and use safety goggles, especially when working with children.
Planning and Design
Video of the Day
As with all DIY projects, the first step in building a wooden go kart is planning. Decide how big you want the go kart to be and draw a simple plan. Determine what you will need for the project and obtain the necessary parts. For a simple go kart, start with a 2-by-6-foot piece of wood and cut it into three pieces. You should have one large piece measuring 48 inches long and two smaller pieces each measuring 24 inches long. Lay the long board horizontally on a table and mark one end "A" and the other end "B." Place the smaller boards vertically under the longer board, one under the end marked "A" and the other under "B." The boards should form an I shape. Drill a hole at the A end and drill four holes in a square shape at the B end. Drill through both the large and small boards at both ends.
Video of the Day
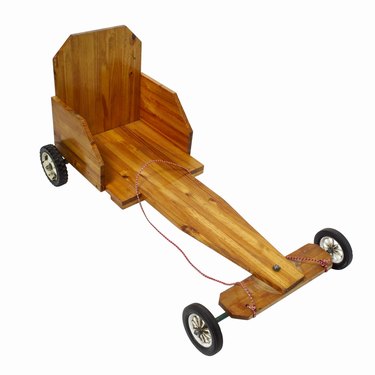
The Chassis
With the boards drilled you are ready to form the chassis of the go kart. Attach the large board to the small board at the A end with a bolt. Flip the I-shaped chassis over so the smaller board is on top, and install washers for a sturdy construction that lasts. Insert one washer between the bolt and the smaller board, two washers between the boards, and one washer on the top. Insert a bolt through the drilled hole so the end of it comes out through both boards and screw in a nut. For a firm construction you may use an adhesive product such as Loctite on the bolt and washers. At the B end, insert four bolts through the drilled holes, with washers both on the top and bottom. Make sure the bolts do not stick out of the wood.
Wheels and Seat
The ride quality of a go kart depends on the wheels and the seat. Once the chassis is formed, install the wheels on each end of the two smaller boards. The wheels should be installed parallel to the large board and perpendicular to the smaller boards. Install each wheel by aligning it perfectly with the large board and putting in four screws so the metal brace of the wheel is firmly attached to the base of the board. Use washers for each screw and tighten. For the seat, simply tape foam padding or layers of folded towel to the chassis.
Brakes and Steering Rope
The final step is to install the brakes and steering rope. Install the brakes by screwing two pieces of wood on either side of the large board. The wooden pieces should lean forward when in "no brake" position, and should raise the kart off of the road when braking, acting as a lever. For steering, install hooks on two ends of the front small board, and tie a rope to the hooks using a bowline knot. Leave some slack so you can reach the rope from the seat.