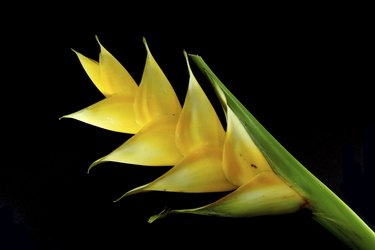
Heliconias make bold statements as houseplants and in gardens with their large, tropical leaves and brightly colored, unusual flowers. The 200 to 250 members of the heliconia plant family grow outdoors in U.S. Department of Agriculture plant hardiness zones 10 through 13, depending on the variety, or indoors as houseplants. Lobster claw (Heliconia rostrata), which grows in USDA zones 10b through 11, and parrot's flower (Heliconia psittacorum), which grows in USDA zones 10 through 13, are two common species. Regular feeding and watering encourage heleconias to grow and flower well. Outdoor heliconias are invasive in some areas.
Feeding Heliconias
Video of the Day
To produce lush foliage and prolific blooms, heliconias need regular feeding when they're actively growing. A liquid 15-30-15 fertilizer supplies the plants' needs and encourages flowering. Dilute the product at a rate of 1 tablespoon per 1 gallon of water for outdoor heliconias, or 1/2 teaspoon per 1 gallon of water for heliconia houseplants, and apply the solution every week until the blooms begin to fade. Alternatively, dilute and apply the product according to the directions on the label. You can substitute fertilizer solution for water, but take care not to over-fertilize indoor plants. Signs of over-fertilization include white films or patches on the inner rim of the container or the potting soil surface. If these appear, pour or run water slowly through the potting soil to wash them away and allow the container to drain thoroughly.
Video of the Day
Watering Heleconias
Heleconias grow best in well-draining, constantly moist soil. Outdoor plants thrive in soils rich in organic matter, which holds moisture well. Potting soil for indoor heliconias should be a free-draining mix, such as equal parts wood chip mulch, peat moss and sterilized soil. Water outdoor heliconias regularly so the soil surface stays just moist and is never saturated. If water takes longer than 10 to 20 seconds to drain, stop watering. Water indoor heliconias when the potting soil surface is dry. Stand the plant somewhere that water can drain freely, such as a kitchen sink, and pour water over the soil surface until it appears through the drainage holes in the base of the container. Leave the heliconia to drain thoroughly before returning it to its regular growing spot. Heliconias left to stand in water grow poorly and may die.
Dealing with Pests
Scale insects, spider mites, mealybugs and nematodes are the main pests that affect heliconias. Scales look like tiny seashells, spider mites look like tiny dots and create fine webbing across the plant stems, mealybugs produce white patches like cotton wool, and nematodes attack heliconia roots, causing poor growth. Spray outdoor and indoor heliconias with an insecticidal soap, such as a ready-to-use product containing 1 percent potassium salts of fatty acids, to control scales, spider mites and mealybugs. Cover all plant parts and spray every week until the pests are gone. Indoor heliconias are unlikely to suffer from nematodes, which look like small worms in the soil and roots. Outdoor plants suffering from a heavy infestation should be dug up and removed, taking care not to leave any roots in the soil.
Pruning and Protecting Plants
Heliconias need little pruning or protection. To tidy up outdoor and indoor plants, sterilize pruning shears by wiping rubbing alcohol on the blades, and prune old, decaying foliage at the end of the growing season. Sterilize the shears again when you've finished. Heliconias growing at the lower end of their hardiness range may die back after a cold snap but usually sprout again when the weather warms up in spring. If your indoor heliconia is growing in an unheated conservatory or other area of your home that experiences low temperatures in winter, move it to a bright spot in a heated area of the house -- but away from direct heat -- when it stops growing in fall.
- University of Guam Cooperative Extension: Heliconias
- University of Florida IFAS Extension: Heleconias
- Texas A&M University System Aggie Horticulture: Heliconia
- University of Florida IFAS Extension: Heliconia Rostrata Lobster Claw
- University of Florida Cooperative Extension Service Hendry County Horticulture News: Heliconias Impart a Tropical Look
- Andromeda Botanical Gardens: The Heliconias