Things You'll Need
Pine wood pieces
Pencil or marker
Vise
Carving knives
Sandpaper
Reference images
Woodcarvings can have simple designs, or they can be complex, displaying an amazing level of detail. As with stone, the quality of the material determines the ultimate value of the carving. A marble carving would be considered more valuable than one made of soft sandstone, for example. When it comes to wood, oak or walnut would be a higher-end material than spruce or pine, because it is harder, more esthetically pleasing and more valuable. To begin carving wood, however, a softwood like pine makes an ideal material, allowing you to carve shapes with less effort.
Step 1
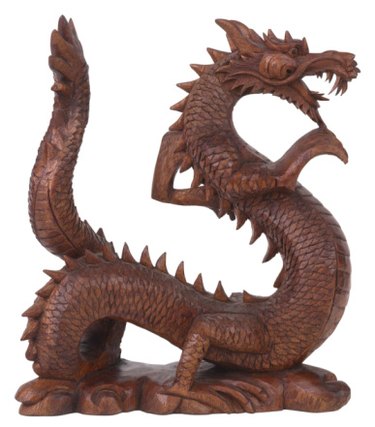
Find some good dragon images showing simple designs that you will be carving out of wood. Stay away from complicated renderings, as they will be impossible to replicate in a simple dragon carving. Examine each piece of wood before carving anything into it. Make sure the wood grain runs along the length of the wood, as the dragon will have an elongated shape. Do not carve against the grain, as this will be much more difficult.
Video of the Day
Step 2
Mark the different features of the dragon using a pencil. Outline the head, the legs, the tail and two tiny wings on the side. Mark the legs against the side of the dragon, as well as the tiny stylized wings. You only need to create these in relief to make them work in these carvings. It would be too difficult to have the legs and wings protruding from the body unless you carve them separately and glue them onto the body (not recommended). Outlining them as positioned against the body is a better option.
Step 3
Secure the wood piece in a vise to carve out the lines you have drawn. Reposition the piece in the vise as you carve different sections. Use different sizes of carving knives, depending on the cut. Use larger ones to remove material and smaller ones to create detail lines. Focus on carving the dragon's head. Carefully create any horns or spikes, as they may break off easily.
Step 4
Carve the eyes and the closed mouth of the dragon. Shave the sides of the head to create the muzzle but keep the shape of two fangs, coming down on each side near the front. Carve in the eyes on each side of the head.
Step 5
Carve into the body of the dragon around the legs and wings to make them stand out. Remove material outside these areas to make the body look smooth. Create flowing lines with your cuts and taper the body as it nears the tail. Etch in the notches along its back to create little spikes. Carve the tail so that it has a slight curve, to give the carving life.
Step 6
Carve the paws by leaving enough material around the bottom of the legs. Create the notches between the toes and carve the claws on each toe. Do not make these too thin, as they will break off. Keep some wood underneath the carved claws to strengthen them.
Step 7
Add more lines to the body of the dragon if you wish to create scales. Draw these evenly and taper them to a smaller size near the tail.
Step 8
Take a break from carving and resume refining the details with fresh eyes. Use fine sandpaper to smooth the wood and apply beeswax or varnish to protect the wood. Sign the dragon with your name or initials on the bottom to finish the carving.
Video of the Day