Things You'll Need
18-inch-tall white plastic oval trash can
Pencil
Scissors
2 part polyurethane foam
Sponge brush
Paintbrush
Reddish brown latex paint
Black latex paint
Lacquer
Spray bottle
Water
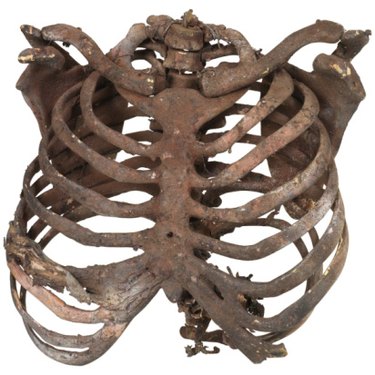
Halloween is the time of year to embrace your ghoulish side and to get creepy. Decorating your home with the spookiest stuff you can find is part of the fun. Skeletons are a popular Halloween costume and decoration. Making a fake rib cage is a fun Halloween project that will yield spooky results sure to scare the neighborhood trick-or-treaters.
Step 1
Sketch a rib cage onto the front of the trash can that continues around the back of the can complete with a sternum, spine and an upside down W shape at the bottom of the rib cage.
Video of the Day
Step 2
Cut out the negative space between the ribs at both the top and the bottom of the can.
Step 3
Mix the two-part polyurethane foam in small batches and apply completely to the front, sides and back of the rib cage with the sponge paintbrush. Allow the foam to dry completely.
Step 4
Paint the rib cage with the reddish-brown latex paint.
Step 5
Add a layer of black latex paint while the reddish-brown paint is still slightly wet.
Step 6
Add a coat of lacquer with a paintbrush while the black paint is still slightly wet. Fill the spray bottle with water and spray the rib cage. Allow it to dry completely.
Warning
Paint and lacquer in a well ventilated area.
Video of the Day