Things You'll Need
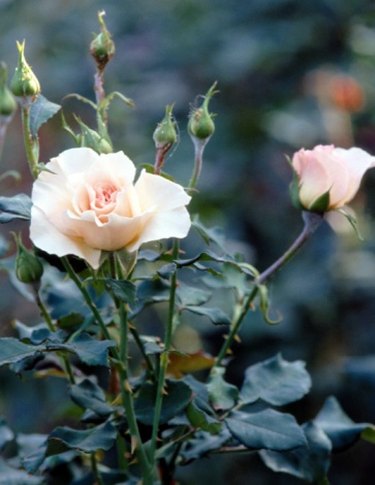
Photo of rose bush
Canvas
Set of acrylic paints
Stick of artist's charcoal
Gum eraser
Paintbrushes of various sizes
Disposable cup with water
Paper towels
Because they are so beloved, flower gardens have always been popular subjects of paintings. The rose is a favorite flower of many people, making it an ideal item to paint. Acrylic paint is an often-used medium among artists, as it dries more quickly than other paints, and produces fewer odors. When using acrylic paint, you can easily create an impressive painting of a rose bush.
Step 1
Arrange your canvas on an easel or tabletop, and place your photo nearby. Set out your paints, paintbrushes and cup of water.
Video of the Day
Step 2
Sketch the general shapes of the rose bush onto your canvas, using the charcoal. If you make a mistake, simply erase the charcoal from the canvas by rubbing it away with your gum eraser. Sketch the outline of the rose bush and the major details of the plant, including large stems and flowers.
Step 3
Select one of your larger paintbrushes. Observe your reference photo, and make note of the colors that make up the background. Mix together a small amount of paint that matches this color, and apply it to the background of the painting, using large strokes.
Step 4
Observe your reference photo, and make note of the colors that make up the foreground of the painting, including the ground beneath the rose bush. Mix together a small amount of paint that matches this color, and apply it to the foreground of the painting. Use your large paintbrush, and apply the paint using large, generalized strokes.
Step 5
Observe your reference photo, and make note of the general colors, including shades of green and brown, that make up the rose bush. Mix a small amount of paint that is similar to this color, and apply it to your canvas, using your large paintbrush.
Step 6
Select a medium-sized paintbrush. Observe your reference photo, and paint any details that you see onto the background and foreground of the painting. Some of these details could include clouds in the sky, or leaves and pebbles on the ground.
Step 7
Observe your reference photo, and take note of any details of the rose bush in your painting. Some of these details could include individual leaves of the rose bush, individual flower buds, and stems of the plant. Paint these details onto your canvas, using a medium-sized paintbrush.
Step 8
Observe your reference photo, and take note of any remaining, tiny details of the rose bush. These could include light reflecting from dewy leaves, as well as textural details of the bark. Subtle color variations, which could range from the different greens of the leaves to the different colors of the roses, could also be added. Use a small paintbrush to paint these small details.
Tip
Allow your painting to dry overnight before moving it.
If you become frustrated at your painting, step away from it for an hour or two. When you come back to it, you may find that you have a clearer understanding of what is needed to complete the artwork.
Warning
Acrylic paint dries quickly on paintbrushes, and can possibly ruin them. For this reason, make sure to rinse out your paintbrushes thoroughly each time you use them.
Video of the Day