
Searching for a zombie makeup DIY for your Halloween costume, a Halloween TikTok or just a really epic The Walking Dead viewing party? Look no further! Our zombie makeup tutorial requires just a few makeup basics, like eye shadow and foundation (no liquid latex or special effects makeup required), plus face paint that you can find on Amazon or at your local craft store.
This is one of our favorite Halloween makeup tutorials because it's beginner-friendly, and it's also easy to take it to the next level. You can customize it to your liking. For example, if you're not too big on costumes, you can wear all black and let your zombie Halloween makeup do the rest. Orrrr, if you want to step up your Halloween costume game, you can throw on a zombie costume, add fake wounds or fake blood (not to worry—we have a tutorial for that as well!) and top off the whole look with a veil for a glam-and-gory zombie bride look.
Video of the Day
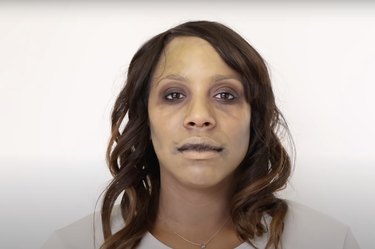
Best of all? You don't have to be a makeup artist to succeed at this Halloween makeup tutorial. In fact, the blotchier you apply the makeup, the better! We're going for undead zombie vibes, after all.
So, grab your makeup brushes and read on for all the step-by-step details on creating a Halloween-ready zombie look that's sure to entertain!
Video Tutorial: Zombie Makeup
Things You'll Need
Primer
Foundation (in a lighter shade than you normally use)
Beauty blender
Purple cream eye shadow
Dark brown eye shadow
Eye shadow brush
Blending brush
Flat eye shadow brush
Yellow face paint
Green face paint
Gray face paint
Flat-top brush
Red eyeliner pencil
Purple eye shadow
Black eye shadow
Medium brown eye shadow
Step-by-Step Zombie Makeup Tutorial
1. Apply makeup primer
Apply a primer of your choice to your face and eyelids.
2. Apply foundation
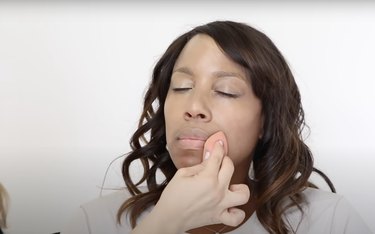
Use a beauty blender to apply a light shade of foundation to your face. Don't smooth it out and leave it a bit splotchy. Be sure to apply foundation to your neck and over your lips as well.
3. Add purple eye shadow
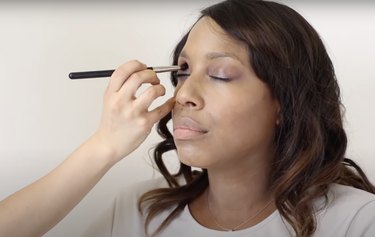
Apply a dark shade of purple cream eye shadow to both your upper and lower eyelids.
4. Add brown eye shadow
Apply dark brown eye shadow to the crease of your eyelid to create a sunken effect.
5. Create "eye bags"
Apply dark brown shadow along your undereye area and drag it down toward the apple of your cheek with a brush and blend. This zombie makeup will accentuate your undereye bags and add to that sunken zombie look.
Use a flat brush to apply more dark brown shadow along your undereye area and around your nostrils.
6. Apply yellow face paint
Use a beauty blender to dab yellow face paint onto the middle of your forehead, down the bridge of your nose, under your nose, on the middle of your chin and along your cheekbones.
Tip
Rather than using a beauty blender, you can cut the edges of a beauty sponge to create a more uneven application method.
7. Apply green face paint
Use a beauty blender to apply green paint to your forehead, around your mouth and along your jawline.
8. Create sunken cheeks
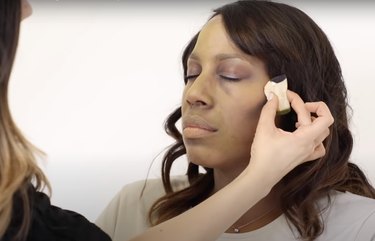
Apply gray face paint to your cheeks to create a hollow, sunken effect. Dab on the paint with a beauty sponge (or beauty blender) and blend with a flat-top brush.
9. Darken eye area
Use dark brown eye shadow to darken the eye area. Apply it to your lower eyelids, along your undereye area and in the crease of your eyelids.
10. Create "bloodshot eyes"
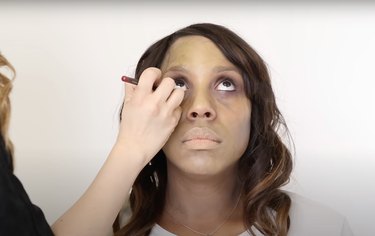
Line your lower waterline with a red eyeliner pencil for that bloodshot look.
11. Further darken eyes
Blend purple eye shadow on your upper and lower eyelids to further darken the eye area.
12. Make "zombie lips"
Apply dark brown eye shadow to the center of your lips and layer black eye shadow over the very center of your lips.
13. Deepen lip creases
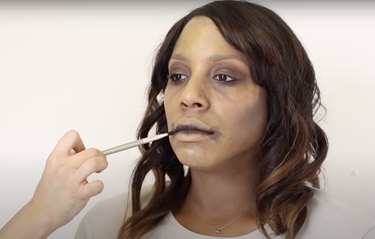
Mix together medium and dark brown shadows and apply to the corners of your mouth. Then, blend with a beauty blender.
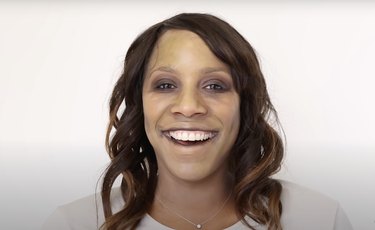
And there you have it! A glam, gory zombie makeup tutorial that'll liven up any Halloween party.