Things You'll Need
Eye protection
Gloves
Installation instructions
Phillips screwdriver
Straight slot screwdriver
Sound blanket
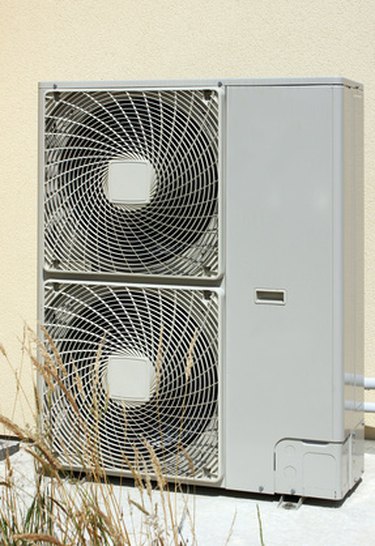
While air conditioners and heat pumps may be ideal for cleaning the air in our houses and cooling or heating it, some compressors are extremely noisy. If your compressor is waking you in the middle of the night when it comes on, there is a way to reduce that noise up to 40 percent or more. Installing a compressor sound blanket can be a quick solution for air conditioner and heat pump compressors that have an unacceptable noise level. These blankets do not diminish compressor effectiveness or harm them in any way, and if you are familiar with your air conditioner or heat pump, you can install one yourself.
Step 1
Put on the eye wear and gloves before beginning. Use a screwdriver to remove the outer panel of the air conditioner or heat pump. Remove the shipping screws from the sides and corners first using the Phillips head screwdriver. Use a straight slotted screwdriver to turn the access panel screws one quarter of a turn to release them. Your unit will have either a single compressor access panel or two. Remove both in the same manner to expose the unit's compressor.
Video of the Day
Step 2

Take the compressor sound blanket out of its packaging and unfold it. Grasp the corners two at a time and give the blanket slight, repeated tugs to completely unfurl it. Do the same for the separate top section and lay it aside for now.
Step 3
Wrap the sound blanket around the compressor in a clockwise direction from left to right. Slide the blanket all the way to the base of the compressor body. Hold the starting edge in place while you pull and work the leading edge around the compressor.
Step 4
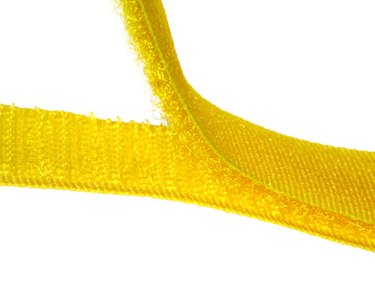
Line up the slots of the blanket with the suction line of the compressor. Use a Velcro strip included with the kit to secure the blanket 2 inches to the right of the suction line. Route the Velcro solidly from top to bottom with no gaps or lifts in the strip. It must be a strong, unbroken attachment seam.
Step 5
Cover the compressor's terminal box with the blanket as you round the compressor and come to it. It is the square or rectangular box mounted on the side of the compressor. Wrapping it is permissible and will not interfere with the compressor function at all.
Step 6
Pull the two seams together where you attached the first Velcro strip to hold the blanket in place as you routed it around the compressor body. The two Velcro seams should align on top of each other, creating a single Velcro seal seam.
Step 7
Align the top of the blanket with the discharge line, and attach the top blanket flap, which you set aside earlier, to the top Velcro edge of the blanket you already have pulled into place. Repeat this same wrapping procedure for any additional compressors on your system, and replace the exterior panels with the Phillips head screwdriver and screws.
Tip
For the blanket to do its job, the compressor must be covered completely with no gaps or seams in the coverage.
Warning
Turn the system off before installing the blanket to avoid possible shock or even electrocution.
Video of the Day