Things You'll Need
Calico fabric, 1/2 yard
Ribbon or trim
Pinking shears
Sewing machine
Thread
Notions (buttons, etc.)
Elastic, 6 to 8 inches
Small plate or bowl
Hot glue gun
Hot glue
Mason jar with seals
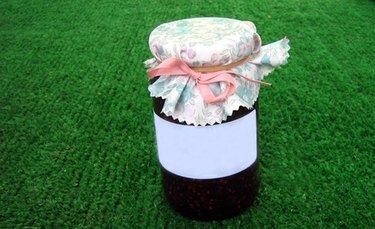
Making canned or jarred goods into a perfect gift is simple by making covers for your mason jars, a fixture in American kitchens for generations. Your homemade preserves, pickles, sauces, jellies and jams are a beautiful and caring way to share your harvest bounty and there are several ways to dress up these simple glass and brass jars. All you need is some fabric, some trim, and some time to give your jars a finishing touch.
Step 1
Place your plate or bowl on the back side of your fabric. Trace the circle and use pinking shears to cut the fabric. The diameter of the standard mason jar mouth is 70mm (2.8 inches), and the diameter of the wide mouth is 86mm (3.4 inches). Your plate or bowl's circle should extend at least 50.8 mm (2 inches) from the lid's circle.
Video of the Day
Step 2
For a no-sew lid, place the circle on top of the sealed glass jar, then screw on the sealing ring. Tie ribbon around the ring for decoration.
Step 3
For a sewn lid, follow step 1. You can leave the edge pinked with the scissors, or add simple lace or ribbon trim. Use a zigzag stitch on your sewing machine or hot glue to attach the ribbon trim.
Step 4
To attach the elastic, fold your fabric in quarters, wrong side up, and mark the edges. Likewise, fold and mark the elastic in quarters. Match the marks on the elastic and fold lines, about 2 inches from the edge of the fabric, and use the sewing machine and a zigzag stitch to attach.
Tip
When attaching elastic, make sure to stretch gently to ensure it sews flat to the fabric. Once you have the circle created you can decorate the lid any way you would like - add buttons, ribbons or flowers.
Video of the Day