Things You'll Need
Heavy gloves
Utility knife
2-liter bottle
3 percent hydrogen peroxide
Bowl
Perlite
Spawn cake
Spray bottle
A simple mushroom terrarium allows you to grow edible mushrooms from a colonized cake of growing medium, or spawn. Mushrooms and other types of fungi grow in humid environments, so a terrarium can provide the humidity while also being a sterile environment so other fungi don't invade your mushroom spawn.
It's important that you only grow mushroom spawn from certified suppliers to ensure the mushrooms are safe to eat. Do not collect or harvest wild mushrooms for eating or spawning because many varieties are deadly if ingested.
Video of the Day
The Best Spawn for Your Fungus Terrarium
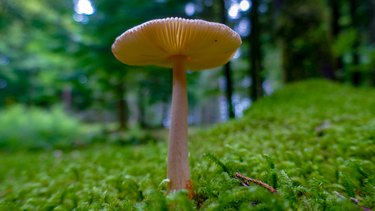
Mushrooms won't begin to fruit until the spawn colonizes the whole substrate bed in the growing chamber, so a small mushroom terrarium is the best choice for fast fruiting if you're new to growing mushrooms. Oyster mushrooms (Pleurotus ostreatus) fruit readily and can be ready within a week of colonizing the terrarium, making them a good choice for your first mushroom project.
Step 1: Glove Up and Cut
Put on a heavy pair of gloves. Use a utility knife to cut off the top of a 2-liter bottle just above the label. Cut away from your body to minimize the chances of injury if the knife slips.
Step 2: Prepare the Mushroom Terrarium Container
Remove the label from the bottle. Cut a 1-inch-long slit up from the cut edge of the top of the bottle. This makes it easier to slide the bottle top over the bottom.
Wash the bottle in hot, soapy water and then rinse it thoroughly in clear water. Rinse the bottle with 3 percent hydrogen peroxide.
Step 3: Soak the Perlite
Place perlite in a shallow bowl and soak it in 3 percent hydrogen peroxide for five minutes or until the perlite soaks up the peroxide and feels moist. Drain the excess peroxide from the mixture.
Step 4: Add the Planting Medium and the Spawn
Fill the bottom of the mushroom terrarium with a 4-inch layer of perlite. Set a colonized cake of mushroom spawn on top the perlite. It doesn't matter which side up you place the cake.
Step 5: Close the Terrarium
Slide the top of the bottle over the bottom, creating an enclosed terrarium. Set the bottle in an area with bright but indirect light where temperatures remain between 70 and 75 degrees Fahrenheit. Check on your specific variety, but most mushrooms do well in this temperature range. Button mushrooms (Agaricus bisporus), require complete darkness to grow, so place them in a dark closet or other dark place.
Step 6: Keep the Environment Moist
Remove the top and mist the spawn and perlite lightly with water if the condensation on the inside of the bottle dissipates, which indicates conditions are drying out inside the bottle. Loosen or remove the bottle cap temporarily if the moisture becomes too high and the condensation begins to drip down the inside of the bottle. It may take up to three weeks of this treatment before the spawn fully colonizes the perlite and begins to produce fruit.
Step 7: Open and Harvest
Remove the cap from the miniature mushroom terrarium when the mushrooms begin to pin, which is the visible development of miniature mushrooms. Harvest the mushrooms once they reach full size but before the caps begin to curl up or the gills begin to open and drop spores.
Tip
Feed the mushroom spawn to encourage more spawning after the first harvest. Poke holes into the perlite substrate and place used coffee grounds in the holes to add organic matter and nitrogen to encourage further fruiting.
You can also substitute plastic milk jugs for the 2-liter bottles. A clear plastic storage tote also works well to make a larger mushroom terrarium by drilling holes in the lid.
Video of the Day