One of the greatest joys of baking is sharing homemade treats with your loved ones. There is no reason to limit yourself to traditional choices, like cupcakes and brownies—you can also celebrate any occasion with chocolates. You can gift them to a significant other on Valentine's day, arrange them on a tray for a party or even use them to decorate cakes.
Video of the Day
Chocolate making is fun and easy, and you can order molds online from Amazon or even get creative and use molds from materials you already have in your kitchen. Whether you've created intricate chocolates with colored candy melts and chocolate or a decadent treat made with a single type of chocolate, removing the chocolate pieces from the mold without leaving any chocolate on the sides or bottom of the mold is the real test.
Video of the Day
Fortunately, this can be made pretty easy by following these tips and tricks. Make sure to prepare the chocolate and the molds properly and every batch is sure to be picture-perfect.
How do you get chocolate out of molds?
Peel back the edges of the silicone mold away from each piece of chocolate. Take your time with this part. Then, turn the mold upside down and press the bottom of each section of the mold to remove the chocolate.
If you are using a chocolate mold that doesn't have flexible sides, such as a metal mold, polycarbonate mold or hard plastic chocolate mold, the process is a bit different. With these molds, you want to turn the mold upside down and gently tap the mold to remove the chocolates.
Tip
It can be tempting to use a knife or another tool to pry the chocolates out of the mold. While this can work for some sturdier chocolates, you risk marring the surface of the chocolate and leaving pieces behind in the mold.
If you follow this tutorial and you still have trouble removing your chocolate sets in one piece, here are a few tips that can help.
Use the right chocolate mold
If there is any grease or residue remaining on the mold or if there is any moisture on the mold, the chocolate is likely to stick to the sides. Make sure the mold is completely clean. Follow the manufacturer's instructions for cleaning the mold. Not all molds are dishwasher-safe or can be cleaned with soap.
Ideally, wash the mold the day before making chocolate to ensure it is completely dry. If that isn't possible, use paper towels to make sure it is completely dry before pouring the chocolate.
Tip
Unless the manufacturer’s instructions indicate you should do so, do not grease or line a candy mold.
Prepare and fill the mold
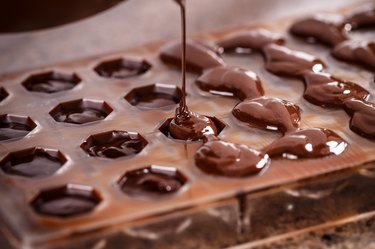
Excess chocolate spilling over on top of the mold can also cause chocolate to stick to the mold. Be sure to fully melt the chocolate and ensure it has a smooth consistency and shine before filling your molds. This process may take longer if you are using a large chocolate bar rather than smaller chocolate chips or candy melts.
You can spoon or pour the tempered chocolate into the molds. Gently tap the mold on the countertop to remove any air bubbles from the chocolate.
Before the chocolate starts to set, clean the top of the mold to remove any spilled or overflowing chocolate. One easy way to do this is to use a bench scraper to clear the top of the mold.
Tip
Pouring chocolate can be messy, so consider putting the melted chocolate into a piping bag and using that to fill each mold.
Chill the chocolate
One final reason your chocolate may be sticking to the mold is if it hasn't fully cooled. In most cases, you can take chocolates out of the mold after 20 to 30 minutes of cooling in the refrigerator. However, this can vary depending on your recipe and the size of the molds.
If the chocolate is sticking, put the mold back in the refrigerator or freezer for a bit longer to ensure it is completely cool.
Whether you are making chocolates for a housewarming gift, a celebration or a holiday, taking a few simple steps can ensure your chocolates come out of the mold in one piece. Make sure the mold is clean and dry and the chocolate has been tempered. Clean away any excess chocolate and make sure the chocolates are completely cooled before removing them. Once your tasty treats are ready, you can serve them on a tray or store them in a cool location in an airtight container to enjoy later!