Things You'll Need
Copper pipe and fittings
Flux
Lead-free solder
Propane torch
Drill
Spade bits
Metal plumber's tape
ABS pipe and fittings
ABS pipe cleaner
ABS glue
Reciprocating saw
Metal plates

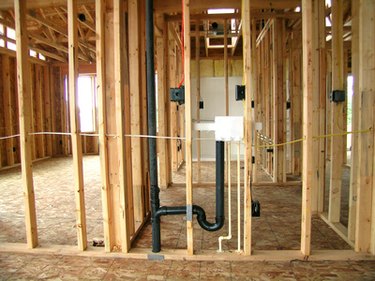
The term "rough-in," when applied to plumbing, means to lay out all the pipes in a new house without making the connections. Contractors usually do the plumbing rough-in while the house is being framed because this is when it is easiest to run pipes through walls and floors. For the DIY home builder, it can save a lot of headaches to make a diagram of the planned water supply and drainage systems, and check these with a licensed plumber for potential code violations before doing the installation.
Roughing In the Water System
Step 1
Make a diagram of the water supply system, showing all angles and pipe sizes exactly as you intend to install them. This will save you multiple trips to the hardware store by ensuring you have enough pipe and all the correct fittings on-hand.
Video of the Day
Step 2
Use type "L" or "M" copper piping, or "Schedule 40" PVC pipe if your local codes allow this. Use 3/4-inch pipe for all main supply lines and 1/2-inch pipe for branch lines to individual fixtures.
Step 3
Make all copper sweat connections with lead-free solder. Make connections by cleaning the pipes thoroughly, spreading flux on both ends of the connection and heating the pipe with a propane torch. When the flux begins to smoke and bubble, remove the heat and touch the tip of a roll of solder to the connection, allowing the solder to wick into the joint.
Step 4
Run water lines laterally through pre-drilled holes in the studs. Make sure these holes are slightly larger than the pipe and are placed at least an inch from the faces of the studs to prevent puncturing by drywall screws or nails.
Step 5
Secure all pipes that will stick out of the wall to be connected to fixtures, or stub-outs, firmly to a stud with metal plumber's tape.
Roughing In the Drainage System
Step 1
Make a diagram of the drainage system, showing all waste and vent lines, and all angles exactly as you plan to install them.
Step 2
Use Schedule 40 ABS pipe for the drainage system. Be sure all installed pipes have a downward slope that is 1/8 inch to 1/4 inch per running foot.
Step 3
Connect ABS pipes by gluing them with ABS pipe cement. Use the brush that comes in the glue can to spread glue on both ends of a connection. Then slide the pipes together, making sure they are completely seated, and give a little twist to be sure the glue is spread evenly.
Step 4
Use 2-inch pipe for sink and shower drains, and 3-inch pipe for toilet waste lines. Where three or more fixtures are joined into one waste line, use 3-inch pipe for the common line. Vent all drain lines with a vertical pipe that either goes through the roof or wall, or connects with another one that does.
Step 5
Run drainage lines laterally through studs by notching the studs with a reciprocating saw, being careful not to weaken the stud to the point where it no longer provides support. Cover the open end of the notch with a metal plate to prevent drywall screws or nails from puncturing the pipe. Use metal plumber's tape to hang drain lines from floor joists in the basement or crawl space. Be sure to keep the required slope on all drain lines.
Tip
It is a very good idea to install an in-line drain at the lowest point of the water service line so that water can be easily drained from the system when repairs are needed.
Warning
Use air pressure to check the water system for leaks before you make the final connections. Sweat connections are very difficult to redo once there is water in the line because it vaporizes and prevents the pipe from reaching a high enough temperature to melt the solder.
Video of the Day