Things You'll Need
Newspaper
Plasticine
Gargoyle prototype
4 marbles
Liquid wax
Brush
Gloves
Respirator
Silicone molding kit
3 buckets
Mixing stick
Wax paper
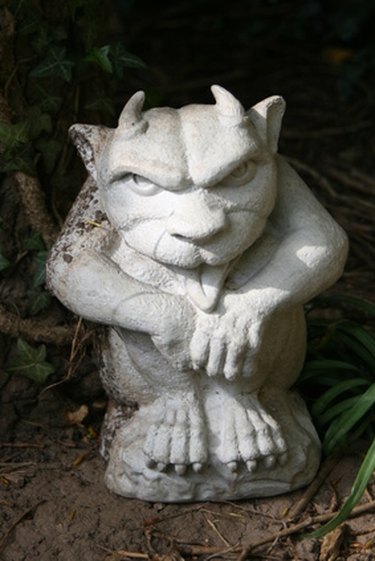
Making your own statues and figurines means creating a suitable mold based on a prototype. Because gargoyles often have horns and wings that stick out, you will want to make a mold that is flexible; these protrusions would be difficult to dislodge from a rigid mold. Also, you should make your mold as two pieces that fit together. Doing so allows for easy casting and removal of a three-dimensional form.
Step 1
Lay down two layers of newspaper over your work surface. On top of the newspaper, form a bed of plasticine for your gargoyle prototype. Make it 2 inches longer and wider than your prototype. Make it half as deep as your prototype.
Video of the Day
Step 2
Embed your gargoyle halfway into the plasticine. Drag your fingers across the plasticine all around the edge of the gargoyle to close any gaps between the plasticine and the figure. Embed four marbles halfway into the plasticine, one at each corner of the bed.
Step 3
Create a ¼ inch thick wall of plasticine all around your prototype. Make it at least 1 inch taller than your prototype.
Step 4
Use a thick paintbrush to paint liquid wax over the inside of the plasticine enclosure and the exposed face of the marbles and gargoyle. The wax will prevent your mold from sticking to your prototype.
Step 5
Don a respirator and gloves. Open one of the two bottles that came with your silicone mold kit. Pour some liquid silicone from one of the two bottles into a bucket, enough to half-fill the plasticine enclosure that you just made. Pour an equal amount of liquid from the second bottle into a second bucket.
Step 6
Pour the contents of both buckets into a third. Pour them slowly so you do not cause any splashing. Mix them together with a stirring stick for a full minute. Pour the mixture into the plasticine enclosure and let it cure overnight.
Step 7
Remove the plasticine from around your new half-mold when the silicone has cured. Flip the mold over and remove the four marbles from the silicone. Do not remove the gargoyle.
Step 8
Create a ¼ inch thick wall of plasticine over the newly-exposed side of your gargoyle prototype. Make it 1 inch taller than your prototype. Brush liquid wax over the exposed gargoyle and the surface of the half-mold around it.
Step 9
Mix up a new batch of silicone, just as you did the first, and pour it into the plasticine enclosure. Let the silicone cure overnight.
Step 10
Remove the plasticine wall and gently pry the two halves of your silicone mold apart. Remove your prototype from inside. Wash the molds gently to remove the liquid wax.
Warning
Always wear protective gear when working with uncured silicone unless your silicone specifically advertises that it may be used for life casting.
Video of the Day