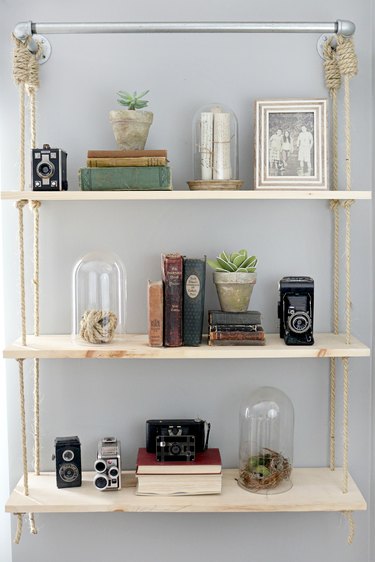
Add an element of suspense to any room with these easy-to-make hanging wood shelves. They serve as a decorative display in your living or dining room and bring character to an empty wall or corner. Alternatively, they can be hung in front of a window, offering a practical storage alternative while letting light shine through.
Things You'll Need
Video of the Day
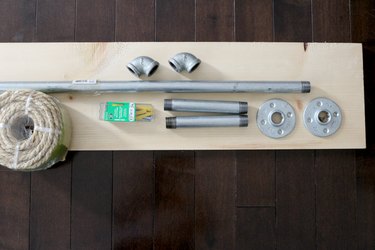
- 3/4-inch flanges, 2
- 3/4-by-7-inch galvanized pipes (threaded at both ends), 2
- 3/4-inch galvanized elbows, 90 degrees, 2
- 3/4-by-30-inch galvanized pipe (threaded at both ends), 1
- Measuring tape
- Level
- Wooden planks measuring 1-by-9-by-35-inches, 3
- Wood clamp
- Drill
- 3/8-inch wood-boring drill bit
- Sandpaper, fine grit
- Tack cloth
- Wood stain (optional)
- Paintbrush or cloth (optional)
- 1 1/2-inch wall screws (and drywall anchors if needed), No. 12-14, 8
- 3/8-inch medium-duty twisted sisal rope, 32 feet
- Hot glue gun and glue stick
Video of the Day
Assemble the Hanging Rod
Assemble the hanging rod by connecting one flange to each of the 7-inch pipes. Connect one elbow to each of the 7-inch pipes, and then connect the other ends of the elbows to the 30-inch pipe.
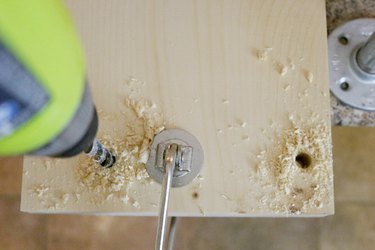
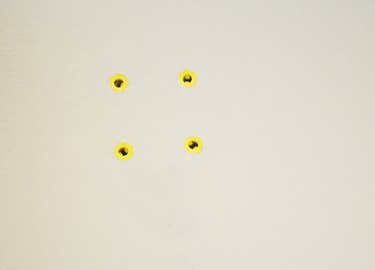
Measure the Drill Holes
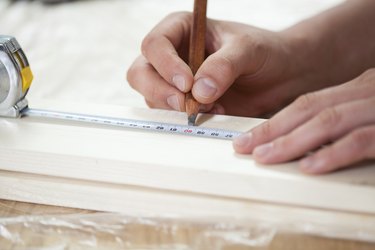
Measure and mark on one of the wooden planks where you will drill the holes for the rope to feed through. You will need two holes on each end of the plank, a total of four holes.
Note: In this case, the holes were marked 2 inches in from either side, 2 inches from the back and 5 inches from the front of the shelf.
Clamp the Planks Together
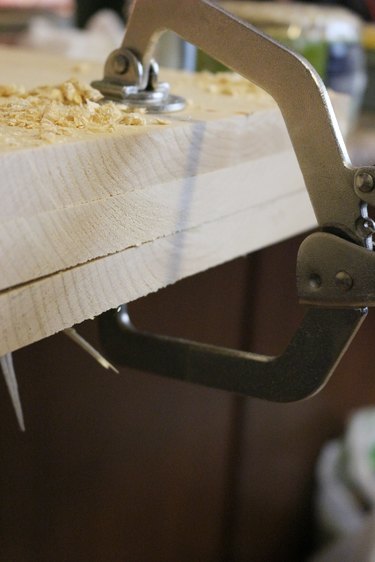
Align and clamp the three wooden planks together, with the marked plank on top. This will ensure the holes stay aligned while drilling.
Drill Holes Through the Planks
Using a wood-boring drill bit, drill the marked holes, going all the way through the three planks.
Sand the Planks
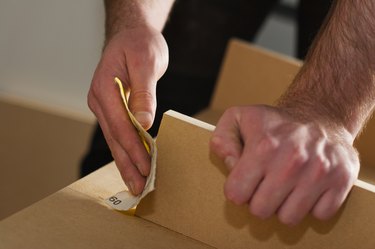
Sand the edges of the planks to smooth them out. If you plan to stain the planks, lightly sand the surface of the planks, too. Wipe away any dust.
Stain the Planks (Optional)
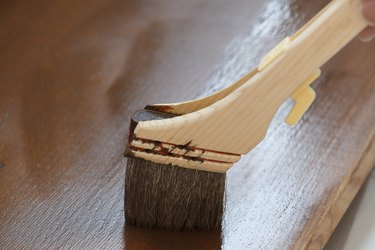
If desired, stain the planks per the wood stain manufacturer's instructions. Allow the stain to dry completely.
Note: The shelving unit shown in this project is not stained.
Secure the Rod to the Wall
Have a helper hold the hanging rod in the desired place on the wall while you check it for levelness. The unit will be approximately 8 feet tall once it's complete, so make sure the rod is high enough on the wall to allow the shelves to hang below. Once you have leveled the rod in the desired spot on the wall, mark the drill points with a pencil. If you're not drilling into studs, then use wall anchors as shown. Secure the rod onto the wall.
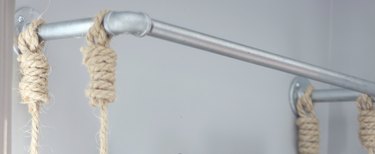
Tie Hanging Ropes to the Rod
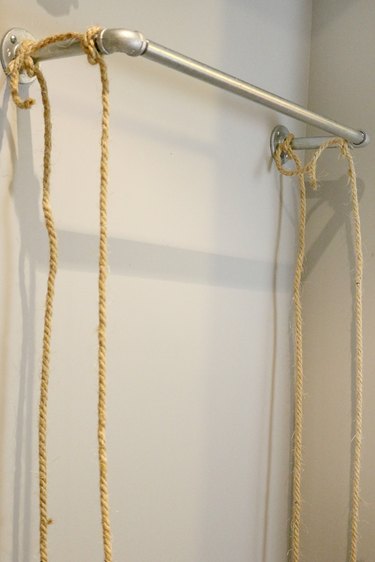
Cut four pieces of rope measuring 8 feet in length. Tie them tightly onto the hanging rod, leaving approximately 6 to 8 inches of excess rope on top of each knot.
Tie the First Shelf to the Ropes
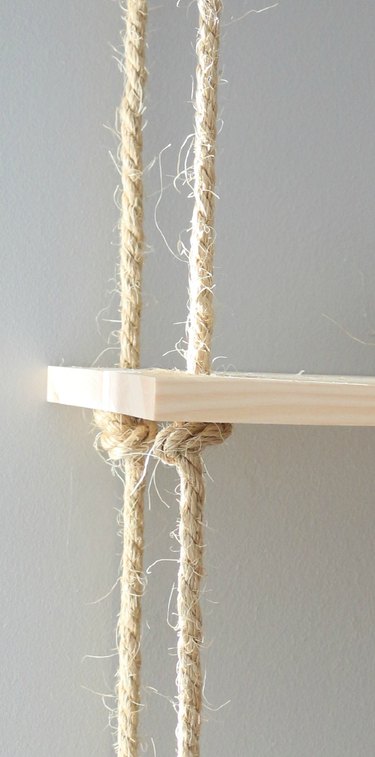
Feed each rope through the corresponding holes of the top shelf to the desired height (14 inches in this example). Have a helper hold the board in place while you tie a loose knot at the bottom of each hole.
Ensure the Shelf Is Level

Use a level to ensure the shelf is straight, adjusting the knots as needed. Tighten the knots when you're satisfied with the height/level of the plank.
Tie the Remaining Shelves to the Ropes
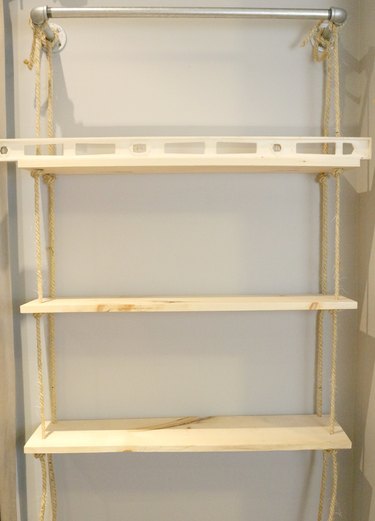
Continue this process for the remaining two shelves.
Make Decorative Coils at the Top
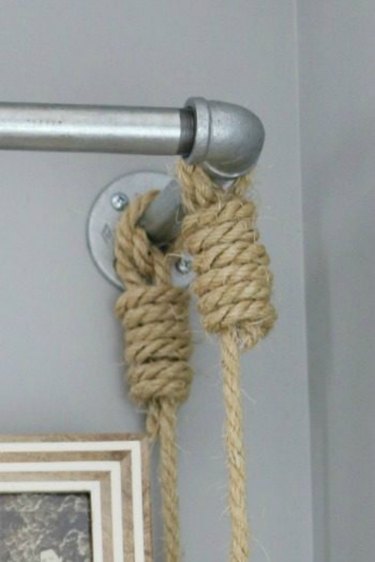
Wrap the excess rope around each of the top knots in a coil pattern and secure in place with hot glue.
Finished Shelving Unit
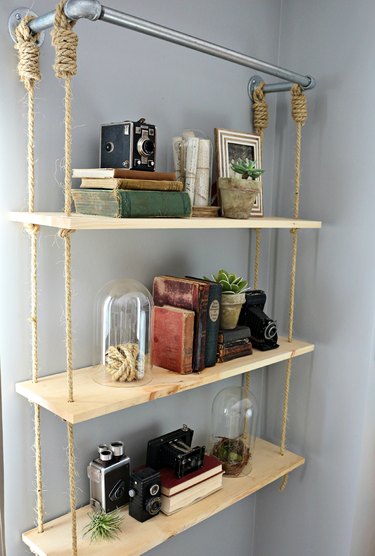
Decorate your hanging shelves with your favorite items. Choose items with a solid base such as books and plant pots.
Tip
This shelving unit is most suitable along a wall or a less transited area, as it will swing when knocked.