Things You'll Need
3 cups flour
3 cups water
Large bowl
Whisk
2-foot square heavy-duty cardboard
Newspaper
Brown paper bags
Masking tape
Acrylic paints
Hot glue gun
Fine-grit sand (optional)
Miniature figures (optional)
Whip a batch of papier-mache into a model island that is ideal for any level of artistic ability. If you need to make a miniature model of an island, such as for a book report on "Robinson Crusoe" or a science project, customize the island to fit your assignment. Or, make a model island to add to your décor, whether you own a beach house or have a tropical-themed playroom. Include lifelike replicas of you and your family to the island to turn the model into a family keepsake.
Creating the Island Form
Step 1
Mix 3 cups of flour and 3 cups of water in a large bowl using a whisk. Beat the mixture, which is the papier-mache paste, to break up any clumps of flour and make a smooth consistency.
Video of the Day
Step 2
Place a two-foot square sheet of heavy-duty cardboard on a flat work surface. Draw an outline of the island form on the cardboard to use as a guide.
Step 3
Crumple a sheet of newspaper into a tight ball, if you are making a taller island, or into a disc shape that is approximately the height you want for the island. Tape the newspaper onto the cardboard in the center of the outline of the island using masking tape to create a form to hold the papier-mache.
Step 4
Tear four to six sheets of newspaper -- you may need more or less depending on the size of the island -- into three-by-six-inch strips.
Step 5
Dip a strip of newspaper into the papier-mache paste. Coat both sides and squeeze off any excess paste with your fingers; the glue is non-toxic and safe for children.
Add the Details
Step 1
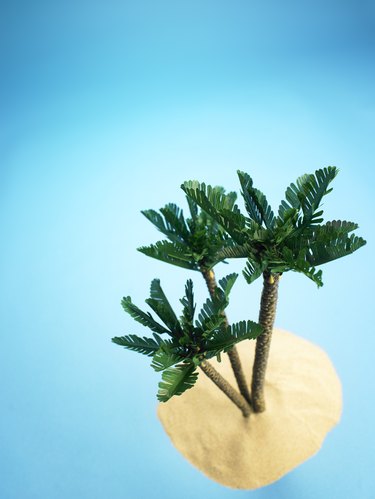
Dip a strip of brown paper bag into the papier-mache paste. Twist the coated newspaper lengthwise until it resembles a rope to use for the trunk of a palm tree. Determine how long you want the trunk. Tear off the excess length while the paper is wet; use the excess twisted paper for additional trees, if desired. Place the twisted newspaper on a flat surface; make a slight curve or leave the paper in a straight line. Allow it to dry overnight
Step 2
Cut six to 12 oval leaf shapes that are approximately one by three inches for each palm tree. Dip each leaf in the paste to coat. Allow the leaves to dry.
Step 3
Paint the tree trunk brown and the leaves green using acrylic paint. Paint the island tan, white or green, depending on the type of island.
Step 4
Use hot glue to attach the leaves to the end of the palm tree trunk; fan the leaves out from the trunk. Affix the palm tree on the island using hot glue. Add additional palm trees, as desired.
Step 5
Paint the cardboard surrounding the island with blue or blue-green acrylic paint. Add details, such as sea creatures, if desired, to the water using paints.
Tip
Add fine-grit sand to the paints used for the island to give the island texture, if desired. You can also add miniature figures, such as people, animals, sea creatures or huts, to personalize the island.
Video of the Day