How to make apple cobbler that sets and bakes through
Most cobbler failures trace back to two separate problems that get treated as one: a filling that never firms up, and a biscuit topping that looks golden on top while staying wet underneath. Fixing the filling doesn't fix the topping, and the reverse is just as true. The way around both is to treat them as separate problems solved before they ever meet in the oven: cook the filling to a visible thickness on the stovetop, and handle the topping as little as possible.
Apple variety changes how a filling behaves once it's heated. Some apples hold their shape and release liquid slowly, while others break down and release liquid fast. Cornstarch also thickens with less quantity than flour and leaves less of a starchy aftertaste behind, which is part of why it works well in a fruit filling like this one.
This recipe is built around three decisions: cook the filling on the stovetop until it visibly thickens, mix the topping with minimal handling, and judge doneness by sight and feel instead of the clock. The quantities, times, and temperatures below describe one specific version of this dessert, not a universal law of cobbler. Apple juiciness, oven calibration, and pan thickness will all shift the particulars, which is why the visual cues at each step matter more than the numbers attached to them.
What you'll need
Video of the Day
For the filling:
- 3 pounds apples, peeled, cored, and sliced no thicker than ¼ inch (roughly 7 cups once sliced)
- ⅔ cup sugar
- 3 tablespoons cornstarch
- 1 tablespoon lemon juice
- 1 teaspoon cinnamon
- Pinch of salt
For the topping:
- 1½ cups all-purpose flour
- ⅓ cup sugar
- 2 teaspoons baking powder
- ½ teaspoon salt
- 6 tablespoons cold butter, cubed
- ⅔ cup cold heavy cream
A 9x13-inch baking dish at least 2 inches deep keeps the filling from spreading so thin it overcooks before the topping finishes. Have a saucepan large enough to hold the sliced apples with room to stir, and a toothpick for checking doneness. Grease the dish lightly with butter before starting.
Video of the Day
Step 1: make the filling
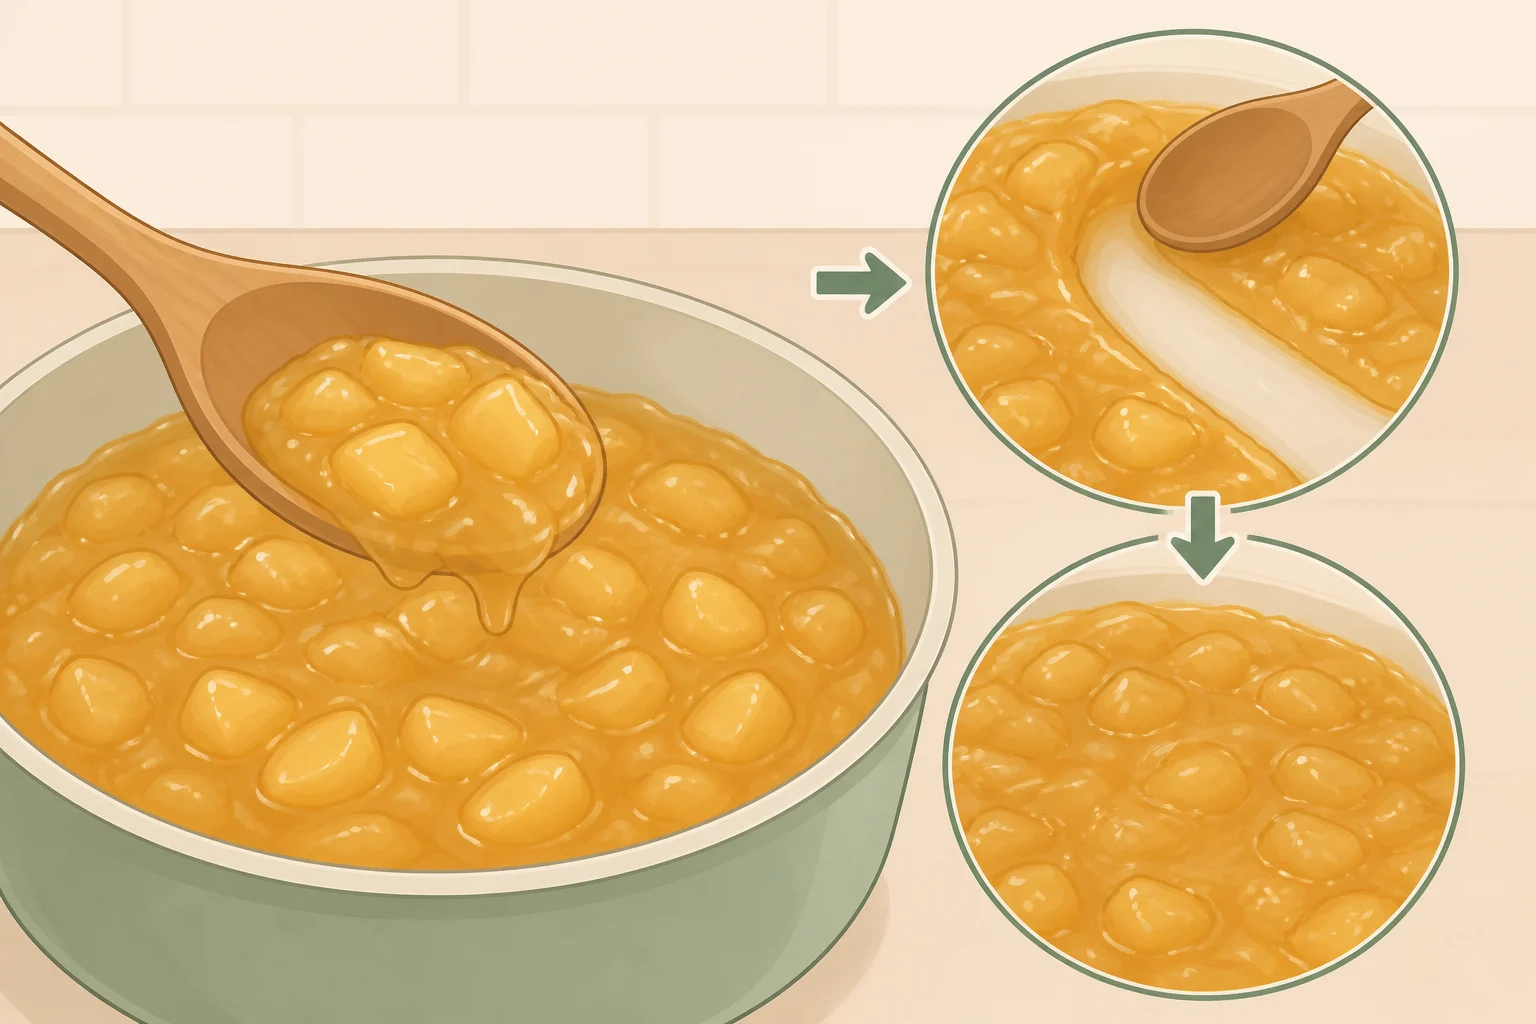
Start the apples. Peel, core, and slice them into pieces no thicker than ¼ inch. Consistency matters more than exact thickness: a mix of thick and thin slices in the same pan cooks unevenly no matter which variety is used.
Pair a tart, firm apple with a softer, sweeter one, such as Granny Smith alongside Honeycrisp, Gala, or Braeburn. The firm variety holds its structure under heat while the softer one breaks down slightly and adds sweetness. The exact ratio is flexible.
Combine the sliced apples with the sugar, cornstarch, lemon juice, cinnamon, and salt directly in the saucepan while everything is still cold. Set the pan over medium heat and stir occasionally as it works toward a simmer. Several pounds of cold fruit take a few minutes to warm through; that stretch is not the same as the thickening stage still to come.
Cook until it thickens. Once the mixture reaches a full simmer, stir it almost continuously. A fruit filling with sugar and starch in it can catch on the bottom of the pan fast. Watch the liquid rather than the clock: it should turn glossy, and a spoon pulled through it should leave a trail that holds for a second or two before closing back up. That shift takes about 8 to 10 minutes of simmering in this recipe, though extra-juicy apples can sometimes stretch it a few minutes longer.
Check the apples as the liquid thickens. They should be just starting to soften at the edges, not fully tender; they finish cooking in the oven. If the mixture starts sticking before it thickens, lower the heat rather than adding water, which thins it out instead of helping it along.
Step 2: mix the topping while the filling cooks
Preheat the oven to 375°F now, so it's ready the moment both components are done.
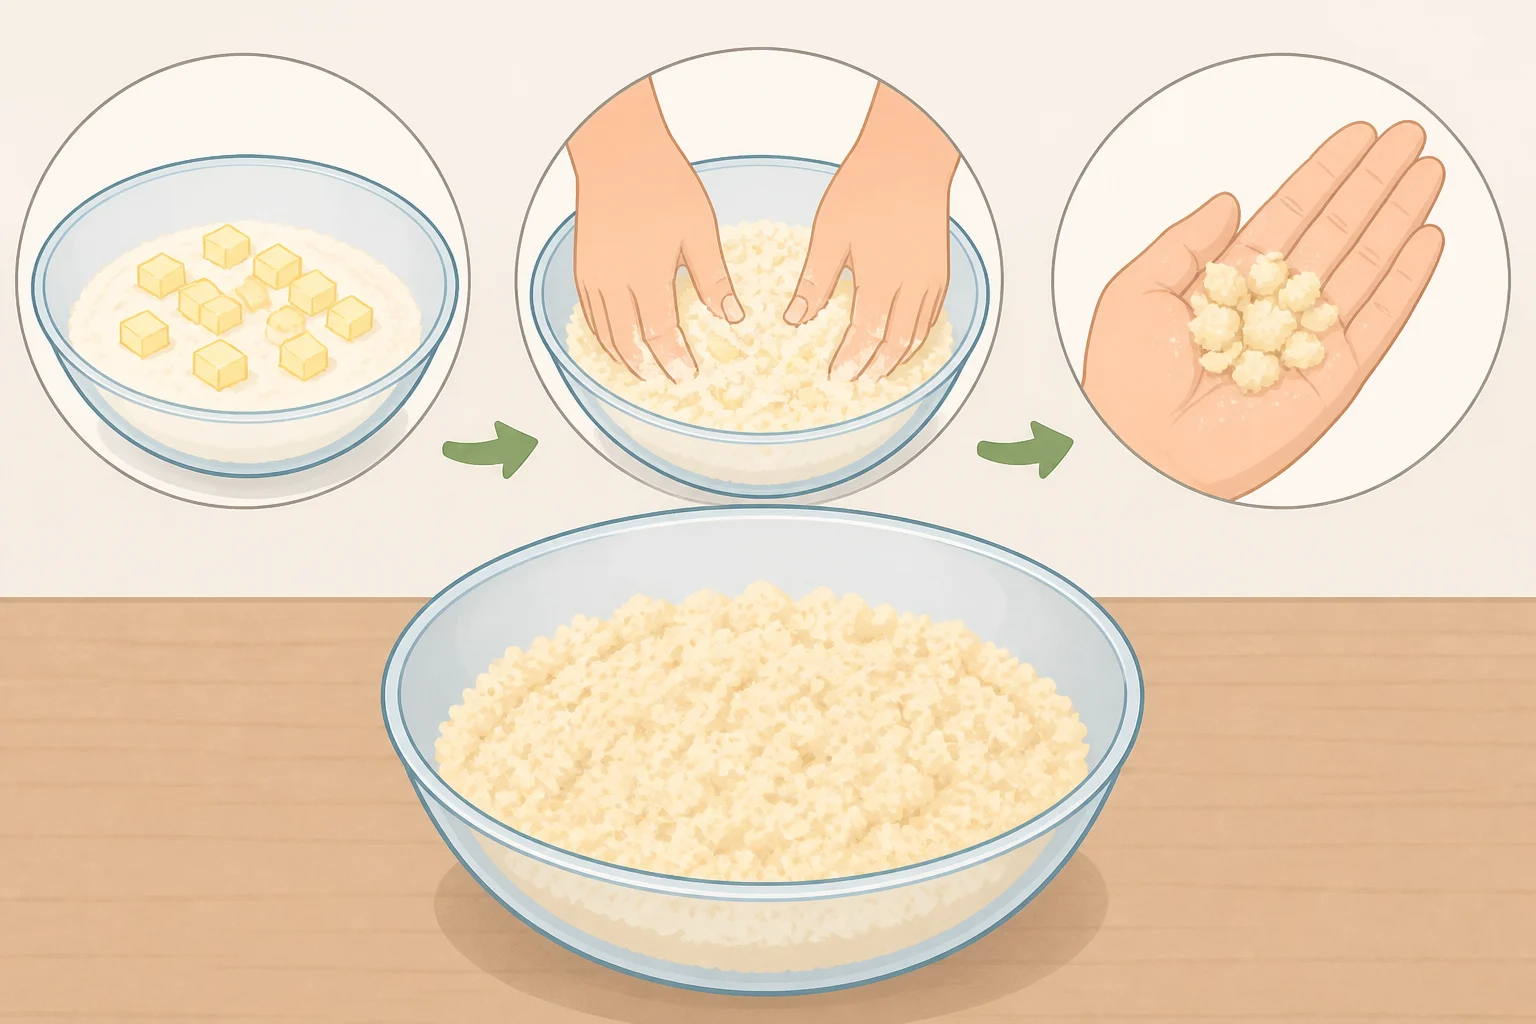
Whisk together the flour, sugar, baking powder, and salt. Cut in the cold butter with a pastry cutter or fingers until the pieces are roughly pea-sized, then pour in the cold heavy cream and stir just until the dough looks shaggy and holds together, with no dry flour left in the bowl. Stop there. If it still looks too dry to hold its shape once mounded, add cream a teaspoon at a time until it does.
Two separate things can ruin this dough, and they're easy to mix up. Overmixing develops gluten, which is what makes a biscuit dense instead of tender. Keeping the butter cold is a different matter: distinct pea-sized pieces melt into steam in the oven, which is what gives the topping some lift and flake, rather than a slab of fat that has already blended into the flour before it ever gets hot. Both problems matter, but cold butter is the more direct way to guard against the second one.
Portion the dough into 8 mounds, about ¼ cup each, using a scoop or two spoons scraped against each other. Keeping the mounds close in size helps them bake in roughly the same amount of time, rather than some finishing while others lag behind. Slide the bowl into the refrigerator while the filling finishes simmering; starting from cold dough gives it a better chance of holding its shape once it hits a hot oven, rather than slumping before the structure sets.
Step 3: assemble and bake
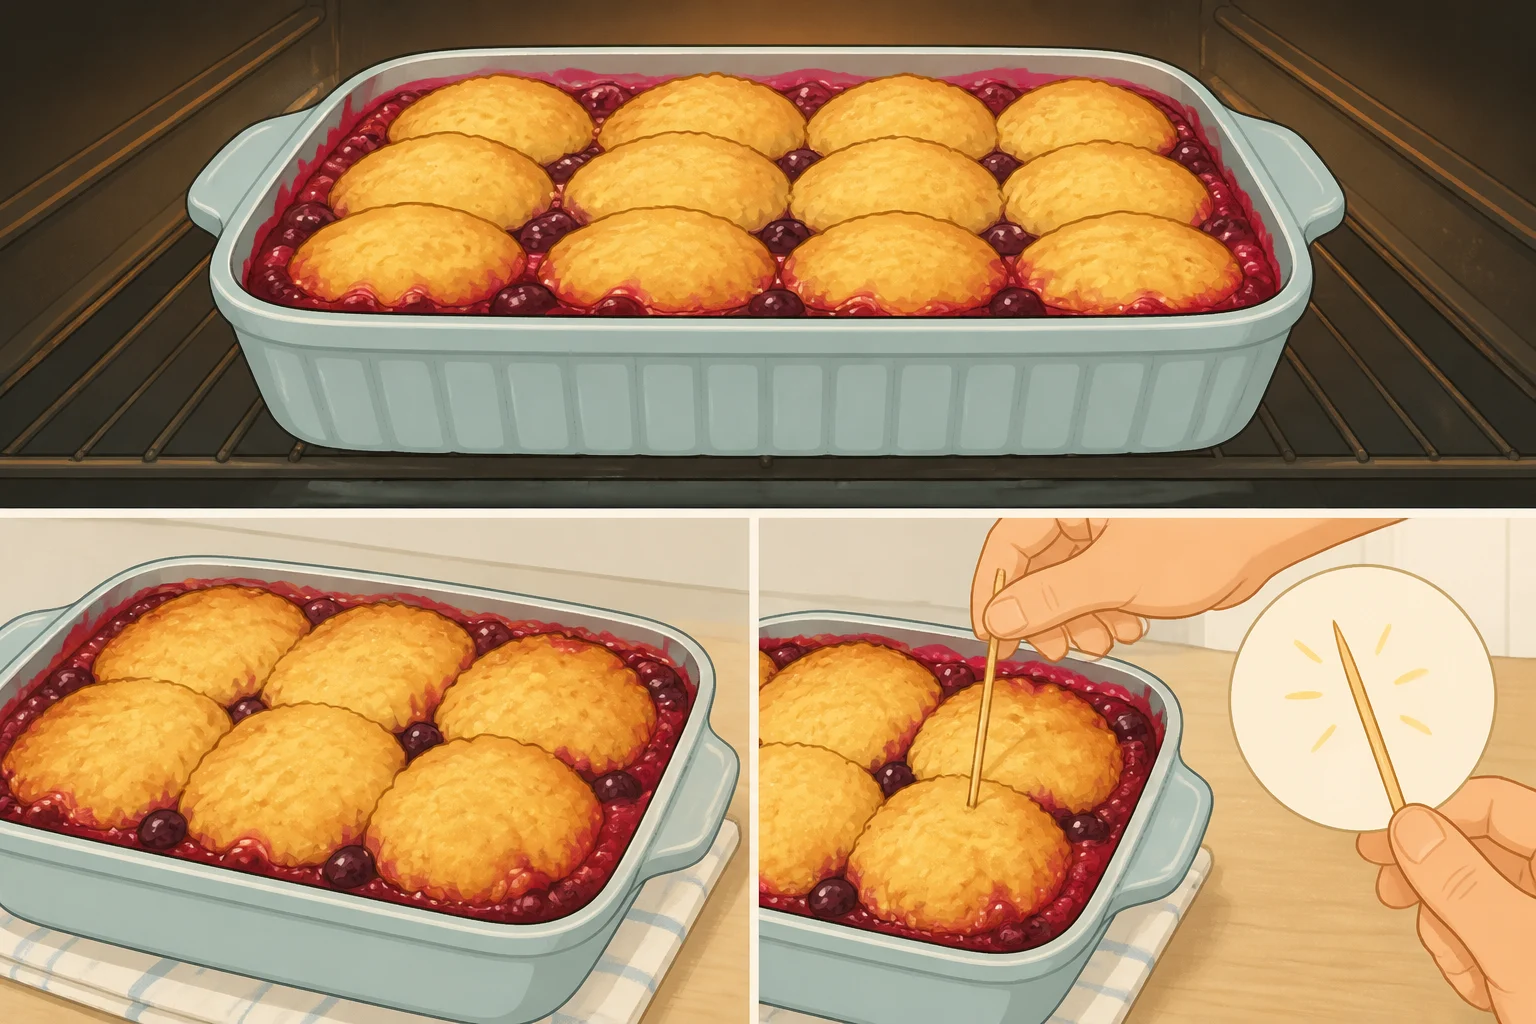
Pour the hot, thickened filling into the greased baking dish. Drop the 8 biscuit mounds over it, spacing them so fruit shows between them. The gaps let the filling bubble up around the dough as it bakes and make it easier to check on both parts without disturbing the topping.
Bake at 375°F for 40 to 45 minutes. Watch the dish rather than the timer: the filling should be bubbling actively at the edges, and the topping should be a deep, even golden brown, not pale. Insert a toothpick into the center of the largest mound. It should come out clean, with no raw dough clinging to it.
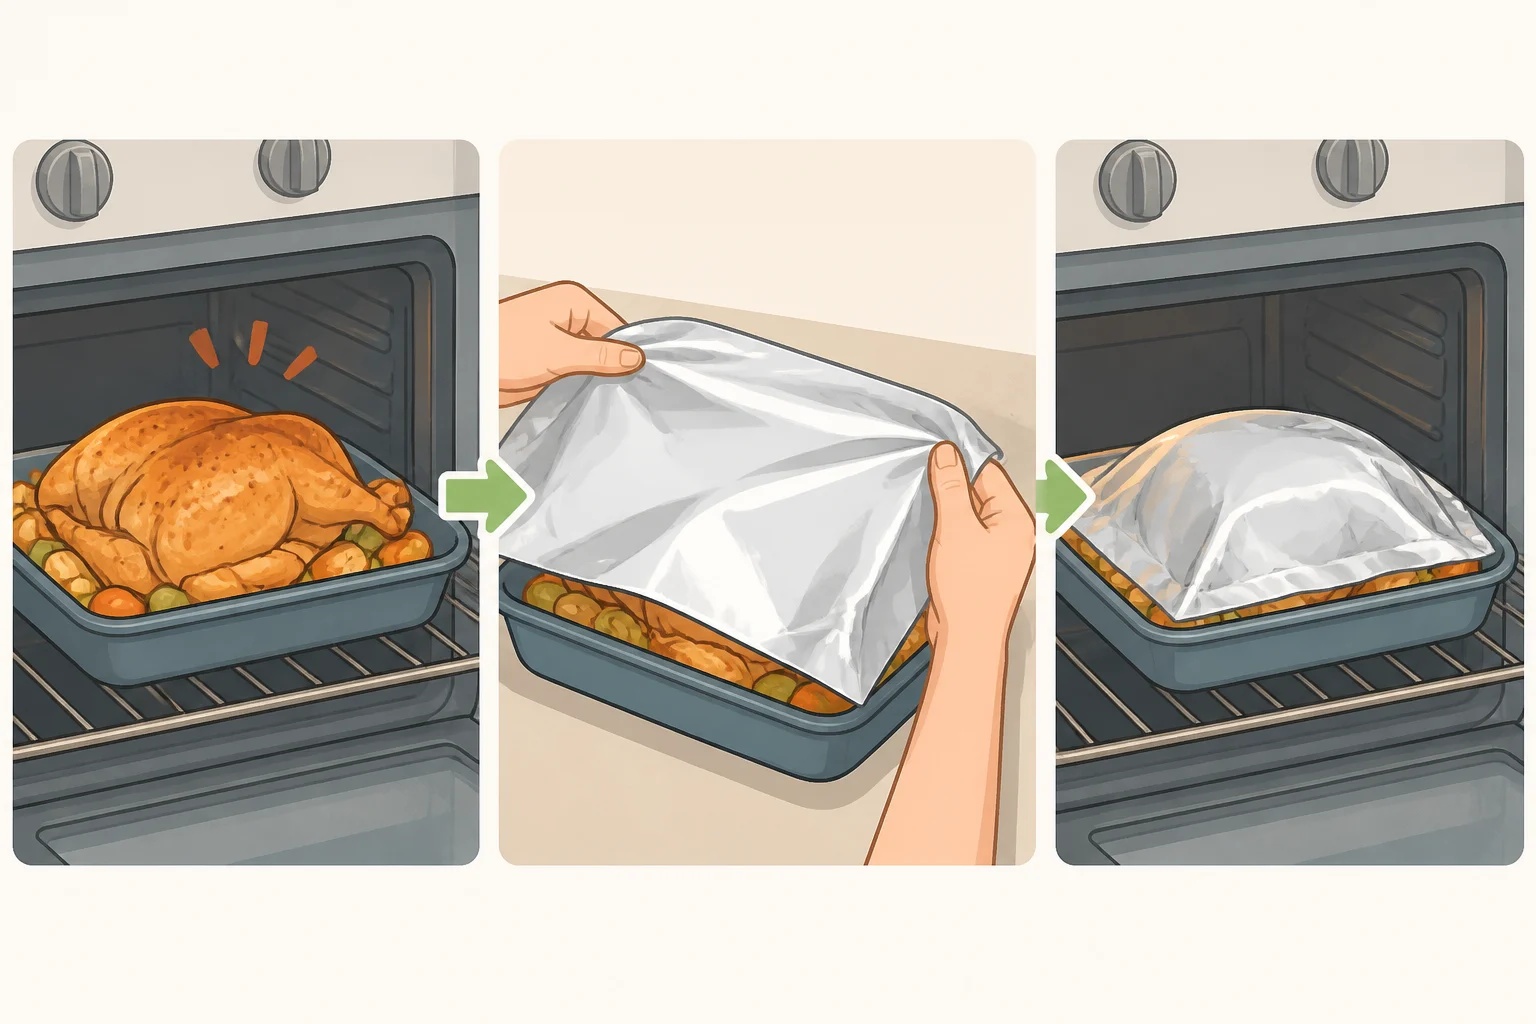
If the top is browning faster than the center is cooking through, tent the dish loosely with foil and keep baking rather than pulling it early. The same fix works for stand-alone biscuits too: foil cuts down on further surface browning while the inside keeps cooking, though the toothpick, not the color, is still what confirms it's actually done.
Rest before serving
Let the cobbler sit uncovered for 15 to 20 minutes before cutting in. The filling keeps setting as it cools slightly, and cutting in too early releases heat and juice that haven't fully come together. Spoon out a small portion to check: it should hold a shallow mound rather than pool flat, though a batch made with especially juicy apples can still look a touch looser than one made with drier fruit.
Troubleshooting
Match the symptom to the cause, fix tonight's batch where possible, and adjust the next one.
Filling is still thin after resting. If it wasn't bubbling at the edges when pulled from the oven, it's underbaked. Return it until it bubbles at the edges, usually another 5 to 10 minutes. If it bubbled well and is still thin once rested, that's a next-time fix: try adding an extra tablespoon of cornstarch during the stovetop step.
Topping looks golden but is doughy in the center, and the dish is already out of the oven. Cover loosely with foil and return it to a 350°F oven until a toothpick comes out clean, usually about 10 minutes. Next time, tent with foil earlier, before the top gets as dark as it did this round.
Apples are still firm after baking. Not much fixes this after the fact. For the next batch, check slicing for consistency rather than blaming thickness alone; apple size and variety both affect how long a piece takes to soften.
Storing and reheating
Don't let the dish cool on the counter for long. Get it into the refrigerator once it's cool enough to handle rather than leaving it out to cool completely in the open. A full 9x13-inch dish holds heat longer than it looks like it would, so split it into a few shallower containers before refrigerating instead of letting the whole pan cool as one block; that brings it down to a safe temperature faster.
Use the cobbler within about 4 days for the best quality. The biscuit topping tastes noticeably better within the first day or two than it does by day four, which is a texture call, not a safety one.
Reheat uncovered at 350°F for 10 to 15 minutes, until warmed through and the topping crisps slightly. Refrigeration softens biscuits, and reheating only brings part of that back; don't expect the topping to match the night it came out of the oven.
What to remember
Two checks decide whether this cobbler worked: a glossy, trail-holding filling before it ever goes in the dish, and a clean toothpick from the center of the largest biscuit mound before it comes out. Everything else, including the exact bake time and the depth of the bubbling, is a cue to watch for rather than a number to trust blindly.
What should carry over to other fruit is the topping, not the filling timing. Cold butter, minimal mixing, and mounds spaced with gaps between them work the same way on a peach or pear cobbler. The stovetop timing won't transfer as cleanly, since peaches, pears, and berries can release liquid at different rates than apples; the thickening stage still needs to be judged by the same glossy, trail-leaving cue rather than assumed to land near this recipe's 8 to 10 minutes.