How to clean a food processor: step-by-step guide
How to clean a food processor doesn't require rubber gloves and twenty minutes of scrubbing, provided you deal with it right after the last pulse. Fill the empty work bowl about a third full with warm water, add a drop of dish soap, seal the lid, and run the machine on high for roughly 30 seconds. That alone knocks loose most of what's clinging to the bowl and blade (KitchenAid Australia).
Washing a food processor this way, immediately after use, keeps residue from drying onto the bowl, blade, and the tighter crevices of the blade assembly, which is one of the easiest ways to save time on the whole job (Good Housekeeping today; Cuisinart FP-7 manual).
The stakes go beyond a shiny bowl, too. Cleaning strips away built-up debris and some of the bacteria that can make people sick, but it doesn't kill anything on its own, which is exactly why food-contact surfaces need a real clean rather than a quick rinse (NSF).
This guide covers the full routine: the quick self-clean trick, safe disassembly, handling blades without slicing a finger, whether food processor parts can go in the dishwasher, and cleaning the base and its hard-to-reach crevices without frying the motor.
How to clean a food processor step by step
Video of the Day
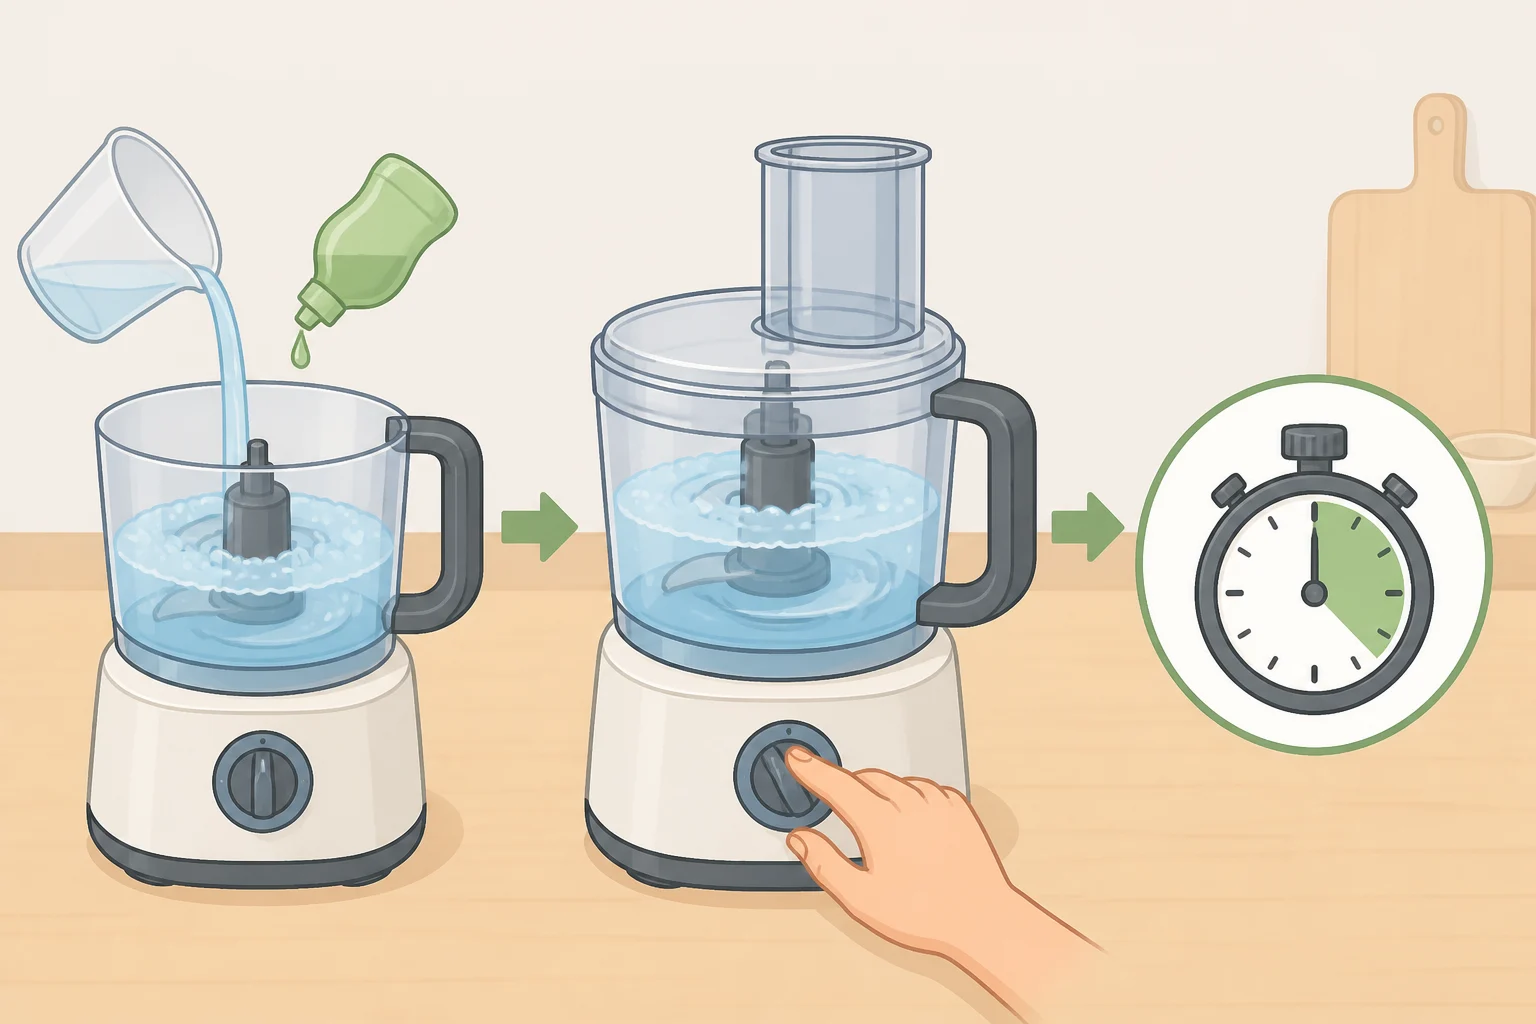
1. Run the quick-clean cycle right after use. Add warm water and a few drops of dish soap directly to the assembled bowl with the blade still locked in, secure the lid, and run the processor on high for about 30 seconds, or pulse it five to ten times. This loosens light residue before it has a chance to dry (Good Housekeeping today; KitchenAid Australia).
2. Pulse away anything stuck-on before adding water. For sticky jobs, pulse the empty bowl and blade first. The spinning motion flings stuck food off the blade and onto the bowl walls, where it rinses away far more easily in the next step (KitchenAid Australia).
Worth knowing before you get too confident: this trick handles light residue well, but peanut butter and other dense, sticky foods still need a brush and some effort (Good Housekeeping today).
3. Unplug the machine, then take it apart. Remove the pusher, lid, blade, and bowl. On some models, the bowl rotates to unlock from the base (KitchenAid Australia; Cuisinart FP-7 manual).
4. Rinse everything, inspect, then hand-wash what's left. Run each removable piece under water, check the gasket, feed tube, and other tight spots for leftover food, and wash away anything that remains with warm water, dish soap, and a bottle brush, working from the center hub outward rather than into the blade's edge (Good Housekeeping today).
5. Skip the pre-clean if it's all going in the dishwasher. If your model's parts are dishwasher-safe and that's where they're headed, there's no need to hand-rinse first (Good Housekeeping today).
Video of the Day
How to clean food processor blades safely
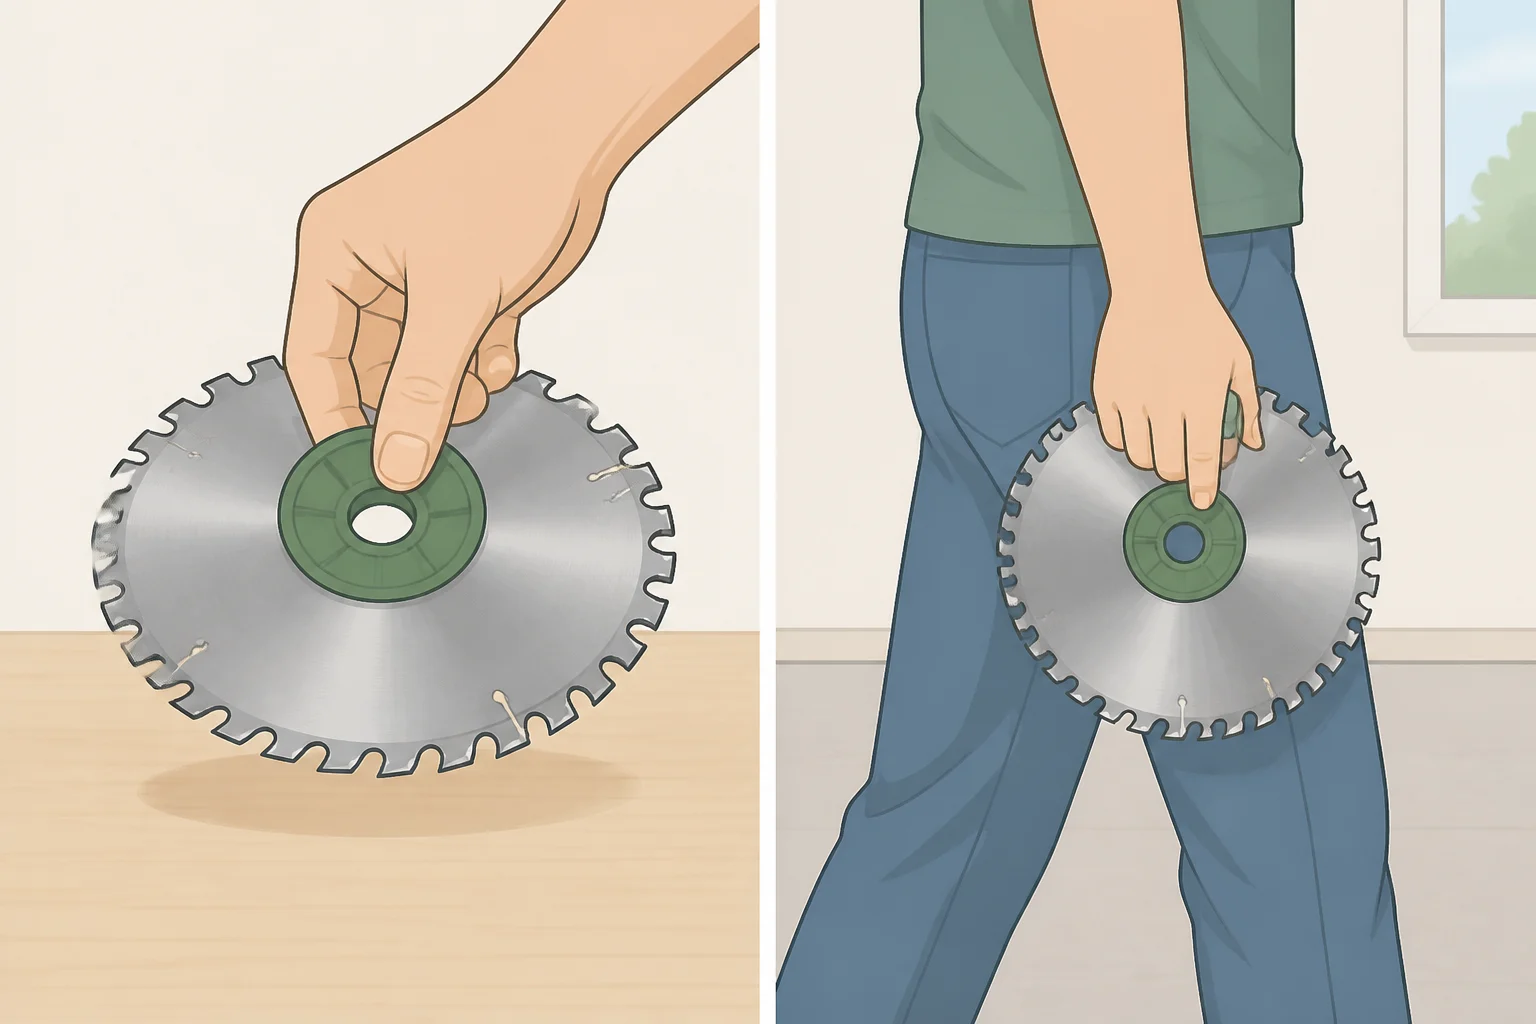
Blades cause more kitchen mishaps than any other part, and washing is often when it happens. Never grab the blade by its metal edge. Lift and carry it by the plastic hub, handle, or finger holes instead (Good Housekeeping today; KitchenAid Australia).
Don't leave the blade sitting in a sink full of soapy water. It disappears from view, and whoever reaches in next without seeing it is the one who gets cut. Wash it right away and set it aside to dry (Good Housekeeping today; Cuisinart FP-7 manual).
The hollow center tube inside the blade assembly is where debris tends to hide, and it's easy to miss on a fast rinse. A bottle brush or other small brush reaches inside without putting fingers anywhere near the cutting edge (KitchenAid Australia; Good Housekeeping today).
Loading blades into the dishwasher works fine on most models, but position them so they can't shift or slip through the rack, and let anyone else who unloads the dishwasher know sharp parts are inside (Good Housekeeping today). KitchenAid recommends hand-washing blades specifically, arguing it keeps them sharper for longer than repeated dishwasher cycles (KitchenAid Australia).
Can food processor parts go in the dishwasher?
Often, yes, but the answer depends on the model sitting on the counter. Many bowls, lids, pushers, and blades are dishwasher-safe, but the specifics vary by brand, and some manufacturers still recommend hand-washing particular pieces (Good Housekeeping today).
Cuisinart's FP-7 manual states that every part except the housing base can go in the dishwasher, top rack only. Load the cover with the feed tube facing up, and set the bowl and pusher upside down so they drain properly (Cuisinart FP-7 manual). KitchenAid says most of its bowls, lids, and attachments are dishwasher-safe on the top rack using a normal or gentle cycle, but warns against high-temperature sanitizing cycles, which can warp or crack the plastic over time (KitchenAid Australia; KitchenAid 5KFP0921B manual, earlier this year).
The manual for your specific model is the deciding document here, not habit or whatever's more convenient that day. If it says top rack only, use the top rack. If it says hand-wash, do that instead.
Whichever method you choose, skip the abrasive scouring pads. They scratch and cloud the plastic, and a scratched bowl only gets harder to keep clean from that point forward (KitchenAid Australia).
How to clean a food processor base and tight crevices
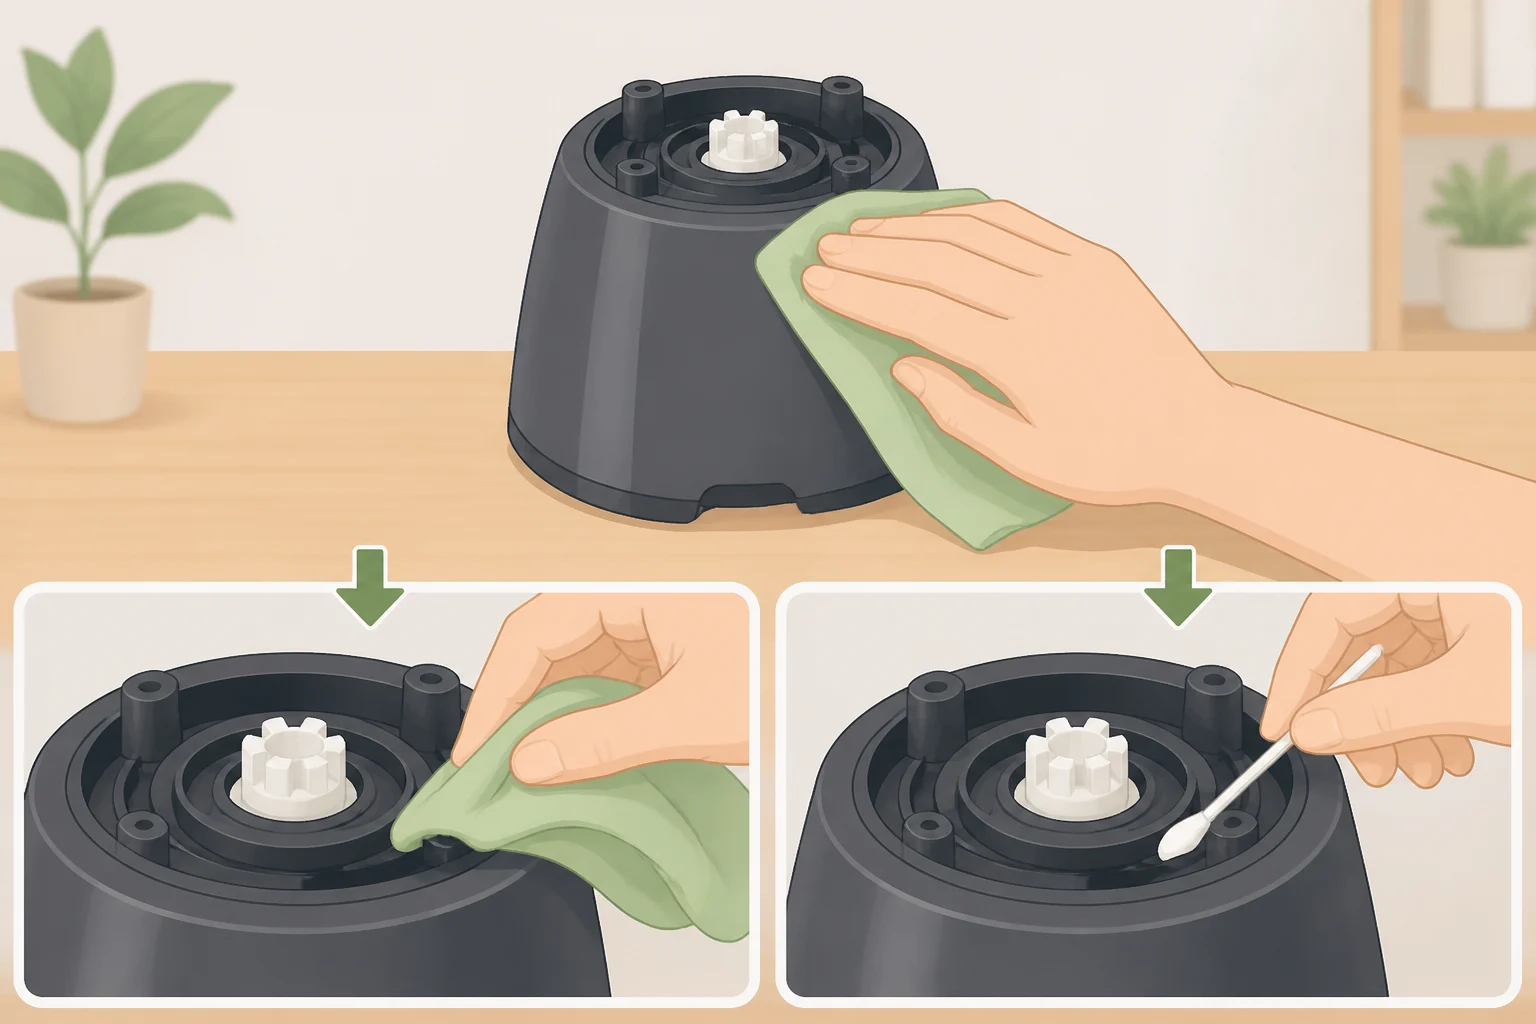
The base houses the motor, and the motor should never meet water. Don't submerge it, hold it under a running tap, or spray cleaner directly onto it. Moisture near the motor causes damage that's expensive, and sometimes impossible, to fix (KitchenAid Australia; Cuisinart FP-7 manual).
Wipe it down instead with a cloth dampened in warm water and dish soap, keeping moisture away from the buttons and controls (Good Housekeeping today; KitchenAid Australia). Food has a habit of working into locking tracks and handle grooves. A damp cotton swab or an old toothbrush gets into those corners without putting the motor at any risk (KitchenAid Australia).
The step most people skip is the one that matters most over time: let every component air-dry completely before putting the machine back together. Reassembling damp parts traps moisture inside, and that trapped moisture is what leads to odors, bacterial growth, or corrosion later (KitchenAid Australia; Good Housekeeping today).
Food-safety guidance draws a useful distinction here: cleaning and sanitizing aren't the same job. Cleaning strips away debris and some bacteria, but bringing bacteria down to genuinely safe levels is sanitizing's job, and that step only works after cleaning is done first (NSF). The routine above, from the quick pulse to the final air-dry, covers the cleaning half of that equation for a typical kitchen food processor.
A quick habit, not a chore
Once this routine is dialed in, cleaning a food processor stops feeling like a task and turns into a 90-second habit tacked onto the end of cooking. What's worth revisiting now and then is the manual for your specific model. Dishwasher compatibility, sanitizing-cycle limits, and hand-washing recommendations differ enough between brands that a rule that works fine for one machine can quietly damage another.
If plastic parts start picking up odors or discoloration from garlic, onion, or other strong ingredients, KitchenAid suggests treating them with lemon juice or a baking soda paste, left on for a few minutes before rinsing. Just keep that lemon mixture off the metal blade edges themselves (KitchenAid Australia).