No-Bake Peach Fluff Bars: 4 Methods and How to Prevent Runny Layers
There are four viable ways to make no-bake peach fluff bars, and the choice you make before you shop determines your pan size, chill time, ingredient list, and how much can go wrong. This guide walks through each method, flags the specific failure points, and gets you to the right decision before anything hits the refrigerator. Active work runs 20–30 minutes. The refrigerator handles the rest.
The actual question isn't "how do I make these?" It's "which version fits my time, my peach situation, and whether clean slices matter?" That framing is more useful, and this guide answers it directly.
"No-bake peach fluff bars" isn't one recipe. It's a family of chilled layered desserts sold under names like peach delight, dream bars, and peach cheesecake bars, all sharing the same three-part structure: crumb crust, fluffy cream cheese filling, peach component. 365 Days of Baking and More calls them the go-to warm-weather option for anyone who wants something crowd-worthy without turning on the oven. Spicy Southern Kitchen frames the appeal plainly: when temperatures hit the mid-90s, the oven isn't an option.
How you handle the fruit splits these into four distinct methods. Everything else follows from that choice.
Before you start: Pull cream cheese from the refrigerator at least 30 minutes ahead. Cold cream cheese won't beat smooth regardless of mixer time. Softening it first isn't optional. If time is short, I Am Baker suggests submerging the sealed block in warm water for 10–15 minutes. You'll also need parchment paper with 2–3 inches of overhang on two opposite sides; those become your lifting handles at serving time.
Choose your no-bake peach fluff bars method before you shop
Video of the Day
The four methods aren't interchangeable. Making this decision before buying anything saves you from mid-recipe improvisation, which is where most problems start.
Method A: Pie filling shortcut. Spread two 21-ounce cans of peach pie filling directly over the cream layer. No gelatin handling, no draining fresh fruit. Shugary Sweets uses this in a 9x13 pan, yielding 20 servings, with a 6-hour minimum chill and an optional reserved portion of crust crumbled over the top. This is the easiest method to execute cleanly because the pre-thickened filling handles the moisture problem for you. Slices are less defined than other methods; flavor is sweeter and less fresh-tasting.
Method B: Gelatin topping with arranged peach slices. Drained peach slices are arranged over the cream layer, then a partially cooled peach gelatin mixture is spooned over the top and the whole pan chills overnight. Ines Kohl uses an 8x8 or 9x13 pan and requires at least 6 hours, with overnight explicitly recommended for the cleanest slices. This version produces the most visually defined layers because the gelatin sets each component in place. It also carries the tightest execution windows: the gelatin must be poured at exactly the right temperature, and the water ratio must follow the recipe rather than the box (more on this below).
Method C: Dry gelatin folded into the filling. Dry peach gelatin powder is beaten directly into the cream cheese, then Cool Whip and diced fresh peaches are folded in. I Am Baker uses just ¼ cup of dry mix from a 3-ounce box rather than the full packet. Spicy Southern Kitchen uses a 9x13 pan, serves 16, and requires 4 hours of chilling before cutting. Peach flavor runs throughout the filling rather than sitting on top. No dissolved gelatin means no temperature windows to manage, making this the simplest gelatin handling of the four.
Method D: Cooked fresh peach glaze. Fresh peaches are cooked down with a cornstarch slurry until glossy and thick, cooled briefly, then spread over the cream layer. Easy Mom Recipes uses this method, yields 12 bars, and chills for at least 90 minutes after glazing. Because the fruit cooks down with nothing masking it, the glaze has a concentrated fresh-peach character that canned or gelatin-enhanced versions don't replicate. It requires about 10 minutes of stovetop work and is the most sensitive to fruit moisture content.
Best choice by scenario:
| A | B | C | D | |
|---|---|---|---|---|
| Easiest to execute | ✓ | |||
| Most defined layers | ✓ | |||
| Peach flavor throughout filling | ✓ | |||
| Concentrated fresh-peach glaze | ✓ | |||
| Best for fresh or frozen peaches | ✓ | ✓ | ||
| Feeds a crowd (9x13) | ✓ | ✓ | ||
| Freezes well | ✓ | ✓ | ||
| Minimum chill time | 6 hrs | overnight | 4 hrs | 90 min |
Making these for tomorrow's party? Any method works; build them tonight. Making them same-day? Method C or D gets you there fastest.
Video of the Day
Build the base: steps shared by all methods
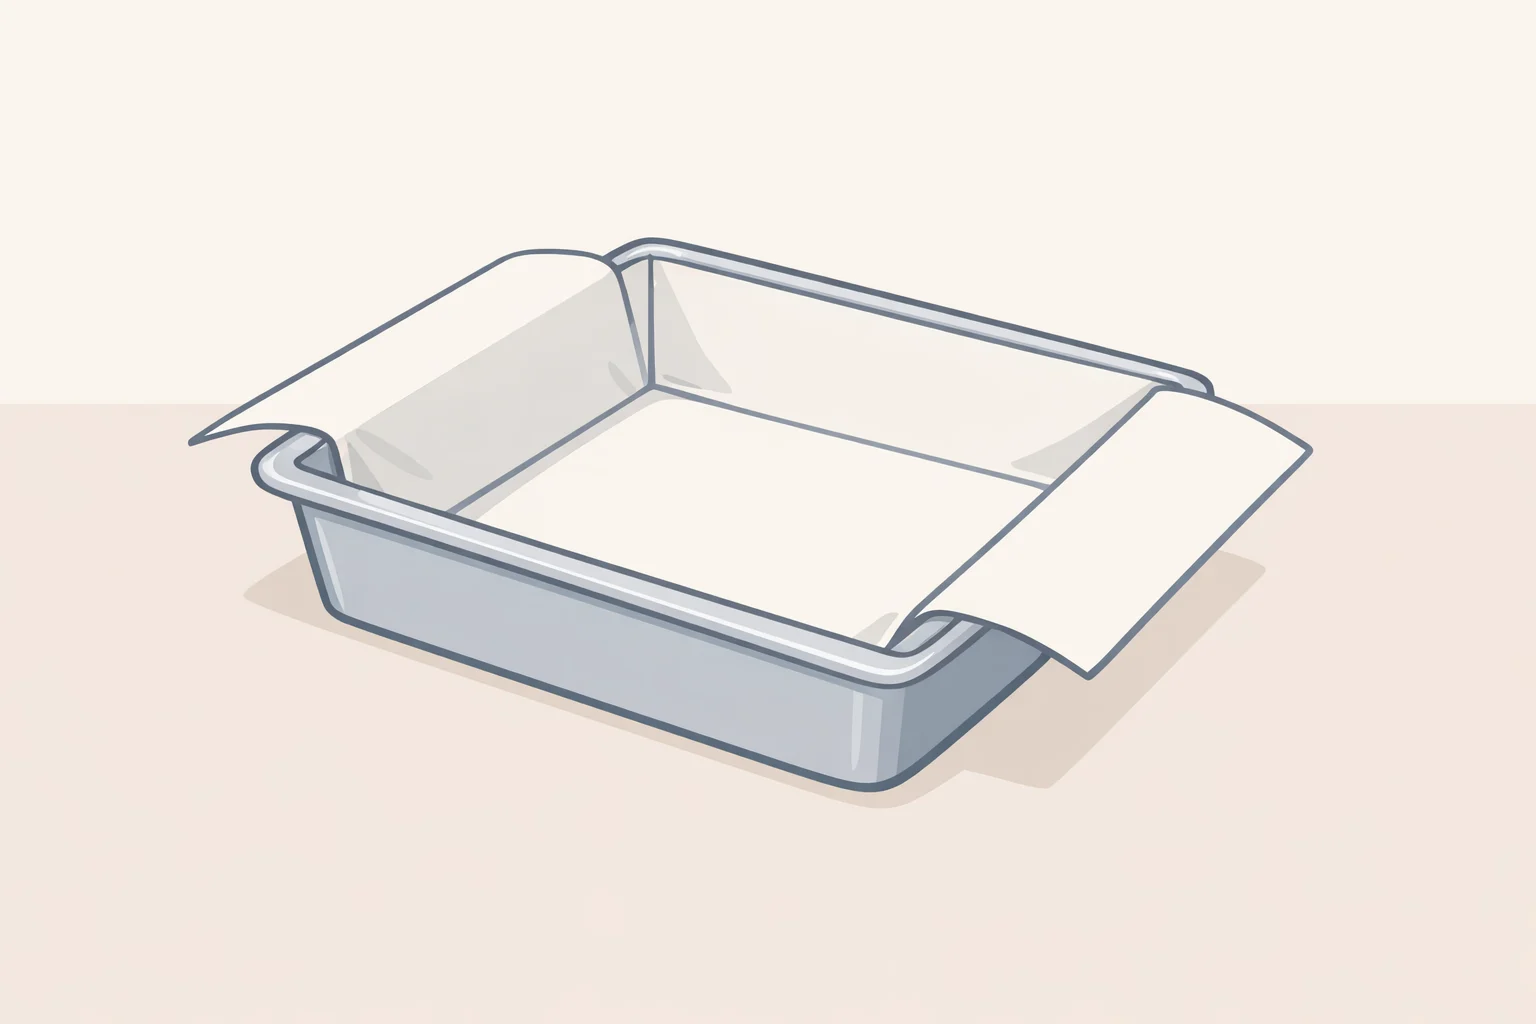
The crust and cream filling are identical regardless of which peach strategy you chose.
Step 1: Prep the pan. Line your baking dish with parchment paper, pressing it into the corners and leaving 2–3 inches of overhang on two opposite sides. For Methods A and C, use a 9x13 pan. For Methods B and D, use an 8x8 or 9x9. I Am Baker specifically warns against using a 9x13 for layered versions: bars come out too thin to hold their structure when cut. The parchment overhang lets you lift the whole slab out before slicing; 365 Days of Baking and More recommends this as the cleanest approach to cutting.
Step 2: Make and chill the crust. Combine 2 cups finely crushed graham cracker crumbs, 1 tablespoon sugar, and ½ cup melted unsalted butter until every crumb is coated. Press firmly into an even layer using the flat bottom of a measuring cup. Refrigerate 20–30 minutes while you prepare the filling. A cold crust holds its shape when you spread filling over it; a room-temperature one shifts. Easy Mom Recipes notes that pulsing crackers in a food processor produces finer crumbs that adhere better to the filling layer than hand-crushed ones do. Nilla wafers work as an alternative: 365 Days of Baking and More uses about 45 cookies (roughly 1½ cups crumbs) with 5 tablespoons of butter.
Step 3: Make the cream filling. Beat two 8-ounce blocks of room-temperature cream cheese with 1 cup powdered sugar and 1–2 teaspoons vanilla extract on medium speed until completely smooth and free of lumps. Fold in 2–3 cups of thawed whipped topping with a spatula. Fold, don't stir, to preserve the air in the mixture. Spread evenly over the cold crust, then move to your method's specific steps.
Method-specific assembly for easy no-bake peach bars
Method A: Pie filling. Spread both cans of peach pie filling evenly over the cream layer. Cover and refrigerate a minimum of 6 hours. Optionally, sprinkle reserved crust crumbs over the top before serving. Pre-thickened filling handles the moisture issue for you, which is the structural reason this version is the easiest to execute cleanly.
Method B: Gelatin topping. Arrange well-drained peach slices over the cream layer. Dissolve the peach gelatin in boiling water using the recipe's specified amounts, not the package instructions. 365 Days of Baking and More is explicit on this: the box ratio produces too soft a set for bars; that recipe calls for ¾ cup boiling water and ¾ cup cold water, which yields a firmer, sliceable layer. Stir in the cold water, then cool the mixture 15–20 minutes until slightly thickened but still pourable. Spoon gently over the peaches. Refrigerate overnight.
Method C: Dry gelatin in filling. Beat ¼ cup of dry peach gelatin powder into the cream cheese mixture before folding in Cool Whip. Add well-drained, diced fresh peaches and fold to combine. I Am Baker reserves some peaches to add just before serving rather than folding all of them in, which keeps the topping fresher. Spread over the crust. Refrigerate at least 4 hours.
Method D: Cooked glaze. Cook fresh peaches over medium heat for 5–7 minutes until softened. Stir in a cornstarch slurry and cook another 2 minutes until glossy and thick enough to coat the back of a spoon. Remove from heat and cool 5 minutes. Spread over the cream layer. Refrigerate at least 90 minutes. Easy Mom Recipes warns against a hard boil during cooking: it makes the glaze grainy.
Why no-bake peach dessert bars turn runny (and how to prevent it

)
Three failure modes account for most of the problems people run into. Each one is avoidable.
Failure 1: Wet peaches. This is the most common problem across all methods. Excess moisture from fruit migrates into the cream layer during chilling, leaving a watery pocket between the crust and filling. Ines Kohl treats thorough draining as a non-negotiable standalone step, not a passing instruction.
For canned peaches: drain in a colander, then spread on paper towels and press gently. For frozen peaches: dice while still partially frozen, thaw completely, then pat dry. I Am Baker and Easy Mom Recipes both flag this step explicitly. Fresh peaches carry the least residual moisture and require only peeling and slicing, about 3 cups for most recipes, per Ines Kohl. Method A sidesteps this problem entirely because pie filling is already thickened.
Failure 2: Gelatin handled at the wrong temperature (Method B only). Two distinct failure modes here that don't apply to the other methods. Too hot: pouring gelatin over the cream layer while it's still warm melts the whipped topping and collapses the layer. Ines Kohl makes this a standalone warning wait until the gelatin has cooled to slightly thickened but still pourable before touching the pan. Too cold: if the dissolved gelatin sits too long and begins to set, it can no longer be spread evenly. 365 Days of Baking and More notes that once the gelatin mixture has been refrigerated more than an hour, it hardens and can't be smoothed into a clean layer. Work during the pourable window, roughly 15–20 minutes after mixing in the cold water.
Failure 3: Cutting too early. Bars sliced while still soft crumble at the edges and lose their layered shape. Easy Mom Recipes identifies early cutting as the single most common mistake: the final chilling step cannot be skipped. The minimum chill times 4 hours for Method C, 6 or overnight for Methods A and B are structural requirements, not conservative estimates. They reflect how long the specific combination of cream, fruit, and gelatin actually takes to reach a sliceable consistency.
When ready to cut, lift the parchment slab from the pan. Run a large knife under hot water, wipe dry, and cut. Repeat between every slice. 365 Days of Baking and More recommends this hot-knife technique specifically for preserving clean edges through the cream layer.
Storage and serving
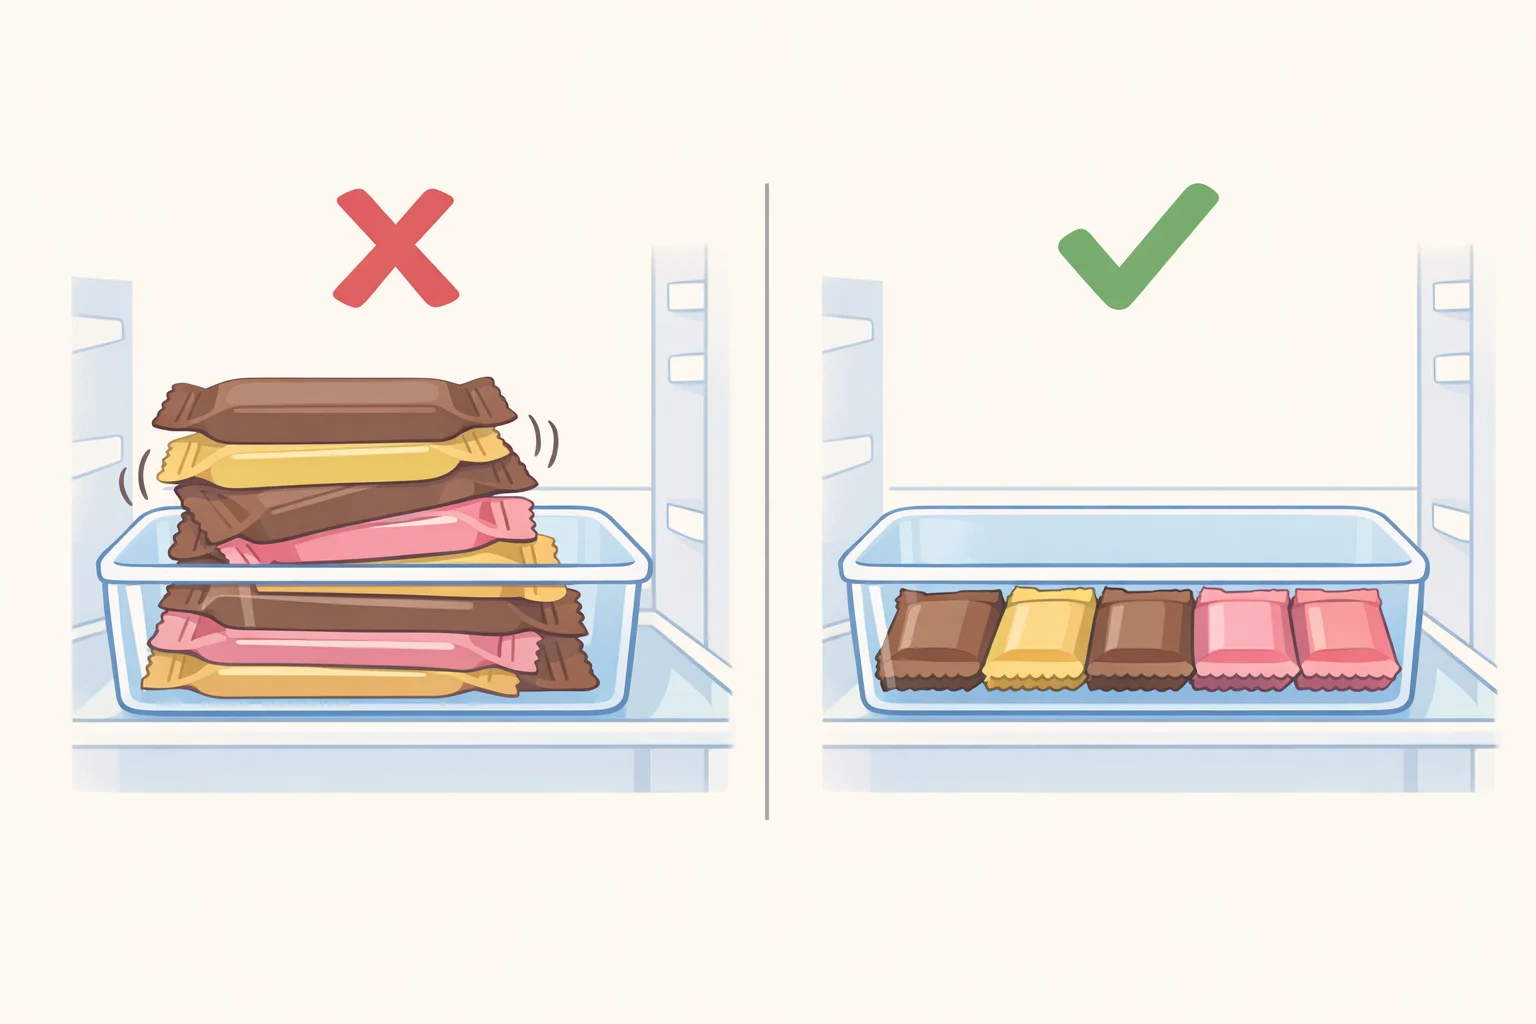
Refrigerator: Storage life varies slightly by method. The pie-filling version (Method A) keeps up to 5 days covered in the refrigerator, per Shugary Sweets. Most other versions keep about 4 days, per Ines Kohl, Easy Mom Recipes, and Spicy Southern Kitchen. Store bars in a single layer; stacking causes the topping to slide. They can sit out during serving for 30–45 minutes before going back in, per Ines Kohl. Add reserved peaches or extra whipped topping just before serving, not when assembling.
Make-ahead: Build the base through the cream layer step, cover, and refrigerate. Easy Mom Recipes says the base holds for up to three days un-glazed, which is useful if you want a fresh peach topping the day of serving.
Freezing: Method A can be frozen for up to 30 days, per Shugary Sweets. Method C also freezes well; Spicy Southern Kitchen reports individually wrapped bars keep for up to 2 months. Avoid freezing Method B. Ines Kohl notes the gelatin topping releases liquid and the cream layer changes texture after thawing. To serve frozen bars, thaw in the refrigerator for 2–3 hours, per Easy Mom Recipes.
What to do next
Two scenarios cover most situations.
If presentation matters clean layers, defined slices, something that looks assembled rather than spooned make Method B the night before. Overnight chilling is what produces that result, and the gelatin execution is manageable as long as you respect the temperature window and use the recipe's water ratios, not the box.
If you want a same-day pan with real peach flavor throughout every bite, Method C is the pick. Four hours in the refrigerator, no dissolved gelatin to time, and the whole thing freezes well if you end up with leftovers.
Either way: drain the fruit more aggressively than feels necessary, and don't cut early. Those two things account for most of the failures.