Crispy Baked Zucchini Fries: The Moisture-First Method
Most zucchini fries fail for one reason: they steam before they brown. The coating goes pale and soft, the flesh turns waterlogged, and the whole thing slides off the stick. Fix the moisture problem first, and everything else follows.
This guide walks through that fix step by step. By the end, you'll produce crispy baked zucchini fries with a panko-Parmesan crust from an oven or air fryer, no deep frying required. A single medium zucchini contains roughly 33 calories before any coating is added, per USDA data cited by Zare Flytrap, which makes these considerably lighter than their potato counterparts.
One expectation to set now: the interior will never replicate the dry, fluffy center of a potato fry. The outside can reach real crunch; the inside stays tender. That's a feature of the vegetable, not a flaw in the method.
Active time runs about 25 minutes, plus a 20 to 30 minute hands-off salting rest. Not a weeknight shortcut. Worth it anyway.
What you need before starting:
- 2–3 medium zucchini (about 8 oz each)
- Kosher salt, all-purpose flour, 3 eggs, panko breadcrumbs, finely grated Parmesan, garlic powder, dried oregano, black pepper, neutral oil or cooking spray
- Wire rack, rimmed baking sheet or air fryer basket, three shallow bowls, paper towels, clean kitchen towel
How to keep zucchini fries crispy: why moisture is the whole problem
Video of the Day
Zucchini is about 90% water, as Our Salty Kitchen notes. That single fact explains almost every soggy batch. The water doesn't disappear in the oven; it vaporizes, steams the breading from the inside, and prevents browning before anything else can go wrong.
The method below works in layers: remove internal water from the seedy core, draw out surface water with salt, protect coating adhesion by drying thoroughly, then prevent steam during cooking by spacing fries apart. Each step targets one of those four problems. Skip any one of them and the failure mode is predictable.
In one home kitchen test, Zare Flytrap found baked fries reached roughly 85% of the crispness of deep-fried ones. That's one tester's benchmark, not a controlled study, but it tracks with what the method produces: a crust that snaps, not just a coating that's technically there.
Video of the Day
The core method: four steps that all serve the same goal
Step 1: Cut uniform sticks and remove the seed cavity
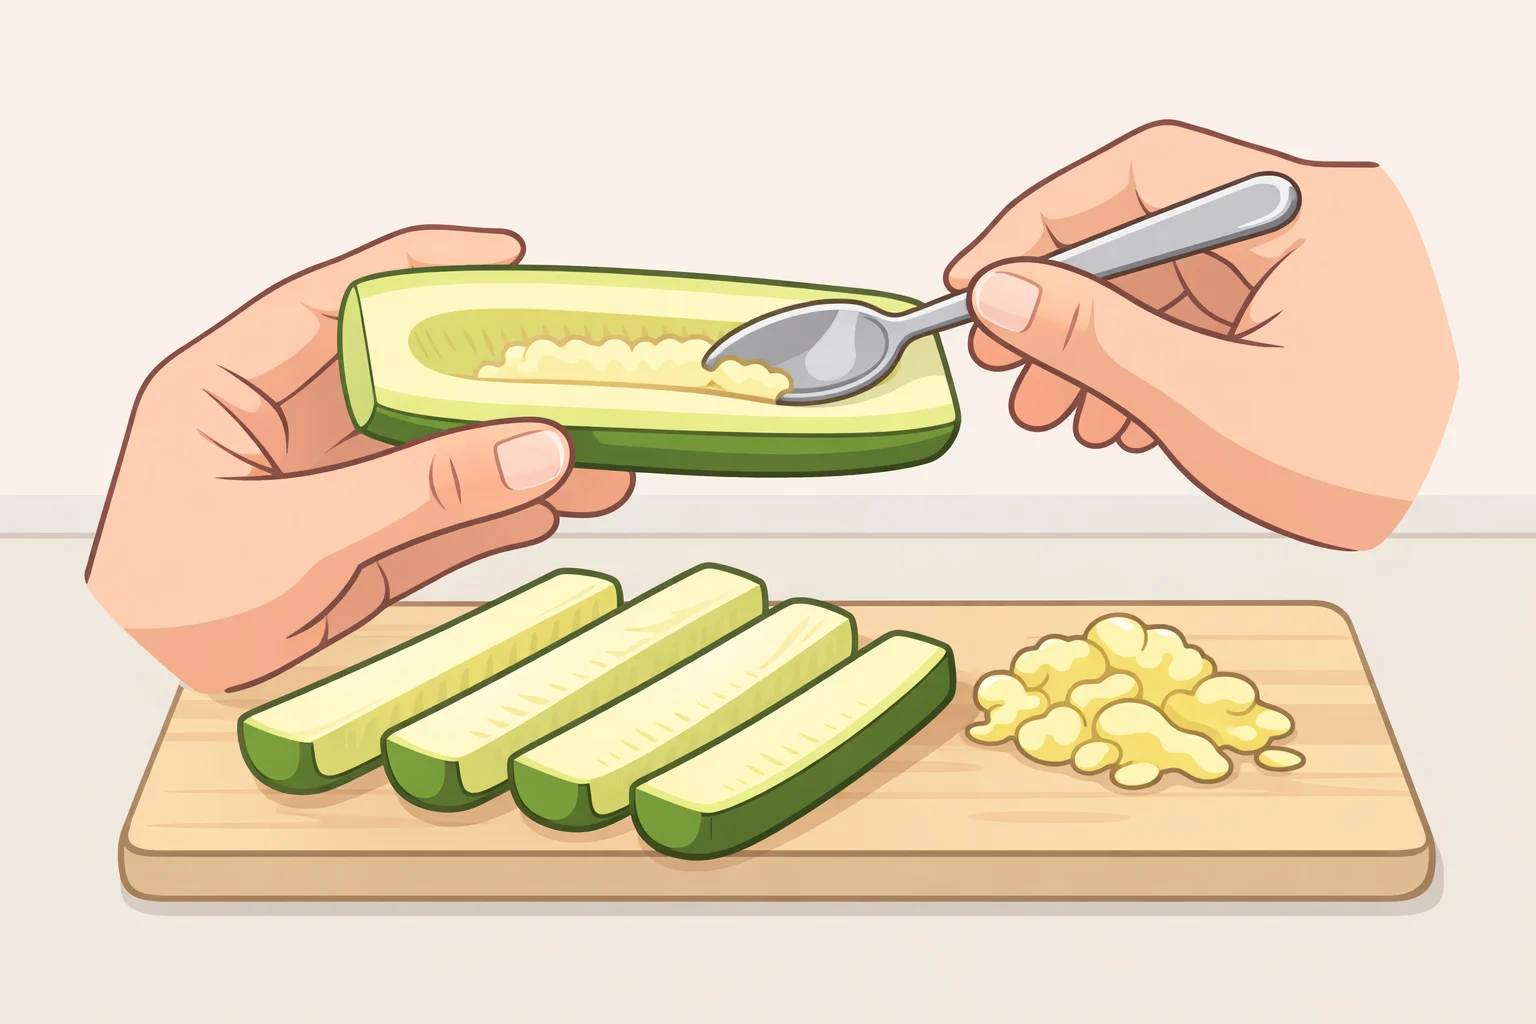
Trim both ends of each zucchini. Halve lengthwise, then cut each half into 3 to 4 sticks along the length, targeting ½ to ¾ inch thickness (Zare Flytrap). Uniform cuts matter practically: thin pieces overcook before the coating browns; thick ones stay raw in the center.
Next, use a vegetable peeler or paring knife to shave the soft, seedy inner strip from each stick. Serious Eats specifically recommends this step, noting that removing the watery inner seeds prevents sogginess during baking. Take only the pithy center, the pale, spongy portion, not the green flesh. What remains is denser, holds its shape, and releases far less moisture during cooking.
This is the most distinctive step in the method and one of the most consequential. Skipping it concentrates excess water exactly where it does the most damage: at the core of each fry, directly beneath the coating.
Checkpoint: Sticks should show a green border with a firm, pale interior. No soft white pulp should remain on the cut face.
Step 2: Salt, rest, and draw out surface moisture
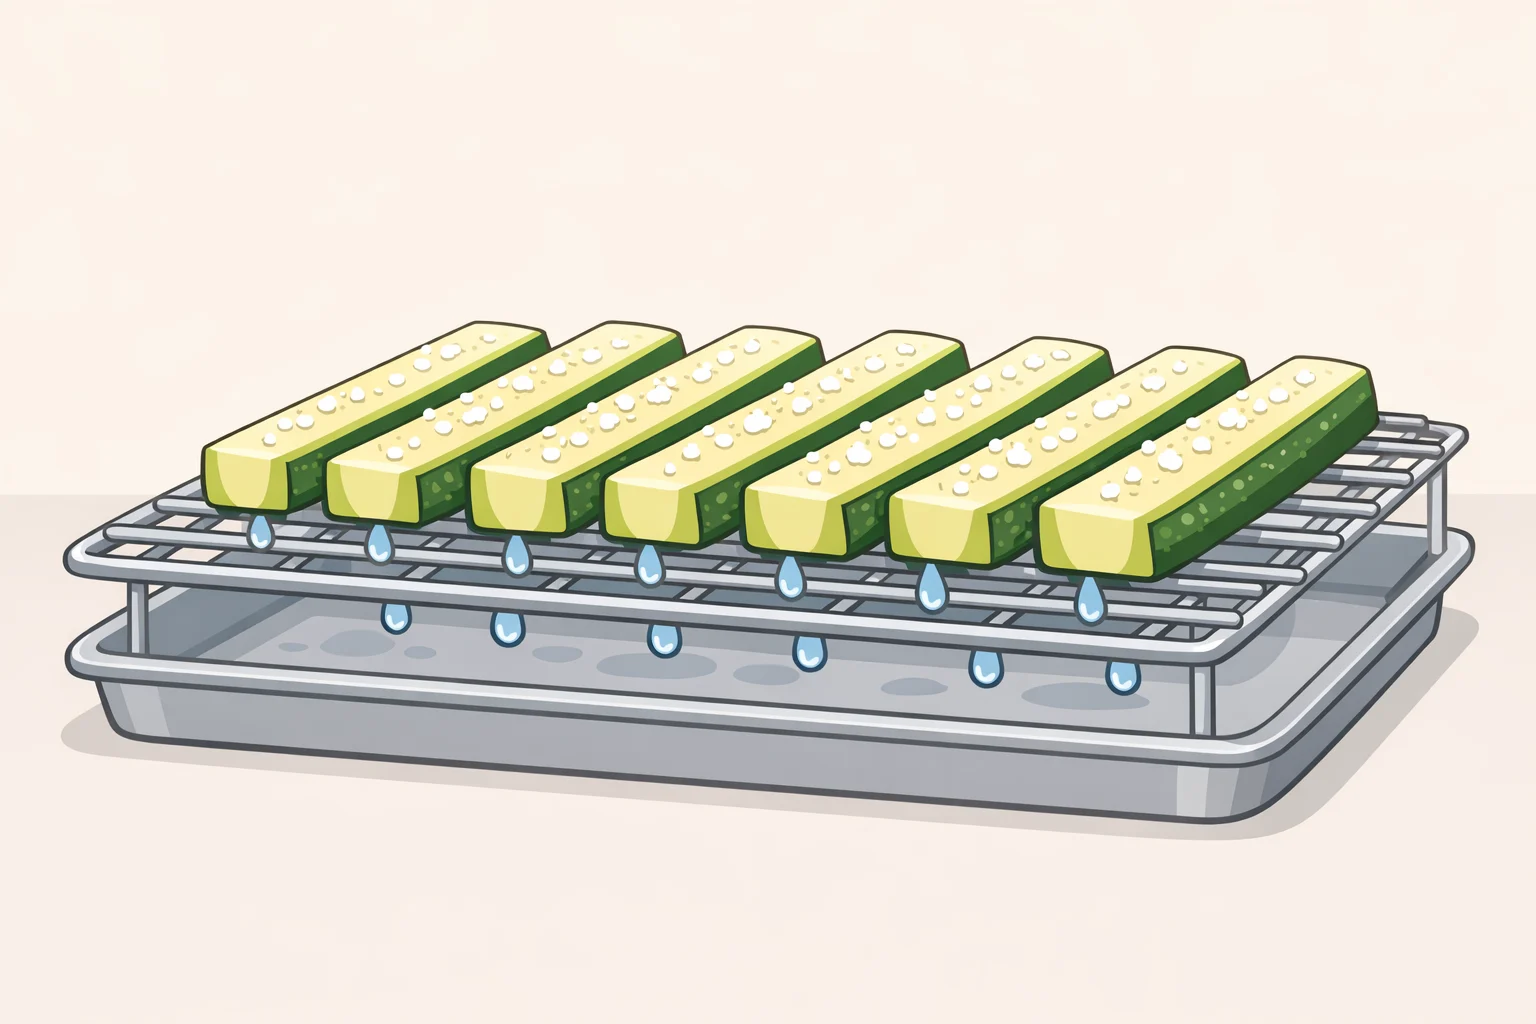
Spread sticks on a wire rack or in a colander. Use approximately 1 teaspoon of kosher salt per pound of whole zucchini, a more reliable ratio than measuring per piece since zucchini varies significantly in size (Serious Eats). Rest for about 20 to 30 minutes. Visible beads of liquid will collect on the surface.
That surface water is what causes zucchini to steam instead of brown. Drawing it out concentrates zucchini's mild flavor while enabling the browning that makes the crust worth eating, as Serious Eats explains. Twenty to 30 minutes is the right window. Less and you're leaving moisture in; much beyond 30 and the flesh begins to soften before it ever hits the oven.
Step 3: Dry thoroughly, oil the crumbs, and build the coating correctly
Blot salted sticks with paper towels, then press briefly in a clean dry kitchen towel (Zare Flytrap). Dry them more thoroughly than feels necessary. Surface moisture at this stage prevents the flour from bonding and causes the coating to lift during cooking.
Checkpoint: Before dredging, sticks should feel dry and slightly tacky, not wet or slick. If a paper towel pressed against the flesh comes away damp, keep blotting.
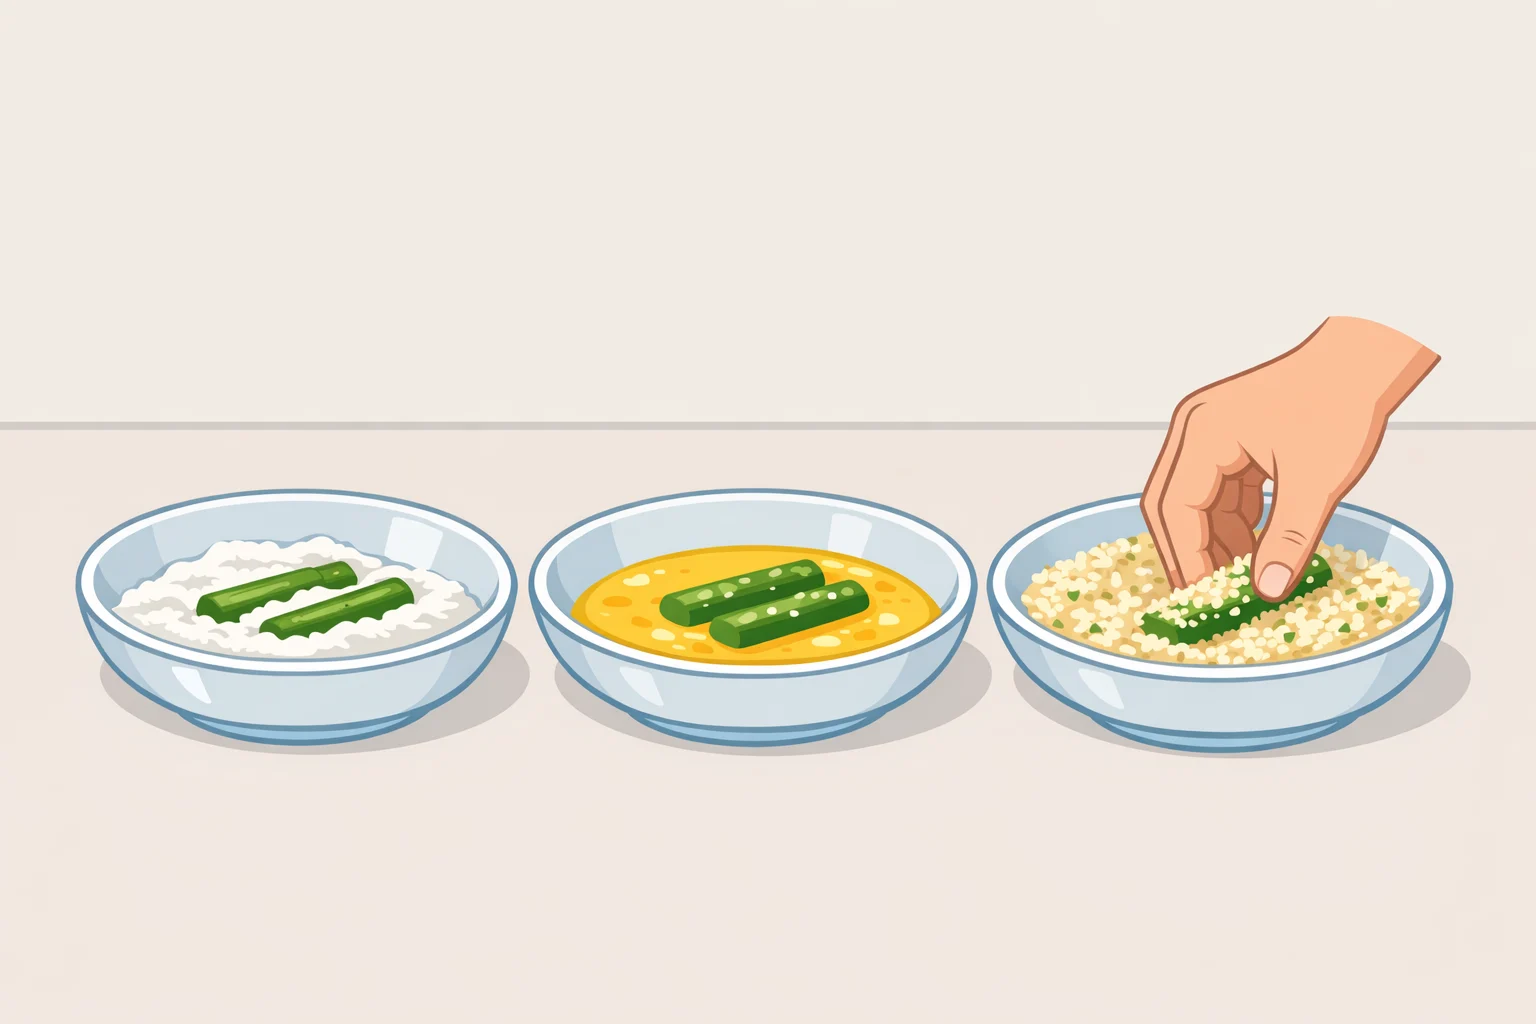
Set up three shallow bowls: flour with a pinch of salt; beaten eggs; panko combined with finely grated Parmesan, garlic powder, dried oregano, and black pepper. Bon Appétit uses 1½ cups panko to ¾ cup Parmesan, a ratio that produces a coating with real substance. Before dredging anything, mix 1 tablespoon of olive oil directly into the panko mixture (Serious Eats). Pre-oiled crumbs brown reliably within the oven's short cooking window; without the oil, the crumbs tend to stay pale no matter how long they're in. Crush the panko lightly by hand first a mix of coarse and fine particles creates more texture than uniform flakes.
Working a few sticks at a time: dredge in flour and shake off the excess, dip in egg and let the excess drip off, then press firmly into the panko. Pressing is not optional; loose coating separates during cooking (Bon Appétit). After coating, lightly spray or brush each stick with additional oil. This second application is distinct from the crumb pre-oiling and promotes even surface browning. Transfer finished sticks to a clean wire rack while you complete the batch.
Step 4: Cook with space and appropriate heat
Both oven and air fryer methods work, and the one you choose comes down to batch size. The oven handles larger quantities with less monitoring. The air fryer requires batching but delivers a crust with a bit more snap.
Spacing is where many otherwise careful cooks lose the batch. Fries that contact each other trap steam between their crusts and soften each other. This isn't a presentation consideration; it's active moisture management continuing through the cook. Give each stick clear room on all sides.
Oven and air fryer specifics follow in the next section.
Oven vs. air fryer zucchini fries: final execution and what to expect
Oven: for 3–4 servings at once
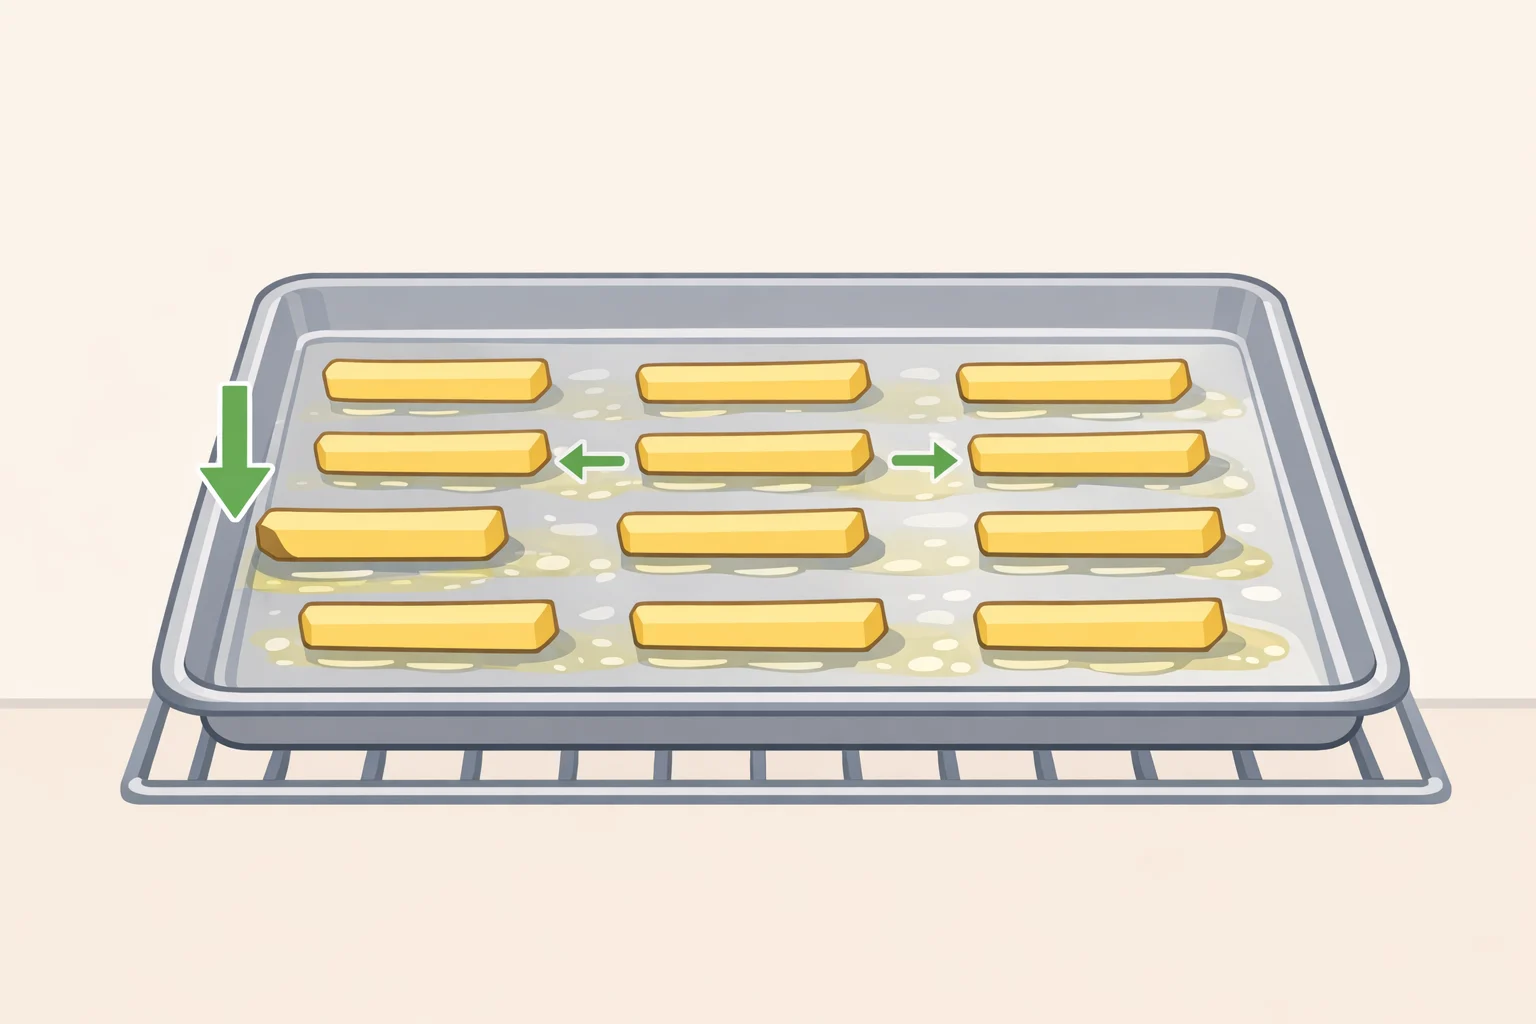
Place a rimmed baking sheet on a rack in the lower third of the oven. Preheat to 425°F with the pan inside. Once the oven reaches temperature, carefully pour a thin layer of neutral oil onto the hot sheet and tilt to coat. Arrange fries flat-side down with clear space between each stick.
A preheated, oiled pan is what separates a crust that snaps from one that's merely golden. Bon Appétit is explicit on this point: heating the baking sheet first, combined with a light coating of oil, is what produces the audible crunch. Zare Flytrap found a firm exterior and tender interior at 18 to 20 minutes at 425°F; build in a flip halfway through and check for deep amber color at the base before continuing.
Checkpoint at flip: The bottom should show deep golden color with darker edges. Uniformly pale or light-tan at this point means the pan wasn't hot enough or the crumbs weren't pre-oiled.
Air fryer: for 1–2 servings per batch
Heat to 400°F and spray the basket generously. Arrange sticks in a single uncrowded layer. Cook 6 to 8 minutes per side, spraying the exposed surface after each flip (Bon Appétit). Total per batch runs 12 to 14 minutes (The Nutrition Junky). Subsequent batches cook faster as the basket heats up, so reduce time by a minute or two and watch more closely.
Success benchmark for either method: The coating should be amber-brown, not golden-yellow. It should tap with an audible crackle and hold firmly to the flesh. Season lightly with salt the moment the fries come out of the oven or basket, and plan to serve within about 10 minutes. The crust softens as internal moisture redistributes after cooking, and that process is faster than most people expect.
Make-ahead note: Zucchini can be cut and de-seeded through Step 1 and refrigerated in an airtight container for up to two days before breading (Serious Eats). The feta-herb dip below keeps up to five days refrigerated, per Serious Eats. Make it during the salting rest.
Troubleshooting
Map each failure back to the step it came from:
- Coating is pale and soft: Crumbs weren't pre-oiled, the exterior wasn't sprayed before cooking, or the oven or basket wasn't fully preheated. Confirm temperature before the fries go in and don't skip the oil-in-panko step.
- Coating slides or falls off: The zucchini wasn't dry enough before dredging, or pressing was rushed. Wet flesh prevents the flour from bonding; dry harder, press each stick firmly into the panko.
- Fries are limp or wet inside: Seed cavity wasn't removed (Step 1), salting rest was too short (Step 2), or pieces were touching during cooking (Step 4). All three are moisture failures at different stages.
- Exterior browns before interior is done: Sticks were cut too thick. For ¾-inch sticks, add about two minutes to the cook time (Zare Flytrap).
Variations
The three-bowl dredge structure stays the same regardless of dietary preference; only the components change.
- Gluten-free: Certified gluten-free panko or finely crushed rice crackers; replace the flour dredge with a light coating of cornstarch (Zare Flytrap).
- Dairy-free, vegan, or lower-carb: Almond flour and nutritional yeast replace panko and Parmesan, with no egg wash required. The crust is denser but adheres well without the standard three-step dredge (The Nutrition Junky).
- Keto: Crushed pork rinds substitute for panko; browning is reliable, texture is denser (Zare Flytrap).
What to serve with them
Zucchini's mildness means a dip isn't optional, it's structural. Bon Appétit blends labneh or Greek yogurt with lemon zest, dill, parsley, and basil. Serious Eats takes a richer route: feta processed with yogurt, garlic, thyme, dill, lemon juice, and honey. The salt and acidity in the feta version do a lot of work against zucchini's neutral flavor. Make either during the salting rest; the feta-herb version keeps up to five days refrigerated.
Storage and reheating
Cool completely on a rack before storing. Trapped steam softens the crust within minutes, so don't shortcut this. Store loosely in an airtight container lined with paper towels for up to 3 to 4 days (Zare Flytrap). Reheat at 400°F on a wire rack for 6 to 8 minutes, or in an air fryer at 375°F for 3 to 4 minutes (Zare Flytrap). The microwave traps steam and reverses most of what the oven accomplished.
Freezing raw breaded fries is not recommended; ice crystals thaw into sogginess. To freeze, partially cook first, about 8 minutes in the oven, freeze in a single layer, then finish from frozen (Zare Flytrap).
Once you've run this method a couple of times, the same logic applies to any watery vegetable: eggplant, yellow squash, even thick-cut cucumber. Salt, dry, oil the crumbs, and give everything room to breathe. The specific vegetable changes; the moisture problem doesn't.