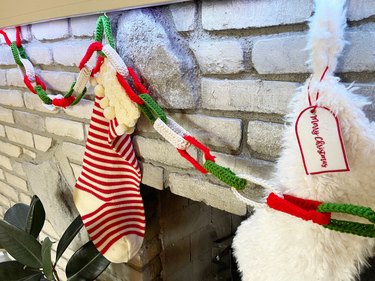
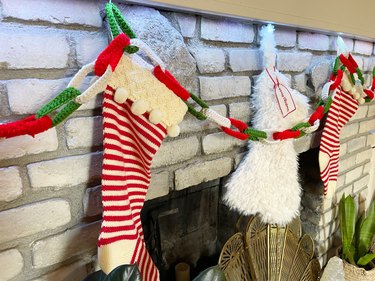
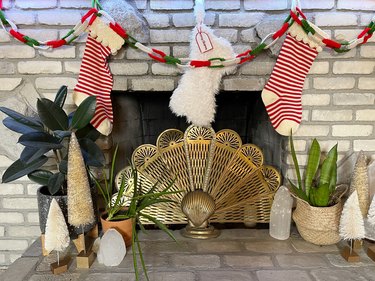
This holiday season, deck the halls—and the fireplace mantel!—with a festive cottagecore crochet chain garland. Inspired by paper chain garlands made during childhood, this crochet project puts a soft spin (goodbye, paper cuts!) on a classic Christmas decor item that dates back to the 19th century. The chain garland also provides a great use for scrap yarn, as it doesn't require a whole skein and looks fantastic with mixed and matched or solid colors.
Whether you choose to create a red, white and green Christmas garland or try a more minimalistic winter color theme, this DIY project can be made to match many holiday decor aesthetics. It also transcends Christmas and would make a fun and festive Hanukkah garland in blue, white and gold hues—or keep it in mind for Easter decor, when pastel shades would work best (psst: attach crochet bunny ears to white rings for an extra-special touch). On top of the project's potential for creativity, the technique used here is super simple, making it ideal for beginners.
Video of the Day
Video of the Day
So, let's get into the holiday spirit and make a festive crochet garland!
Things You'll Need
Big Twist Value Worsted Yarn in red, green and white (scrap yarn will also work for this project)
How to make a Crochet Chain Garland:
1. Create a "foundation chain"
The first step in this beginner crochet project is to create a foundation chain. The project calls for 31 chain loops, but you can add more loops for larger chain rings.
To create a foundation chain, make a slip knot and insert the hook into the loop—this will count as the first chain stitch. Pull the yarn tail through the loop to create a second chain stitch. Continue until the chain is 31 stitches long.
2. Add a row of double crochet stitches
Once the foundation chain is complete, yarn over (i.e., pull the yarn forward over the hook to create an extra stitch), flip the chain and insert the hook into the second chain stitch on the right to start a second row. For this row, add one double crochet stitch into each chain stitch until there is a total of 30 stitches across. (By skipping a chain stitch in the beginning, you lose a stitch but gain height on your row.)
To double crochet, yarn over and insert the hook into a chain stitch. Then, pull up a loop—there should be three loops on the hook at this point. Yarn over again and slip the yarn through the first two loops on the hook. Now, there are two loops left on the hook. Yarn over once more and pull the yarn through the two loops. This will create a double crochet stitch. Follow these steps until the entire row is complete.
3. Add a second row of double crochet stitches
Give the crochet strip—which will become one of the rings on the chain garland—some height by adding another row of double crochet stitches. To do this, create a single chain stitch, yarn over and flip the strip so that you can crochet from right to left. Insert the hook into the first chain (there's no skipping this time!) and pull up a loop. With three loops on the hook, yarn over and pull through two of the loops. This will leave two loops on the hook. Yarn over once more and pull through the last two loops to complete the first double crochet on the second row. Repeat this until all 30 stitches have a second row of double crochet stitches.
When you get to the end of the second row, cut the yarn (leaving a 3-in. tail) and make a slip knot by pulling the tail through the loop on the hook. You're left with the first crochet strip, aka the first ring in the chain.
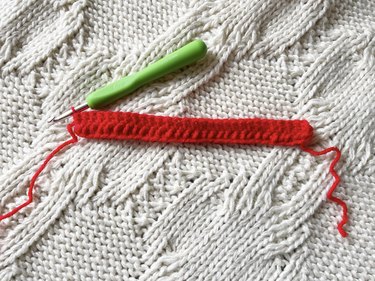
4. Make 37 crochet strips
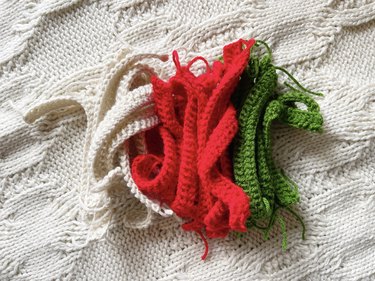
After getting the hang of things with the first strip, it's time to create 36 more for a total of 37. If you're opting for traditional Christmas colors, create 12 strips in white, 12 strips in green and 13 strips in red. The extra red strip ensures that both ends of the chain end in the same color. If you want the chain to end in green or white instead, make 13 strips of either color and 12 of the other two colors.
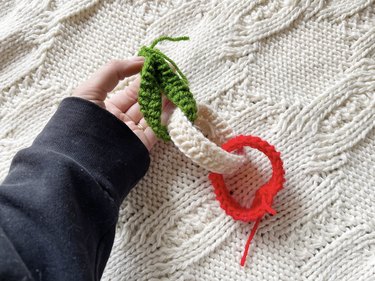
5. Sew strips together to form a chain
When all 37 strips are finished, it's time to attach them and create a granny-chic chain garland. To attach the first chain (red), fold it in half and use a yarn needle to sew the short edges together. Flip the chain right-side out (so that the sewn edges face the interior) and then take the next strip (white) and insert it into the red crochet ring. Fold the strip in half, stitch the short ends together and then flip it right-side out.
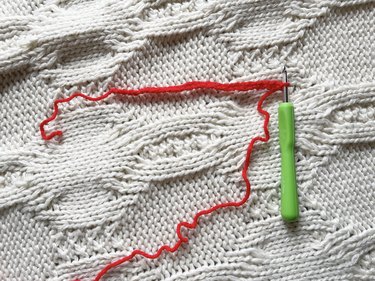
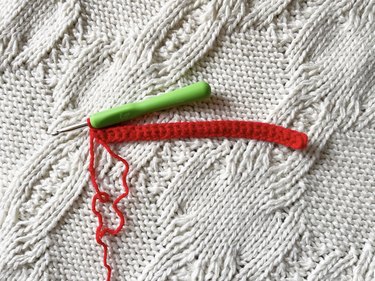
Tip
If you don’t want to flip the chains right-side out, try twisting the tops of the short ends (pictured above) and stitching the short ends together. Once stitched together, the seam will automatically face the interior.
Continue this process with the third strip (green) to create the alternating color pattern. Keep going until all 37 rings are attached to create a 109-in. garland. The beauty of this project is its potential for customization. For a longer garland, continue making and attaching strips until the desired length is achieved.
And just like that, you've created an easy and festive piece of homemade decor. Who knows? You might just find yourself creating a garland for every occasion!