We could go on and on about the wonders of gardening: It's good, low-key exercise that gets you out in the fresh air, it can help keep your grocery bills low and it can even help reduce your stress level. Mind you, you may find yourself feeling a bit stressed by midsummer when your garden abruptly hits full production mode and turns out fresh produce faster than you can keep up!
Video of the Day
Of course, in an ideal world, you'd have planned your garden to avoid being overwhelmed by your harvest. This isn't an ideal world, though, and many gardeners (especially novices) find themselves struggling to make use of everything that suddenly needs to be picked. You can only eat so many meals in a day, and most produce will last only so long after it's picked. So, your options are basically to a) preserve your harvest or b) waste a lot of food.
Video of the Day
You've already put in the money and effort to grow your garden, so it makes a lot more sense to preserve vegetables (and berries and other fruit and whatever else you grow) every way you can. Luckily, home food preservation is another engrossing and deeply satisfying hobby in itself, and it goes hand in hand with gardening.
We'll get into four preservation strategies for prolonging your harvest below. There's one thing to remember: The more preservation methods you use now, the more variety you'll enjoy in later months!
Tip
Beyond preserving or eating your harvest, there’s a third option. If you have a bigger harvest than you know what to do with, reach out to local food banks and charities. Fresh, healthy produce is something many organizations are chronically short of, and many will cheerfully accept your garden’s overproduction.
Method 1: Dehydrating
Drying food is perhaps the oldest form of preservation there is, and there's absolutely still a place for it in the modern cook's arsenal. A lot of what you grow in your vegetable garden lends itself to dehydration, including peas and beans; root vegetables, such as beets and carrots; tomatoes; sweet bell peppers and most herbs. A good rule of thumb is to ask yourself if you've ever seen that vegetable sold in dried form. If so, give it a shot!
Slice your vegetables thinly and evenly if they're large and then blanch them in boiling water to deactivate their natural spoilage enzymes. (Don't do this with herbs.) You don't need a dehydrator to dry your foods, though of course it's a great convenience.

Otherwise, you can dry most herbs and veggies on trays at a very low oven temperature, or herbs can simply be hung in bunches in a breezy, shaded spot and left to air dry. Vegetables are ready to store once they're leathery and pliable. They can be packed into airtight containers, Mason jars or zipper-seal bags. Vacuum sealing is even better if you own (or can borrow) a sealer.
Drying your veggies largely preserves your foods' nutritional value. You'll lose some vitamin A and most of the vitamin C, but your foods will otherwise hold up well. They'll need to be rehydrated as they cook, so they're ideal for use in soups, stews and casseroles. For other uses, you'll need to rehydrate vegetables in some cold water before adding them to your recipe. (The soaking water retains some nutrients, so plan to use it!)
Before we move on, let's review the benefits and drawbacks of dehydrating:
Dehydrating Pros:
- Food retains much of its nutrition
- Dried foods take up very little storage space
- Dried foods aren't reliant on electricity, so they remain food-safe in the event of a power outage
Dehydrating Cons:
- Alters the texture of foods
- Loss of vitamins C and A
Recommended for: Root vegetables, fruit and berries, tomatoes, peppers, most herbs, fruit and vegetable purees (to make leathers)
Not recommended for: Some vegetables (e.g., broccoli and cauliflower) have an unpleasant texture when dried, and some herbs (e.g., cilantro and, to a lesser extent, dill) lose their distinctive flavor.
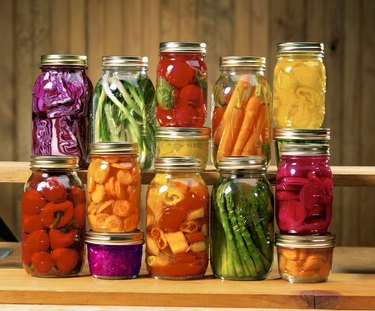
Method 2: Pickling
There are two ways to pickle fresh vegetables. One is to immerse them in a salty brine where beneficial microorganisms will ferment their juices, converting them slowly to vinegar. This kind of old-school fermentation process takes time, but the resulting vegetables (and their brine) are thought to have beneficial effects on your gut health.
Quick pickles cut out the middleman, so to speak, and simply require pouring a hot, vinegar-based brine over your vegetables. Some quick pickles are ready to eat in just a couple of hours; others are ready in a few days or a week. They'll keep for a month or so in the fridge, or you can process them through water-bath canning and keep them in the pantry for many months. Whichever method you use, choose a recipe from a reliable source (the National Center for Home Food Preservation is a good starting point) and follow it closely. Canned or naturally fermented pickles should be stored in a cool, dry place out of direct sunlight.
Cucumbers are the default option for pickling, but many other vegetables pickle beautifully. It's one way to keep up on your surplus (small) zucchini, for example. Quick-pickled onions, radishes and shredded carrots can add flavor and crunch to your salads, wraps and sandwiches as early as the same day. Pickled ginger and radish are staples in some Asian cuisines, while pickled, sliced turnips (often with beet added for color) are equally common in the Middle East. (And let's not forget kimchi or sauerkraut while we're discussing staples.) Almost any other vegetables you grow—beans, asparagus, okra, peppers, you name it—is suitable for pickling or turning into a relish or chutney.
Pickling preserves your vegetables' nutrients pretty well, though if you subsequently can them, you'll get a small degree of nutrient loss (a fair trade-off for the added shelf life). Naturally fermented pickles may have additional health benefits as well. The only downside with pickling is the high level of sodium your foods will contain, which can be a health concern.
So, to recap, here are the benefits and drawbacks of pickling:
Pickling Pros:
- Food retains much of its nutrition
- Can last for many months if canned or a month or so in the fridge without canning
Pickling Cons:
- Mason jars and lids are bulky, heavy and a definite expense
- High level of sodium
- Potential for spoilage,if you don't follow the recipe closely and maintain a high level of cleanliness
Recommended for: Zucchini, cucumbers, cabbage, cauliflower, beets, beans, asparagus and most fresh vegetables in general. You can also pickle watermelon rinds and many firm fruits.
Not recommended for: Delicate, leafy greens aren't an easy option, but otherwise, feel free to try just about anything.
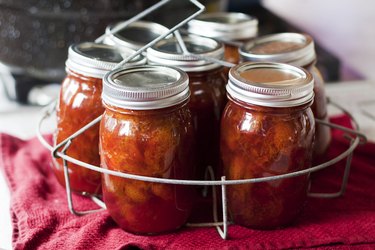
Method 3: Canning
When you think of preserving your garden's bounty for the winter, canning may be the first thing that pops into your head. Many of us remember our grandmothers pulling steaming loads of canning jars out of a water-bath canner, and those are just as useful now as they were in her day. The important thing to remember is that a water-bath canner can be safely used only for foods that contain a certain amount of acidity (making it a great companion method for pickling), and vegetables don't measure up. They're classed as low-acid foods, which means you'll need to use a pressure canner to safely preserve them. Even then, you'll need to closely follow canning directions from a reputable source, such as your local extension service, to minimize the risk of botulism.
Tip
Tomatoes can be canned safely in a water-bath canner, but you’ll need to boost their acidity with citric acid, lemon juice or vinegar before you process them.
Home canning is a really versatile option, but there's no way to overstate that it really is a Production with a capital "P." First, you'll need to harvest your vegetables at their peak of quality and then peel or prepare them as necessary. Second, you'll need to blanch them briefly in boiling water (which stops the spoilage enzymes) and shock them by plunging them into ice water, which prevents your veggies from overcooking. Next, you'll pack everything into jars, top them up with a suitable liquid as spelled out in your recipe and then—and only then—lower them into your prepared canner. You'll be coping with a large and heavy pot full of water and jars, you'll need specialized implements to lift the hot jars out of the canner and you'll also be sweltering in a hot and steamy environment at the very time of year when your weather is already likely to be hot and steamy.
The payoff is beautiful rows of jars lined up on the shelves in your pantry, where they'll store safely for up to a year at a cool room temperature. Keep them out of direct sunlight; a cool, dry, well-ventilated place is best. Canning does cause the loss of some heat-sensitive nutrients, notably vitamins A and C, and the texture of the finished vegetables can be softer than you might prefer.
Here's a quick recap of canning as a preservation method.
Canning Pros:
- A versatile storage option that works for many foods
- Long storage life without the need for electricity
Canning Cons:
- Mason jars are bulky and heavy, and the jars and lids (and especially the pressure canner) represent a significant initial investment
- Not suitable for all foods, even if you're pressure canning
- Canning is a lot of hot, sweaty work and may require more effort than you realize
- Potential for botulism or spoilage if you don't follow directions
Recommended for: Asparagus, peas and beans, green beans, most root vegetables (diced or sliced), winter squashes (diced or sliced), peppers, greens, tomatoes or tomatillos and prepared soups or sauces made from those or similar ingredients
Not recommended for: Summer squashes and dense vegetable purees, such as pureed pumpkin or winter squash
Method 4: Freezing
The simplest way to preserve your harvest (or your farmers' market haul) is through freezing. Freezing largely preserves your food's fresh flavor, texture and color, and it's the quickest of the four main preservation methods we've looked at. Once again, you'll want to blanch and shock your vegetables for the best storage life and then drain them thoroughly. Afterward, you can pack them into airtight containers or, better yet, freezer bags for long-term storage. With frozen foods, air is the enemy of quality, so you'll want to minimize your food's exposure to it. In containers, that might mean pressing a piece of plastic film to the surface of your food before freezing. In bags, it means squeezing out as much air as possible before sealing them.
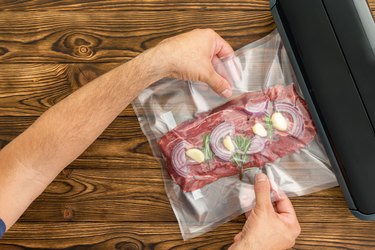
You can up your freezing game by inserting a straw into the corner of a freezer bag's opening, tightening the bag around it, and then sucking out as much air as possible before removing the straw and sealing the bag. Better yet, use a vacuum food sealer. If the bag is tightly sealed, your food will remain food-safe essentially forever, though over time, the quality will deteriorate. That's especially true in a refrigerator's freezer compartment, which lacks the extreme cold of a standalone freezer, or in a self-defrosting freezer, which will periodically cycle through warmer and colder temperatures. Although freezing maintains your vegetables' nutritive value largely intact, you'll see some loss of nutrients due to the blanching process.
Tip
A bag of individual peas, beans and other small items or diced-up larger vegetables is much more useful than a large “brick” that needs to be thawed and used all at once. To enjoy that supermarket-style convenience, spread your veggies in a single layer on a baking sheet and freeze them this way. Once they’re frozen, move them to a bag and seal it as well as possible. As long as the bag doesn’t thaw and refreeze, you’ll be able to remove whatever quantity you want.
Here's a quick look at the pros and cons of freezing:
Pros:
- Preserves the fresh quality of most foods better than alternative methods
- Relatively quick and easy with minimal equipment required
- Storage life can be a year or more if vacuum-sealed
Cons:
- Quality will deteriorate in as little as a month or two if the food isn't airtight when sealed
- Dependent on electricity, so an extended outage can cost you much of your carefully stored food
- Organizing your freezer effectively can be a challenge, meaning food can easily become "lost" until it is past its prime
Recommended for: Most vegetables, fresh herbs (when processed appropriately)
Not recommended for: Uncooked potatoes, salad greens
Tip
Freezing is a useful technique for preserving your surplus herbs, especially those that don’t dry well. Puree them in a blender or food processor with just enough oil to coat them and then pack them into zipper-seal bags and squeeze out any excess air. When you want the fresh flavor of dill, cilantro or some other herb, simply open the bag, break off a piece and return the rest to your freezer.
Some notes on planning...
If you're new to gardening, it's genuinely shocking how productive even a small space can be. That's especially true if you've been too enthusiastic in planting heavy producers, like tomatoes, zucchini and cucumbers. Keeping up with your harvest require a serious effort, one you might not have been entirely prepared for. The good news is that it doesn't have to be that way. This winter, as you pore over your seed catalogs and dream of spring, you can minimize the stress of next year's harvest with a bit of advance planning.
How? A few examples include:
- Planting early, midseason and late-season versions of your favorites. If you're a fiend for green beans, for example, you might find an early bush bean that matures in 50 days, a midseason pole bean that's ready to go in 65 to 70 days, and a long-season runner bean that could go to 90 or 100 days.
- Trying succession planting. This simply means planting your favorites repeatedly at two- to three-week intervals rather than all at once. It's an especially good option for things like peas, which tend to produce heavily but briefly, or herbs that quickly run to seed, such as dill and cilantro.
- Choosing indeterminate tomatoes rather than determinate varieties. Determinate tomatoes produce a whole bunch of fruit all at once and then stop. Indeterminate varieties continue to bear all season until the frost kills them, which gives you a steady flow of tomatoes instead of a sudden glut. If your season is long enough to grow indeterminate varieties reliably (early yielding, short-season tomatoes are usually determinate varieties), you may find this easier to cope with.
- Staggering your heavy producers so they aren't hitting you at the same time. If you got buried in beans and tomatoes at the same time, for example, you can change the planting time of one crop (or pick a variety with a different number of days to maturity) so it doesn't coincide with the other.
- Thinking strategically in the garden. If you garden in a short-season area and face time constraints for your gardening season, using cold frames, row covers or a small greenhouse can help you start earlier and harvest later, helping shorten the overlap between different harvests.
Having this year's experience to draw upon will help you be better prepared for next year's harvest, even if you do nothing differently in your garden. Making use of one or more of these techniques so the harvest isn't ALL HAPPENING RIGHT NOW AT ONCE will help even more. Remember that having food put away for the winter is a good thing, but you shouldn't let it stress you unnecessarily.