Most gardeners would agree that growing things is a remarkably satisfying hobby, but it would probably be just as good (or more so) if it involved a bit less hard work. Digging over your beds every year requires a significant investment in sweat and labor, and creating new beds from untouched turf requires even more. That's part of the reason why many gardeners have come to embrace no-till gardening. While it does require some effort to start a no-till garden, it takes progressively less work as the years pass.
Video of the Day
What is No-Till Gardening?
The idea underlying no-till gardening is very simple: by building your beds up, instead of digging down, you create a more welcoming environment for your garden plants yet simultaneously discourage weeds. Weeds are resilient because they're designed to bide their time and survive in the soil – sometimes for years – until favorable growth conditions arrive. Those usually include exposure to the air and sunlight, and a suitable degree of moisture.
Video of the Day
So what happens when you dig over your bed in spring? Why, you provide exactly those conditions! Any weed seeds that have been dormant in the soil suddenly receive oxygen and warm sunshine, right along with the spring rains, and they'll take advantage of this bonanza to spring up healthy and thick right in your garden. No-till gardening deprives them of this, by 1) not tilling the soil to begin with; and 2) piling on mulches and other organic material to bury the weed seeds (and any stray surviving weeds) ever more deeply.
The Advantages of No-Till Gardening
There's a lot to like about no-till gardening. Most obviously, once your no-till garden is up and running it requires much less maintenance than a conventional garden. One of its earliest popularizers, Ruth Stout, was already well into her 60s when her books on no-till gardening – and her own eccentric charisma – made her a hero to the counterculture movement of the 1960s. She bragged of feeding herself, her husband and many of the neighbors from her own garden, while barely breaking a sweat and putting in minimal amounts of work.
On a practical level, no-till gardening resolves many gardening problems at a stroke. Got poor, stony soil? Heavy clay and poor drainage? Intractable stands of resilient weeds? No-till gardening can put them all behind you. The quality of your existing soil, and its current weed population, don't matter when you're building new soil literally from the ground up. The new soil, with its high levels of organic material, will also provide a nurturing environment for the worms, insects, fungi and and microorganisms that give healthy soil its diversity and vitality.
Starting a No-Till Garden
There are several ways to approach no-till gardening, depending on your goals, the size of your garden and the quality of your existing soil. The most challenging scenario begins with marginal soil or unbroken ground, with the soil you build providing most of the nutrients. The steps listed here start from that assumption, though they're broadly applicable to most gardens (you get to do a few things differently if your soil is already okay).
Tip
A no-till garden can be started in spring or fall. The instructions here assume a spring start, but you can begin the cycle at the end of your gardening season just as easily.
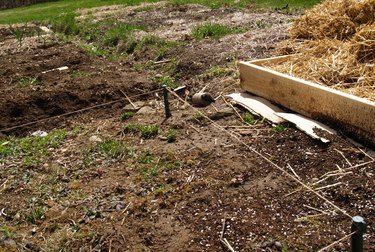
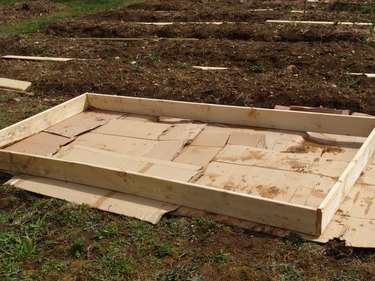
1. Lay Out Your Beds
Mark out the area you'll use for your bed or beds. For a rectangular bed (or a full-sized plot containing several beds), drive pegs at the corners and connect them with twine to mark the borders of your garden. Alternatively, snap a chalk line. For oblong or irregularly shaped beds (usually flower or herb beds), use a length of flexible material such as heavy twine, rope, or even your garden hose to mark the outline.
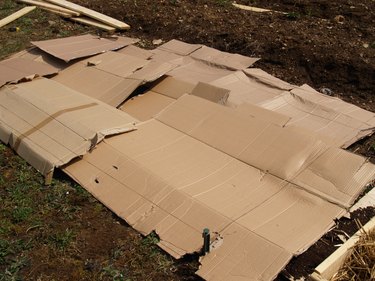
2. Set Down Your Weed Barrier
Lay down corrugated cardboard, or four to eight layers of newspaper, to act as a barrier and smother out weeds. Newspapers are the easier option for irregularly shaped beds, because they can simply be folded to fit whereas cardboard must be cut or torn. For square or rectangular gardens, cardboard can be simpler. Be sure to overlap the sheets of cardboard so weeds can't grow up between them.
Tip
Use only plain black-and-white newspapers, or ordinary corrugated cardboard. The colored inks on sales flyers, cereal boxes and other forms of paper and cardboard contain chemicals that may be toxic in a vegetable garden.
If you start in autumn, or very early in the spring, you can use a tarp or a sheet of heavy plastic to smother the weeds. It will need to remain in place for at least eight weeks, then be taken up before you plant your garden.
3. Measure and Allocate the Available Space
Measure your beds and walkways. You'll need 18 to 24 inches between beds so you'll have room to plant, weed and harvest. The beds themselves can be any width up to 48 inches (any wider and you won't be able to reach the middle of the bed).
Tip
If you have a limited space, work backwards from that to decide the size and spacing of your beds. If you have a large plot available, decide on the size and spacing of your beds beforehand and mark out a big enough area to accommodate them.

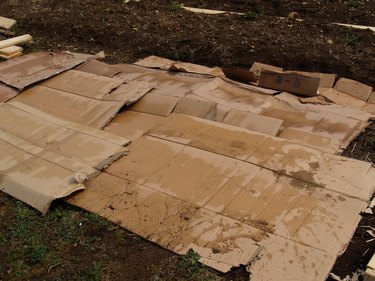
4. Soak the Weed Barrier
Moisten the weed barrier thoroughly with a hose or watering can. This helps begin the process of breaking it down, so roots can penetrate. You can skip this step if you start the bed in fall, because the winter weather will do that for you.
5. Frame the Bed (Optional)
Frame the beds with any suitable material you have available, from lumber to bricks or concrete blocks to the stones you've laboriously removed from the soil during previous gardening seasons. This step is optional but it makes for a neater appearance, and it keeps wind and rain (and pets and kids) from scattering your bedding materials.
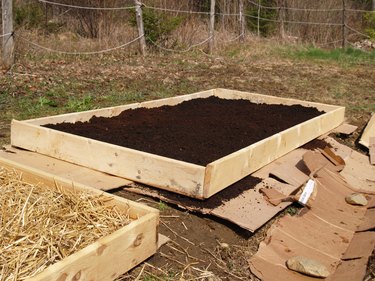
6. Lay Down a Layer of Soil or Compost (Optional)
Set down a layer of new topsoil, well-aged compost or a mixture of compost and soil over the barrier in each bed. You'll need to buy your topsoil from a reputable supplier who's willing to warrant that it's weed-free, otherwise you'll be playing whack-a-mole with the weeds again for the first year or two. You'll need at least 4 to 8 inches of soil and ideally more, depending what you can budget for.
Tip
This step is only necessary if your existing soil is so poor, thin or stony that it's of little or no use to your plants. Otherwise you can skip it and go on to the next step.
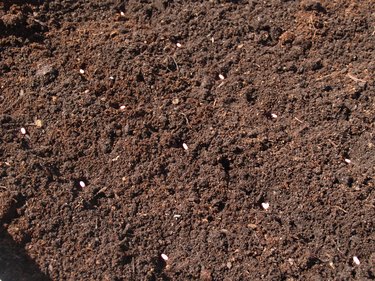
7. Plant Your Garden
Plant your garden. If your soil is good and you're planting through the weed barrier, cut a small hole in the paper or cardboard for each seed or transplant. If you're planting into new soil on top of the weed barrier, simply plant the seeds or transplants normally.
Tip
If you're building new soil from the ground up, avoid deep-growing root crops such as carrots and turnips for the first few years. Potatoes can still work, because you'll "hill" them by piling additional soil or mulch over the spuds as they grow.
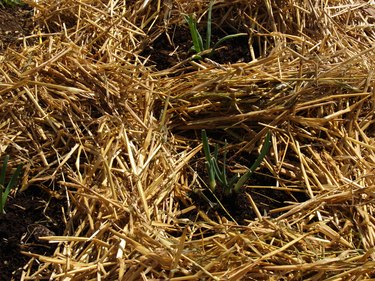
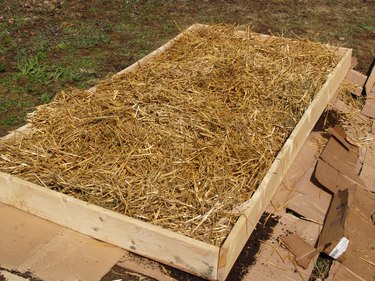
8. Apply Your Mulch of Choice
Apply mulch once the overnight temperatures (and soil) are warm enough for your plants to grow happily, usually at least in the range of 50 to 60 degrees Fahrenheit (applying the mulch too early keeps your soil cold). Spoiled hay, grass clippings, shredded leaves, straw, fine sawdust, shredded paper and well-aged compost are all suitable choices, and you may have others available that are specific to your local area. Depending on the material, you'll typically need 4 to 8 inches of mulch to suppress weeds and retain moisture.
Tip
Don't apply mulch right up to your plants. Leave an open area at least 2-4 inches in diameter around the plants, so they're not physically in contact with the mulch. Despite its many benefits mulch can trap moisture against the plants' stems or leaves (increasing the risk of disease) or provide a handy bridge for insect pests to reach your plants.

Things You'll Need
Chalk line (optional)
Corrugated cardboard or newspapers
Lumber and nails (optional)
Hose or watering can
Topsoil (optional)
Aged compost
Straw, shredded leaves or other mulches
End-of-Season Maintenance and Preparation
At this point you've laid the (literal) groundwork for your no-till garden. Your plants have a weed barrier below them to smother entrenched competitors, and a layer of mulch above them to discourage any random weeds that manage to come along. You can simply go ahead and garden normally until autumn. That's when you'll begin to prepare your new no-till beds for the following season.
Start at harvest, by cutting down your spent plants at ground level rather than pulling them up by the roots. Their roots add organic material to the soil, and help keep it aerated, so they're valuable right where they are (unless the plants were diseased, in which case they've got to go). Now, top the beds with a layer of fresh mulch. This will break down over the course of the winter, contributing to the formation of new soil. It's also an insulating layer, delaying the moment when your soil's population of worms, insects and microorganisms is forced into (relative) dormancy by the cold.
Tip
It's important to not grow closely-related crops - tomatoes, peppers and potatoes; or cabbage, collards and broccoli, for example - in the same beds year after year, lest pests and disease become established. That's especially crucial if you're leaving the roots in the soil. Instead, rotate your crops so it's at least three years before they're back to the same bed.
Continuing Your No-Till Garden
When gardening season rolls around again in spring, you'll have notably less work to do: simply dig down into last year's compost and the underlying soil for your transplants (how deep you go depends on the size of the pot you're transplanting from; the soil from the pot should be level with the soil in the bed once you're done). If you're planting from seed, pull aside the mulch and plant into the underlying soil. Alternatively make hollows in the mulch at the correct spacing, add a trowel of soil to each hollow, and plant your seeds in those.
Once your plants are established, top-dress the beds with well-aged compost or manure, pull any visible weeds, and then add a new layer of mulch. Again, it should be at least 4 to 8 inches deep to deter weeds (a few weed seeds will inevitably land in your beds each year). Repeat this cycle of spring and fall mulching (with occasional top-ups as needed; some mulches will break down more quickly than others), and top-dressing with mature compost or manure, every year. The decomposing mulches will break down to create soil that's crumbly, aerated and high in organic material, while the compost and/or manure provides additional nutrients to keep the soil rich and productive.
Variations on No-Till Gardening
There are a number of variations on no-till gardening. If your soil is already good, for example, you don't need to add a layer of soil or compost at the very beginning. A couple of specific variations on the theme include:
Bagged Soil Gardening: This can give you an "instant garden" even on poor soil, or a quick start on a conventional no-till garden. Simply lay bags of ready-to-use topsoil over the area where you want your garden, cut the top surface away from the bags, and use an awl or screwdriver to poke 10 or 12 holes through the bag's underside. Plant directly in the soil, then - after harvest - slide the bag out from under and leave the soil in place. If you're using this method to start a conventional no-till garden, apply cardboard or newspapers to the ground before placing your bags. That way, when you slide the bag out at the end of the season, there's still a weed barrier in place.
This technique works best for modestly-sized plants: there's not enough depth of soil for most root crops, and a bag of soil won't support sprawling, heavy-feeding crops like pumpkins or melons.
Straw-Bale Gardening: Straw is one of the most commonly-used mulches in no-till gardening, but this method cuts to the chase and plants directly in the bales themselves. About three weeks before planting, soak the bales well with water and let them begin to decompose. You should also add a source of nitrogen, such as a sprinkling of aged manure or blood meal. The bales will begin to decompose, and will soon be ready for planting. Transplants and large seeds can be planted right into the straw, but for small seeds (carrots and lettuces, for example) it's best to sprinkle the surface of the bale with a bit of potting soil, and then cover the seeds lightly with a second sprinkling of soil.
Most vegetables and herbs will grow nicely in a straw bale, and in usually you'll be able to use the same partially-decomposed bale for a second planting the following year.
Sheet or "Lasagna" Gardening: You can think of lasagna gardening as a more refined or formalized approach to the no-dig method. It calls for ingredients to be applied to your beds in sheets, like the layers of a lasagna, hence the two common names for this style. Essentially it treats the entire bed as a compost pile, and it's built accordingly. You start with the paper or cardboard weed barrier; then add a thick layer of high-carbon "brown" mulches such as straw, leaves, fine sawdust or peat; a thinner layer of high-nitrogen "green" mulches such as grass clippings, vegetable peels from the kitchen, coffee grounds or compost (yes, some of those are literally brown, but for composting purposes they're "green"); and finally a layer of soil.
Repeat those layers to make a raised bed, then water it deeply and wait until spring. The layers will decompose to make excellent soil, shrinking down as they do (you'll need to start with at least 18 to 20 inches of layers), and you can plant in it directly when spring arrives. At the end of the season, repeat the layering process to prepare for next spring.
Questions and Answers
Q: Are there any downsides to no-till gardening?
A: There are a few, mostly revolving around the mulches you choose. If you spray your lawn with herbicides, for example, don't use your grass clippings in your garden: the herbicides will lay waste to your vegetables. If you buy hay or straw from an unscrupulous (or careless) grower, it can also be tainted. Some mulches (oak leaves, pine straw) are acidic and can be an issue for acid-sensitive plants. Black walnut contains compounds that inhibit the growth of other plants, so using sawdust or leaves from that tree can be an issue. Most mulches are okay, just do your research first and find a supplier you can trust.
Q: Is no-till gardening expensive?
A: It depends how you go about it. If you're buying soil and mulches, especially in small bags at the garden center, that can drive your costs up. If you don't need to buy soil, and if you scrounge most of your mulches for free or near-free, it can be very low-cost. Mostly you'll be expending the time, effort and gas required to gather them up. Be proactive. Offer to haul away your neighbors' leaves, or look for mulches that are cheap or free in your vicinity: sawdust from sawmills, seaweed from the nearest beach, and so on.
Q: Does no-till gardening build good soil?
A: As a rule, yes, though to an extent it depends on the mulches you use and how varied they are, because each mulch adds different nutrients. If you add compost or manure each year, or follow the "lasagna" method, your fertility will almost certainly improve (though it's still a good idea to test your soil periodically). You may want to add high-value amendments such as manure or blood meal every few years, as well, just to boost your soil's fertility.
Q: I read another article and it gave different advice. Should I be concerned?
A: Gardening is like cooking, you'll find a lot of different "recipes" for anything garden-related. If you compare between books and articles you'll usually see that the broad strokes are quite similar, though the details vary. If your sources disagree, try it one way and then the other (or each way in its own bed) and keep detailed notes. That will tell you which method works best in your own specific location, with your own specific climate and soil. Every garden is different, which is (usually) why the advice differs as well.
For Further Reading:
- Ruth Stout: Gardening Without Work: For the Aging, the Busy, and the Indolent
- Charlie Nardozzi: The Complete Guide to No-Dig Gardening
- Charles Dowding: Organic Gardening: The Natural No-Dig Way
- Patricia Lanza: Lasagna Gardening: A New Layering System for Bountiful Gardens: No Digging, No Tilling, No Weeding, No Kidding!