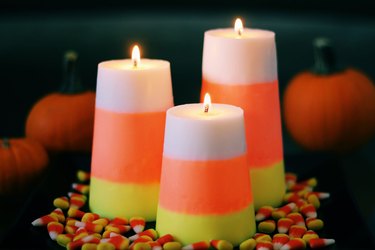
Halloween just isn't Halloween without candy corn. And even though many folks don't like the taste of it, candy corn does make a fun home decor motif during the fall season.
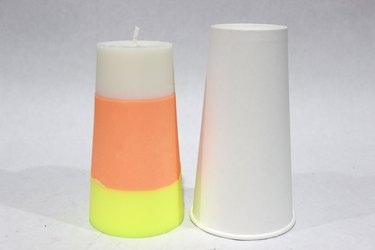
These DIY pillar candles are inspired by the white, orange and yellow confections. To create the tapered candy corn candle shape, use paper cups, which are perfect for holding the hot wax. The candles slide right out when they're done.
Video of the Day
Video of the Day
Displayed on a platter of actual candy corn, they'll add a whimsical touch to your Halloween decor.
Things You'll Need
Paper cups
Marker
Knife
Candle wick
Adhesive putty
Duct tape
White pillar candles
Tin cans or mason jars
Orange and yellow crayons or wax dye
Hairdryer
How to Make the Candy Corn Candles
1. Prepare the candle mold cups
Use a marker to draw two lines around the circumference of the plastic cups, dividing them into three vertical sections. These lines indicate the levels for filling three different colors of wax to resemble Halloween candy corn. With your knife or a nail, poke a hole in the center of the bottom of the cup. The bottom of the cup is where the tops of the Halloween candles will be.
Tip
For a complete set of DIY candy corn candles, use three different sizes of paper cups.
2. Thread a wick through the hole

Cut a length of candle wick that is at least four inches longer than the cup height. Thread the wick through the hole in the cup, leaving about one inch extending above the hole. The remainder of the wick can run out the bottom for now.
Tip
You can find candle wicks in the candle making section of the craft store, or order them online along with other DIY candle making supplies.
4. Cover up the hole
Plug the hole with a bit of adhesive putty to prevent melted wax from seeping out. Press down on it to get a good seal. For additional protection, cover the putty with a small piece of duct tape.
5. Secure the candy corn candle wick
Turn the cup right side up. To keep the wick centered and secure, position a piece of duct tape across the diameter of the cup. Cut a slit in the middle of the tape, thread the other end of the wick through the slit, and pinch the tape around the wick.
Prepare the Wax
1. Break up wax into pieces
With a knife, repeatedly shave down the sides of a white pillar candle. It can be a soy candle or regular wax candle. The wax will crumble into small pieces. Crumble the entire candle, or multiple candles depending on the size and number of candy corn candles you are making for this DIY project.
2. Melt the candle wax in tin cans
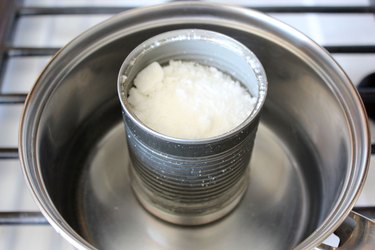
Thoroughly wash tin cans or mason jars and let them dry. Be careful while handling cans, as the rims can be sharp. Pour the crumbled wax into a can or jar, and place the can or jar in a pot containing about two inches of water. Heat the water to a gentle simmer, and allow the wax to slowly melt.
3. Pour the first layer
Pour the melted white wax into the cup molds up to the first marked line. This will be the white upper third section of the candy corn candles.
4. Divide the wax for dying
Divide the remaining white wax into two tin cans or mason jars, in roughly equal amounts. You will dye one half yellow and the other half orange, using either crayons or wax dye. Note that candles dyed with crayons do not burn as well as wax blended with wax dye.
5. Dye the wax
Add orange dye to one batch of wax, and yellow dye to the other, following the manufacturer's instructions. If you are using crayons, cut them into small pieces with a knife, and add a few small pieces at a time to the white wax. Stir with a wooden skewer, and add more dye or crayon pieces to achieve the colors you desire.
Tip
You need to wait for each layer of wax to solidify before adding the next, or the colors will mix and ruin the candy corn effect. You can dye the batches of yellow and orange wax just before you’re ready to pour those candle layers, or do it in advance and re-heat the wax when needed.
6. Pour the orange wax
Wait for the first layer of white wax to be completely solid, about 24 hours, and then pour the orange wax on top of it up to the second marked line on the cup. Allow this layer to solidify overnight.
7. Pour the yellow wax
Pour the yellow wax into the mold on top of the hardened orange layer, going all the way to the top. Let it harden overnight.
Complete the Candy Corn Candle
1. Cut Off Excess Wick
Trim the excess wick from the top of the yellow layer. Since this will actually be the bottom of the candle, there does not need to be any visible wick.
2. Remove the seal to reveal the candle
Turn the mold upside down. Take off the duct tape and adhesive putty covering the hole at the bottom of the cup. Squeeze the sides of the paper cup, and the candle will slide right out.
Clean up the edges
If any colors seeped into another section (e.g., the yellow wax going into the orange), don't fret. It can happen when the wax contracts, leaving gaps that subsequent layers of melted wax will want to fill in. Just shave off any overlapping wax with a knife, and the candle will be perfect.
After shaving off any uneven edges, run a hair dryer over the surface of the candle and smooth it out with your fingers.