Things You'll Need
Soft leather
Utility knife
Sewing machine
Nylon string, rope or wire
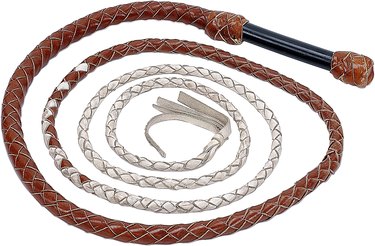
A bullwhip is a tool used for working with and controlling livestock. Bullwhips are usually made from braided leather and are single-tailed. A typical bullwhip consists of a handle, a fall, a cracker and a long tail or a thong. The tail is generally so long, in fact, that when it is used, its end moves faster than the speed of sound. Because of this, there is delay in hearing the whipping sound, which is actually a small sonic boom. If you want to own an interesting tool or a weapon, you may want to learn how to make your own bullwhip.
Step 1
Cut six strips of fabric for your bullwhip. The choice of material is the most important consideration when it comes to bullwhips, and will be an essential factor in the performance and speed of the bullwhip that you make. You can use soft leather, kangaroo strips, fabric, hemp and even duct tape. For a professional-looking bullwhip, soft leather or kangaroo strips are highly recommended. Make sure that the strips are at least 10 to 30 inches long. Note that you will shorten them with braiding anyway. Also make sure that all the strips are the exact same width. Use a sharp utility knife to cut them.
Video of the Day
Step 2
Anchor the strips on one end, either by tying or by sewing them together. Then fold the tied or sewn tip over to make a thick end and sew it to secure the whole thing in place. Do not worry about the aesthetic appeal of this joint, as it will eventually be covered with the handle anyway.
Step 3
Braid the strips together, starting from the anchored end. Attach the anchor end to a fixed object to make the braiding process easier and faster. Divide the six strips into pairs and braid the three units together. Be sure to braid the strips in a tight and neat formation. Continue braiding the strips until you reach 3 to 4 inches from the other end.
Step 4
Sew the end of the braid, 3 to 4 inches from the end, to keep it from unraveling. Let the six strips hang free below the sewn part for now.
Step 5
Cut another piece of the same fabric you have been using. Make it 4 by 5 inches at least, depending on the size of the handle you want.
Step 6
Wrap this 4 by 5 inch piece of fabric around the anchor you started with. Wrap the fabric neatly, folding it over the thick end and then sewing it along the seam. Make sure to sew all around the handle, as well as being careful to attach the handle itself to the strings.
Step 7
Add poppers or crackers, which are loose strings at the end of a whip, to your bullwhip. Attach the popper by sewing it to the bottom joint. Note that the popper can be made from a nylon piece of string or a small piece of rope or wire.
Tip
If you are making a bullwhip as a part of an Indiana Jones costume, or if you don’t need it to be as authentic, use fabric or duct tape instead of leather.
Warning
Be very careful when using a whip; it is, after all, a weapon and not simply a tool.
Video of the Day