The blanket stitch is one of the best hand-sewing techniques for beginners, as the decorative stitch is easy to create and helps elevate a fleece blanket for a more finished look. Instead of cutting the edges into strips and tying them together to create a fringe finish, this technique utilizes a little bit of embroidery floss in a simple (yet intricate-looking) pattern to add a nice edge to your work. You can use it as the beginning of a crocheted border or leave it alone for a subtle contrast on the edging of the blanket.
Up ahead, find a step-by-step tutorial for sewing blanket stitches on a sampler piece of fleece fabric.
Video of the Day
Video of the Day
Blanket Stitch Sewing Tutorial
Things You'll Need
Fleece fabric
Embroidery needle
Embroidery thread
1. Thread the needle
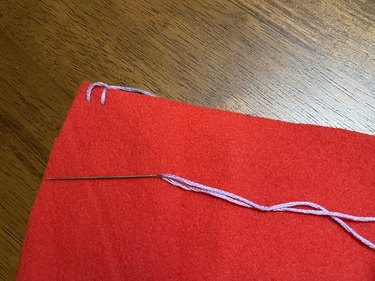
Before stitching, start by threading the needle with embroidery floss and tying a French knot on the end so that the thread stays in place.
2. Create first blanket stitch
Starting in one corner of the fleece blanket, insert the needle through the back side approximately 1/4 in. from the edge. Pull through until the knot comes up against the back of the fabric.
Insert the needle back through the front of the fleece blanket (toward the back), around 1/4 in. from the first position. When pulling the needle through, ensure that the needle stays positioned in front of the thread so that the embroidery floss sits along the edge of the fleece fabric. Then, continue on with the next stitch, keeping the needle in front of the embroidery thread like you did on the last stitch.
3. Repeat steps

Continue stitching along the side of the fleece blanket, following step two. As you continue the stitching line, you should have straight stitches in a vertical pattern around 1/4 in. apart with a horizontal stitch (sort of like a running stitch) laying across the edge of the blanket to create a finished appearance.
Repeat these steps down the entire side of the blanket and around all of the other sides as well, keeping your stitches 1/4 in. apart and 1/4 in. from the edge of the fabric to create an even and professional-looking blanket stitch design.
Whether you use this technique to add a simple yet finished edge to your pieces or add onto it with a crocheted edge, the simple blanket stitch is a skill that comes in handy for all types of projects.