With "granny chic" taking the holiday decor scene by (winter) storm, it's the most wonderful time of the year to get cozy with a crochet craft. Just like baking Christmas cookies with your grandma, this pillow project will bring a dose of warmth and holiday nostalgia to your home. Whether you simply want to crochet yourself an adorable Christmas pillow while curling up to watch your favorite holiday movies or you need a homemade gift idea, we've got you covered.
Up ahead, learn how to make a Granny-approved crochet pillow with a Christmas wreath appliqué.
Video of the Day
Video of the Day
Things You'll Need
Big Twist Value Worsted Yarn in Varsity Green or Lion Brand Tinsel Christmas Yarn in Green
12 x 12 in. pillow insert (this project will also fit a 14 x 14 in. pillow insert)
How to make a Crochet Holiday Pillow:
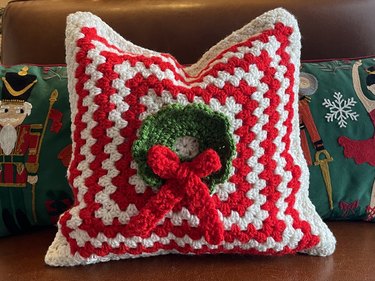
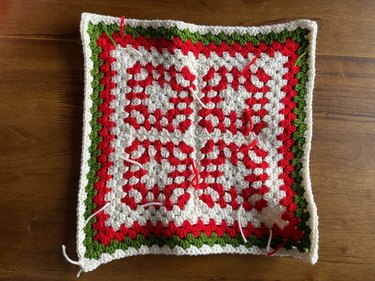
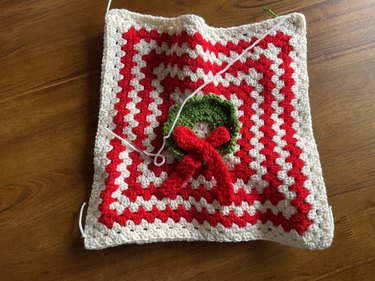
This Christmas crochet project consists of two granny square panels plus a simple wreath and bow appliqué for a festive touch. The front is made up of one large granny square crafted from 19 double crochet rows, while the back consists of four smaller granny squares (six rows each) that are pieced together to create a gridlike design with a border made of seven rows.
1. Crochet granny squares for back of pillow
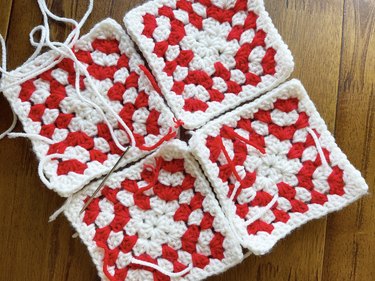
Prep the back panel by making four basic crochet granny squares, which you'll ultimately piece together to form one big square that's equivalent to 12 rows. For this panel, I started with two rows of white and then alternated between red and white to create a candy cane vibe. If you are confident making granny squares, go ahead and create the squares and then move on to step two. Need more guidance? Follow the steps below.
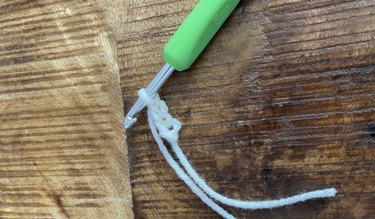
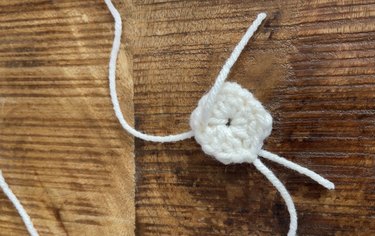
To create the granny square foundation, grab the white yarn and start with a slip knot on the hook and chain four. Once there are four loops (including the loop on the hook), insert the hook back into the first loop. You should have the first and last loops on the hook. Next, pull the yarn through both loops to create a single loop.
With one loop on the hook, chain two. This chain is the first stitch in the foundation square and helps secure the loop, which you'll stitch into for this first square. Yarn over, insert the hook into the circle and pull up a loop. At this point, there should be three loops on the hook. Yarn over and pull through two loops and then yarn over again and pull through the last two loops to create a double crochet stitch. Follow these steps again until the circle has a chain and two double crochet stitches next to each other. Next, chain one to create the corner followed by three more double crochet stitches into the circle.
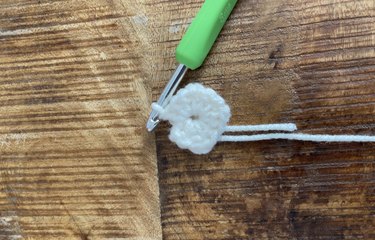
At this point, you should have something that looks like a corner consisting of three stitches, a single loop (chain stitch) and three more stitches. To finish the foundation square, repeat this pattern three times—three double crochet stitches, chain one, three double crochet stitches—until you have four corners. Secure the square by inserting the hook into the first stitch (the chain) and creating a slip knot. Cut the yarn and then pull the tail through the loop on the hook to tie it off.
For row two, start by inserting the hook into one of the corners on the foundational square (where that chain stitch is). Pull yarn through the corner and tie it into a knot to secure. Insert the hook back into the corner, pull the yarn onto the hook to create a loop and then chain two. Just like with the first square, this chain is the foundation stitch and is meant to act as the first "double crochet" stitch.
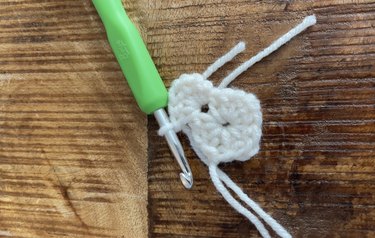
To create the second row, follow the same pattern as the first row (the foundation square) but insert the hook into the chain-stitched spaces on the corners instead of the circle. Follow this pattern for each corner: three double crochet, one chain stitch, three double crochet. Secure the second row by inserting the hook into the first stitch (the chain created at the beginning) and creating a slip knot. Cut and tie off the yarn.
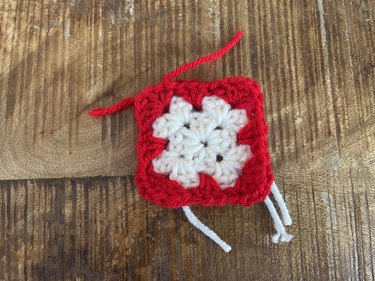
It's time for row three, which means it's also time to switch to red yarn for that perfect candy cane color scheme. For this row, follow the same steps as above but instead of solely focusing on the corners, you'll create length on the sides too.
On this row (and all the rows that follow), create corners by crocheting a section of three double crochet stitches, a chain stitch and another section of three double crochet stitches. Then, between the corners, add a section of three double crochet stitches by inserting the hook in the middle of the two corners on row two. When finished with row three, you should have 12 sections: eight on the corners and four on the sides.
Continue making rows (and alternating between red and white yarn) until the square has six rows (four white, two red). Repeat these steps three more times to make a total of four granny squares.
2. Attach granny squares
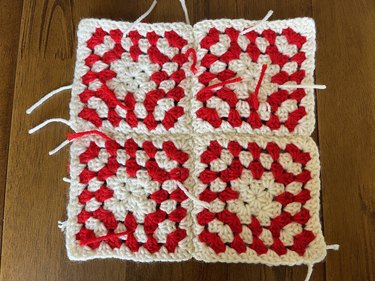
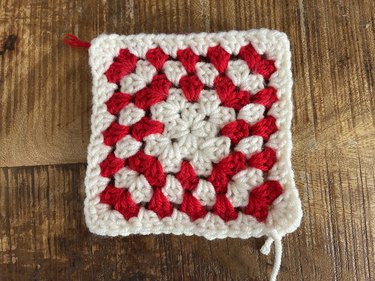
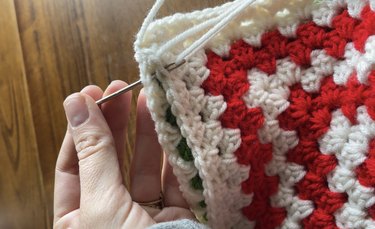
Attaching granny squares is a lot easier than it looks and involves a simple hand-stitching process using the tops of the double crochet stitches to camouflage the stitch. To attach, take two granny squares and put them together with the front sides facing each other. Next, string a piece of white yarn on the needle and insert the needle into one of the corners. Tie the end of the yarn around the corner to secure before inserting the needle into the top of the first stitch on both granny squares.

Pull the needle through both stitches and on the same side, insert the needle into the next stitch (on both squares) and pull through. Continue this pattern—which is similar to a basting stitch—until one side is sewn together. Then, cut and tie off the yarn and follow these steps again for the other two squares.
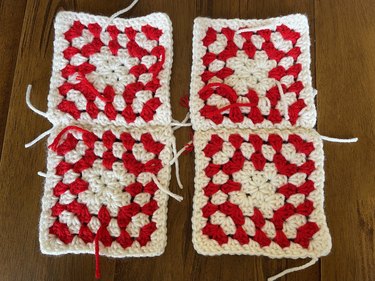
After securing two squares together, you should be left with a pair of long rectangles. Place the rectangles together with their front sides facing each other and follow the same stitching instructions to attach them. Once finished, you should have a large square made from four separate granny squares.
Tip
It’s OK if the squares look a little wonky either on their own or once stitched together. Once both panels are sewn and stuffed with the pillow insert, it won’t look warped.
3. Crochet a border around granny squares
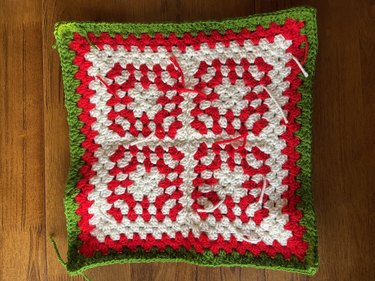
Once stitched together, the granny square grid is equivalent to 12 rows. To get up to 19 rows, I created a border from two more rows of white, two rows of red, two rows of green and one more row of white.

To create the border, insert the hook into one of the corners and pull a piece of yarn through. Tie it in place and then, similar to starting a new row on the smaller granny squares, insert the hook again to pull up a loop and chain two. Make a corner by adding two double crochet stitches, a chain stitch, and three more double crochet stitches. Continue around the square, adding sections of three double crochet stitches in between the sections on the edge of the large square.
Once you reach the point where the small granny squares connect, add two double crochet stitches into the next opening (where the corner on the first square once was before it was connected) and then a double crochet stitch into the next opening (where the corner once was on the second square).
Instead of creating two full sections—which creates excess stitches and, therefore, more warping—this faux single section allows you to continue the pattern and keep the shape. Continue adding sections of three double crochets along the side of the square, corners and faux sections (you should have four in total) until the row is completed.
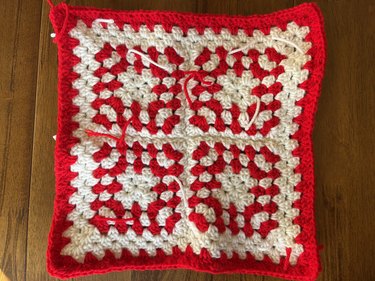
With the first row and those faux sections out of the way, you can finish the other rows just like you did with the small granny squares. Add one more row of white followed by two rows of red, two rows of green and one row of white to complete the back panel.
Tip
Take the crochet hook and pull any loose yarn threads to the back side of the panel. Since this will all be on the inside of the pillow, you don’t need to worry about cutting the loose threads, though you can if you want to. Follow this same cleanup process for the large granny square.
4. Make a large granny square for front of pillow
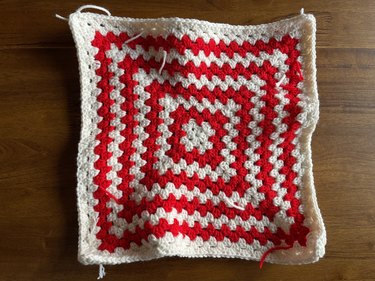
When the back panel is complete, move on to the front panel by creating one large granny square. For this panel, I alternated between red and white yarn every two rows to create thicker stripes. To create this panel, follow the granny square instructions in step one and this color pattern for a total of 19 rows:
- 2 white rows
- 2 red rows
- 2 white rows
- 2 red rows
- 2 white rows
- 2 red rows
- 2 white rows
- 2 red rows
- 3 white rows
5. Make a Christmas wreath appliqué
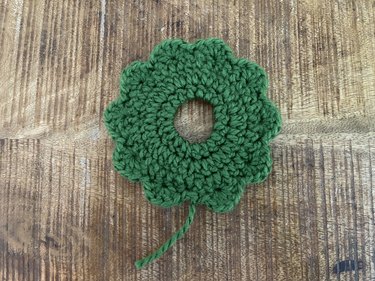
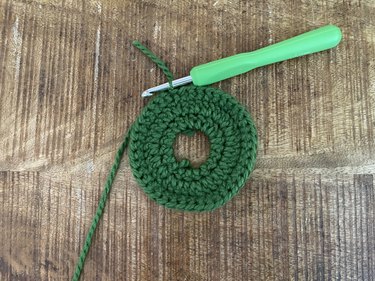
When both panels are complete, move on to the crochet wreath appliqué. Start by making a magic ring (aka a magic circle) by looping yarn around your middle and index fingers to create an X on top. Insert the hook under the bottom piece of yarn, grab the top piece and pull it through while rotating the hook on your way out to form a loop. To secure the circle and create a foundational stitch, chain two. Yarn over, insert the hook into the circle and pull up a loop so that you have three on the hook and can create a double crochet stitch.

There should now be two stitches on the magic circle: one chain (which serves as a faux double crochet stitch) and one double crochet. Add 18 more double crochet stitches for a total of 20 around the circle. To secure this row in place, insert the hook into the first stitch (the chain) and create a slip knot. Snip the yarn and thread the tail through the loop on the hook to tie it off.
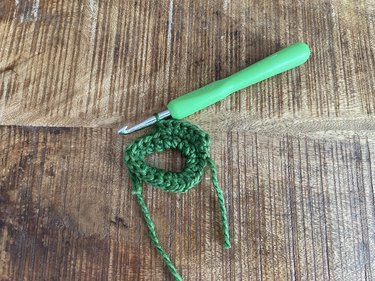
For row two, insert the hook on or close to the first chain stitch on row one. Pull the tail of the yarn through and tie it off to secure. Then, insert the hook again, pull up a loop and chain two. In that same stitch, add a double crochet. Next, yarn over and insert the hook into the second stitch to create a double crochet. Add a second double crochet to the same stitch.
Continue around the circle, adding two double crochet stitches into each single stitch on row one until you have 40 stitches around. Secure the row in place by inserting the hook into the first stitch (the chain), making a slip knot, cutting the yarn and threading it through the loop on the hook.
Row three consists of another 40 double crochet stitches, which will add some height to the wreath. To create this row, insert the hook into the foundation stitch on the second row, thread the yarn through the stitch and tie it into place. Insert the hook again and pull up a loop, followed by two chain stitches. Yarn over and insert the hook into the second stitch to create a double crochet.
Continue adding one double crochet stitch in each stitch around until you have another row of 40. Follow the above steps to secure and tie off the yarn before moving on to the fourth and final row.
Tip
If you are a beginner, instead of creating scallop stitches on row four, add another simple row of double crochet stitches all around. Although it won’t have a scallop finish, this will add more height and still look like a wreath, especially once the bow is added.

The fourth row features a scalloped design, which looks complicated but is fairly easy once you get the hang of it. To create this look, insert the hook into the foundational chain on row three, pull through and tie to secure. Insert the hook again and pull up a loop followed by a single chain. Skip the second stitch and add five double crochet stitches into the third stitch. Skip the fourth stitch and on the fifth stitch, add a slip knot by inserting the hook and pulling the yarn through the loop on the hook.
To continue, skip the next stitch, add five double crochet stitches into the third stitch, skip the fourth stitch and slip knot into the fifth stitch. Continue this pattern all the way around until you have 10 scallops. Add security by inserting the hook into that first chain stitch, creating a slip knot and tying in place.
Tip
When working with a scallop design, it helps to think about it in sections of four stitches: Add a slip stitch into the first stitch, skip the second, add five double crochet stitches into the third stitch, skip the fourth stitch and repeat.
6. Crochet a holiday bow
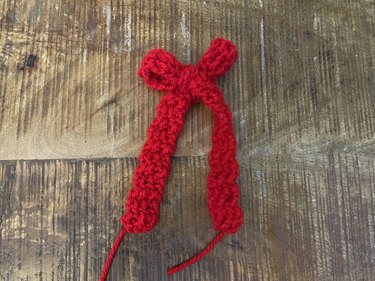
No wreath is complete without a bow, and this one is super easy to construct. To make a crochet bow, reach for the red yarn, create a slip stitch and chain four. Yarn over, skip the first loop on the foundation chain and add a double crochet stitch into the second. Repeat this step for the third and fourth loops. Chain one, flip your work and add a double crochet into the stitch closest to the hook.
The foundation of the bow is a simple rectangle that is only three stitches across and 45 stitches long (though you can make it longer and wider if you want a bigger bow). To finish the rectangle, continue adding three double crochets, flipping your work and adding three more until you reach 45 rows. Once all the rows are finished, snip the yarn and pull it through the hook loop to secure.
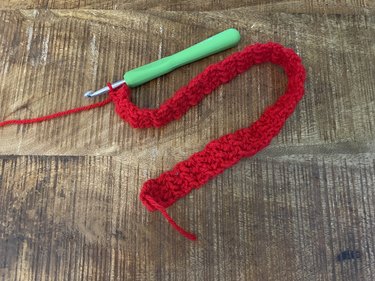
Now, you have a long piece of crochet "ribbon" to tie into a simple bunny loop bow. If you want to get extra fancy, you could make the crochet ribbon longer by adding more rows and trying your hand at a Christmas bow.
Tip
Don’t worry about the tails at either side of the rectangle (or “crochet ribbon”). You can use these to secure the bow to the front panel or snip them off if you wish to let the ends lay loose.
7. Secure bow to wreath
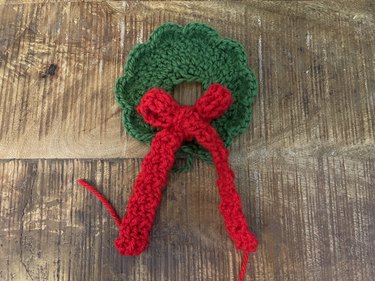
In preparation for adding to the front pillow panel, secure the bow onto the wreath. Take a piece of red yarn and thread it through the needle. Insert the needle into the knot part of the bow and through the base of the wreath, leaving a 2-in. tail. Release the needle from the yarn and thread the tail into the needle. Insert the needle into the knot part of the bow (next to where you first inserted it) and pull it through the bow and wreath. Flip the wreath over and tie the two red yarn tails into a knot. For extra security, you can also secure the back of the bow loops to the wreath using the same method.
Tip
The section of the wreath with all the foundation chain stitches might look a little messy or wonky. To hide this, make it the bottom of the wreath and sew the bow over.
8. Attach wreath to front crochet pillow panel
Before stitching the panels together, attach the wreath appliqué to the front panel. To do so, place the wreath in the center of the panel and thread a long piece of green yarn onto the needle. From back to front, insert the needle through the panel and the wreath, close to the inner circle and leaving a short tail. Then, stitch around the inner circle. When you reach the starting point, make sure the needle is inserted into the wreath and panel and that both tails are next to each other before tying off.
If you want to attach the ends of the bow to the panel, this is a great time. Reach for the crochet hook, grab ahold of one of the tails and pull it through the panel. Repeat this on the second tail and then flip over the panel. For added security, look for a piece of yarn close to the tail and use that to tie a simple knot.
Tip
I wanted to give the wreath some movement and dimension, so I only secured the center. However, if you prefer a more flat-laying appliqué, stitch around the scalloped edges to further secure it to the pillow panel.
9. Attach front and back panels
It's finally time to attach the crochet pillow panels. For this step, stitch up three sides so there's space to add the pillow insert.
Similar to the process for attaching small granny squares, start by placing the panels on top of each other with the interior sides (the ones with yarn tails) facing inward. Then, grab a needle and a long piece of white yarn and begin stitching up the sides, starting at the corner and using the same technique as step two until three sides are secured together.
Tip
Don’t cut and tie after this step—you’ll want to keep the needle and yarn intact so you can finish stitching up the fourth side.
10. Insert pillow form and stitch up last side

Before closing the fourth side, stuff the pillow form into the crochet cover. Grab the needle and stitch up the fourth side. Secure it in place by tying it to the tail and then use the crochet hook to pull both tails into the pillow so that they remain hidden.
And, just like that, you have a festive crochet pillow for the holidays. This project makes for an excellent DIY home decor moment but would also be an awesome Christmas gift for a loved one or holiday host. Granny chic is alive and well this season!