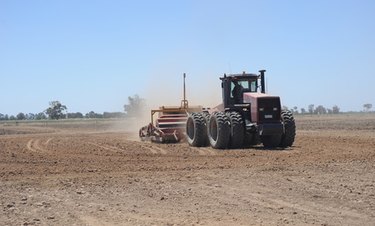
Things You'll Need
Screwdriver
240-volt receptacle
Electrical cable (3-wire)
Diagonal pliers
Cable staples
Wire stripper
Electrical tape (black)
A 60 gallon air compressor forces air into an air tank for use in various commercial and industrial applications. An air compressor contains air pumps that are typically driven by a 240-volt electric motor. Power runs from the electrical panel to the motor via two hot wires and one grounding wire. Wiring an air compressor is a job best suited for someone with prior electrical training and experience, but you can learn the basics of air compressor wiring to understand how to complete this task.
Step 1
Open the electrical panel and turn off the main circuit breaker. Unscrew the electrical panel cover and plug a 240-volt circuit breaker into an empty slot on the panel board.
Video of the Day
Step 2
Mount a 240-volt surface-mount receptacle on a wall next to the 60 gallon air compressor. Unscrew the faceplate of the 240-volt receptacle. Unscrew the receptacle from the outlet box to expose the terminal screws on both sides of the receptacle. Loosen the terminal screws with a screwdriver.
Step 3
Cut away 2 inches of cable sheathing from the tip of the electrical cable using diagonal pliers. You will connect this end of the electrical cable to the receptacle. Strip off 1/2 inch of insulation from the tip of each exposed wire using a wire stripper.
Step 4
Loop the black wire clockwise around a copper terminal screw on one side of the receptacle. Wrap black electrical tape around the exposed white wire to indicate that it is a power wire. Loop the white wire clockwise around a copper terminal screw on the other side of the receptacle. Loop the green or bare wire around the green terminal screw. Tighten each screw to secure the connections.
Step 5
Run the electrical cable across the ceiling from the receptacle to the electrical panel. Attach the cable neatly onto surfaces, using cable staples every 12 inches along the way. Pull the cable from inside the panel and cut the cable after allowing an extra 2 feet from the top of the electrical panel.
Step 6
Cut away the cable's sheathing with diagonal pliers to expose the inner wires. Route the green wire to a terminal screw on the ground bar. Route the black wire and the white wire to the terminal screws at the end of the 240-volt circuit breaker. Wrap black electrical tape around the exposed part of the white wire to indicate that it is a power wire.
Step 7
Insert the tip of the white wire into a terminal screw on the 240-volt circuit breaker. Plug the tip of the black wire into the other terminal screw on the breaker. Insert the green wire into a terminal screw on the ground bar. Tighten all screws firmly to secure each connection.
Step 8
Push the wires carefully into the electrical outlet box. Install the receptacle onto the outlet box using the screws supplied with the receptacle and replace its faceplate. Plug the 60 gallon air compressor into the 240-volt receptacle to test the connection.
Tip
Different air compressor models have different types of plugs that terminate the power cord. Match the type of female receptacle with the correct type of plug to ensure that you can connect the power cord to the receptacle. The male plug serves as the manual disconnect of the compressor, as required by local and national electric codes for 240-volt motors. The amperage of the air compressor must be 80 percent of the amperage of the circuit.
Warning
Wiring a 240-volt electrical circuit is dangerous and should only be performed by a qualified electrician.