Things You'll Need
Ruler
Square
Pencil
Crayons
Graph paper
Cellophane tape
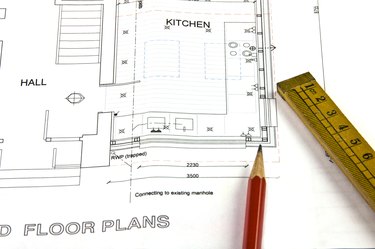
Making a map of your house's rooms and their contents gives you a bird's eye view of the layout of your house, its fixtures and furnishings. If you are thinking of rearranging your furnishings or remodeling a space, a map of your house can help you visualize possible changes. If you are moving, making a map of your new home's room layout can help you decide where your things will go.
Step 1
Measure the outside length and width of your house in feet. Measure the length and width of attics and basements, if they are different from the main living floors. Measure the length and width of any attached garages, patios or decks. Measure the width of windows and doorways in each room and their distance from the corners of the room.
Video of the Day
Step 2
Pick a scale for your map. A scale such as 1 inch equals 5 feet or 10 feet will allow you to map the entire house on a single 8½-by-11-inch sheet, but a scale of 1 inch equals 1 foot will allow you to plot important small details such as power outlet locations. Translate your measurements to your scale. For instance, if the outside of your house measured 40 feet long by 20 feet wide, the outside of your house drawn to the scale of 1 inch equals 1 foot would be 40 inches long by 20 inches wide.
Step 3
Draw the outline of each floor of your house to scale on graph paper. This will help you accurately position interior features. If necessary, join several sheets of graph paper together with cellophane tape. Measure the length and width of each room, kitchen, bath and hallway in the house and translate the measurements to your scale. Draw and label each room at the correct place within the house. If you like, draw color outlines with crayons to distinguish rooms with specific purposes, such as a green outline for bedrooms or blue for bathrooms.
Step 4
Translate the width and location measurements of each room's doorways and windows to your scale and put them in at their correct locations relative to the corners of each room. Draw arcs to scale to represent the direction of each door's swing. Locate electric outlets in each room and mark them in their correct locations on the map.
Step 5
Measure, scale, draw and label permanent fixtures in their correct places within each room. Draw the floor space occupied by fixtures such as stairways, closets, sinks, counters, showers, tubs or toilets. Use simple square, rectangular or round shapes to represent the fixtures. Measure, scale, draw and label the spaces containing permanent utilities such as furnaces and water heaters. Measure and mark the location of fuse panels and of the main gas and water shutoff valves on the appropriate floor.
Step 6
Measure the length and width of your movable furnishings such as beds, tables, dressers, chairs and couches. Reduce these measurements to your scale. Make simple square, round or rectangular shapes to scale to represent these movable furnishings. Label each shape for the furnishing it represents. Place these shapes on your map where you would like the real furnishings to go in each room.
Video of the Day