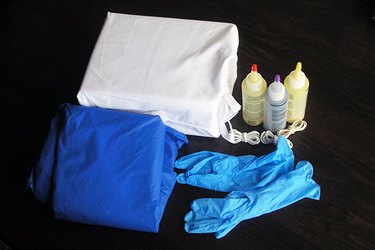
Things You'll Need
100-percent cotton twin sheet set (white or light colors work best)
Tie-dye kit, or 3 fabric reactive dye colors, 1 bottle each
Squeeze bottles (optional)
Disposable vinyl gloves
Rubber bands
Plastic tablecloth
Paper towels
Cooling rack
Trash bags
Large tub (optional)
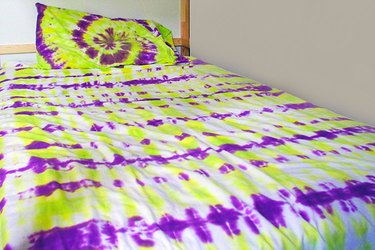
Tie-dye sheets can be pricey, but you can dye your own and achieve the same eye-catching results for a fraction of the cost. There are many ways to tie-dye fabric, but for beginners, a kit is a good place to start. Most craft stores sell tie-dye kits by various manufacturers, or individual dyes from which you can choose your own color combinations. The fabric reactive dyes included in kits, and the individual colors sold alongside them, are formulated to achieve colorful, permanent results in one step, without additional ingredients.
Step 1: Gather Supplies and Set Up the Work Area
Gather your supplies and set up your work area. Choose a mess-safe work area like a basement, garage, laundry room or backyard, weather permitting. Cover your work surface with a plastic tablecloth or a sheet of painters plastic. Place a layer of newspaper or paper towels over the plastic to soak up drips and prevent the dye from running off the table. Remember, the dye is permanent so wear appropriate clothing and protect the entire work area.
Video of the Day
Step 2: Wash the Sheets
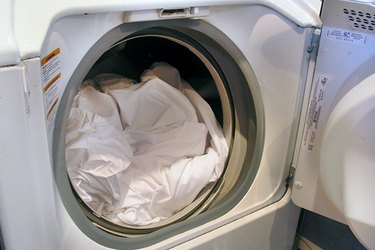
Wash the sheets in a washing machine to remove the sizing. Use regular laundry detergent and no fabric softener, as it interferes with the dyeing process.
Step 3: Fold the Flat Sheet
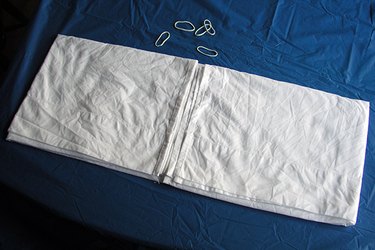
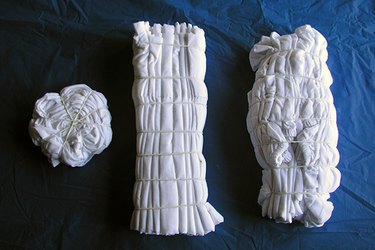
Fold the damp flat sheet in half vertically, bottom to top and then half again. Fold each end into the middle and accordion fold in 2-inch pleats from the edge to the center from each side. Place rubber bands about every 2 inches along the folded sheet from end to end.
Step 4: Try to Fold the Fitted Sheet
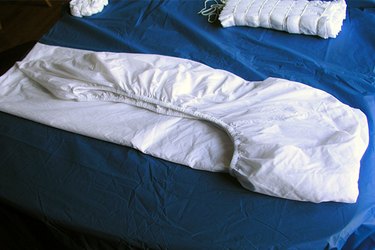
Fold the damp fitted sheet with all four corners fitted together. Bring the sides into the middle and accordion fold them from the ends in the same manner as the flat sheet. Place rubber bands about every 2 inches along the folded sheet from end to end.
Step 5: Pinch and Twist
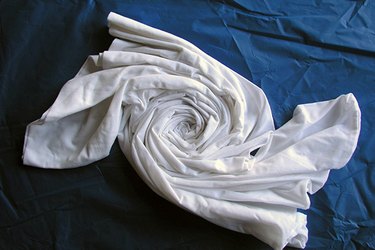
Lay the pillowcase flat and pinch up an area near the middle. Twist in a spiral pattern. Keep twisting until you have a roughly circular shape. Place a rubber band around the circumference to keep it together. Place an additional three to four rubber bands across the face, dividing it into wedges.
Step 6: Prepare the Dyes
Put on the disposable vinyl gloves, fill the dye-filled squeeze bottles to the marked line with warm water and shake for 1 minute. Do not mix the dye until you are ready to use it; its working life is about 45 minutes.
Note: Kits and individual colors come with the powdered dye in a squeeze bottle. With refill kits you'll need to put the powder into a squeeze bottle.
Step 7: Apply the Dyes
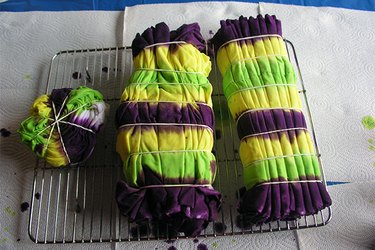
Set the pieces on a cooling rack over the prepared work surface. Placing the tip of the bottle close to the fabric, saturate each banded section with the dye in a pattern of your choice. Start with the light colors first, work from one end to the other, changing colors as desired. Flip the pieces over and repeat the pattern.
Step 8: Seal and Leave Overnight

Place the dyed sheets in a plastic bag. Seal it and leave the sheets overnight for the color to set.
Step 9: Cold Water Rinse
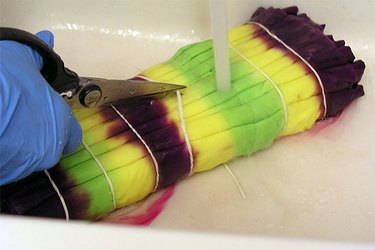
Put on the disposable gloves. Put the DIY tie-dyed sheets in a deep laundry sink, bathtub or a large outdoor tub. Rinse each piece with cold water until the bleeding of the dye slows. Cut the rubber bands and open the sheets and pillowcase. Rinse each piece separately. Continue rinsing until the color stops bleeding.
Step 10: Hot Rinse the DIY Tie-Dye Sheets
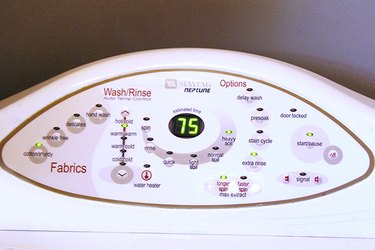
Return the sheet set to the washer and run it with laundry detergent at the hottest temperature recommended for the fabric and the largest amount of water. Set the machine to extra rise, if available. If your washing machine doesn't have an extra rinse setting, rinse the sheets again after the first cycle. Dry the tie-dyed sheets in the dryer.
Tip
Double the dye amount for a full- or queen-size sheet set, and triple it for a king-size set.
Warning
Wash the tie-dyed sheets separately from your other laundry for the first couple of washes to be sure the dye is set.
Video of the Day