Things You'll Need
Masonry hammer
Tuck-pointing chisel
Stiff broom
Garden hose
5 gallon bucket
Mortar mix
Brick trowel
Pointing trowel
Tooling jointer
Sponge (optional)
Tarp (optional)
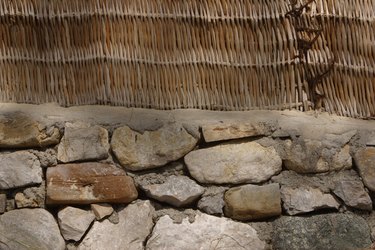
Tuck-pointing a stone foundation wall is a job that requires time, patience and a few specialty tools. Older mortar made with lime and sand gives way rather nicely with a hammer and chisel. Newer mortar made of Portland cement often has to be ground out with power tools. Once the old mortar is removed, the task of replacing it is relatively quick and straightforward, but still requires attention to detail. You will need to determine the type and color of mortar that was used to set the stone of the foundation wall and purchase a supply of matching mortar, including a wastage factor of approximately 10 percent.
Step 1
Clean out the mortar joints between the stones using a masonry hammer and a tuck-pointing chisel or a small, flat cold chisel. Employ the tools gently to avoid damaging the stone. Remove all loose material to a depth of at least 3/4 inch, or two and one-half times the width of the joints. Work slowly and carefully.
Video of the Day
Step 2
Sweep the joints clean, then spray the area with water. Mix a small batch of mortar in a bucket according to the manufacturer's instructions. Add only enough water to the dry mortar to make a mix the consistency of peanut butter. Allow the mortar to slake for 15 minutes, then mix again to incorporate any water that collected on top.
Step 3
Spray the foundation wall again if necessary to dampen the joints. Use a brick trowel to scoop up and hold the mortar beneath each joint while pushing the mortar into the joints with a pointing trowel. Fill the joints, then scrape off any loose mortar clinging to the face of the stone. Allow the mortar to firm up in one section while you move on to the next.
Step 4
Smooth each joint with a tooling jointer once the mortar is firm to the touch. Clean the face of the stone of any loose material by gently brushing at a diagonal across the joints so you don't pull out the fresh mortar.
Step 5
Clean any cement stains from the stone using a sponge if desired, then allow the mortar to set for several days. Once a day, mist the foundation to keep the stone and joints slightly damp. Protect the wall from any harsh weather if necessary by covering it with a tarp.
Tip
The careful use of power tools such as a drill or grinder can speed the process of mortar removal, especially if the mortar is made with Portland cement. You can seriously damage the stone and your foundation, so make sure you're confident in your abilities.
Periodically dampen the foundation wall with a spray bottle while tuck-pointing to keep the old masonry from drying out the new mortar too fast.
Warning
Stone foundations that show signs of bulging, shifting, cracking and/or heavy loss of mortar between the joints should be examined by a professional.
Video of the Day