Apple Cider Braised Pork Shoulder: A Fork-Tender Method
A pork shoulder braised in apple cider looks deceptively simple on paper: cider, stock, mustard, a few herb sprigs, and hours of patience. What comes out the other end is a roast that shreds at the nudge of a fork and a sauce that's already made itself. This guide walks through a full method for apple cider braised pork shoulder, in order, with the reasoning behind each stage so you can adjust on the fly instead of guessing.
Cider does real work in this dish. It sweetens the braise, and by the end it's reduced into most of the sauce with barely any extra effort. But the melt-in-your-mouth texture isn't cider's doing. That comes from hours of gentle, moist heat breaking down the connective tissue running through the shoulder (The Seasoned Mom, published last week). Understanding that distinction changes how you troubleshoot the recipe: if the pork is still tough, the fix is more time, not more cider.
Pork shoulder, sold in most stores as Boston butt, is the cut for this because it carries enough fat and connective tissue to turn tender and flavorful under a long, slow braise (Cooked by Megan, 2 months ago). Fresh apple cider is worth seeking out specifically rather than substituting apple cider vinegar, which is far more acidic, or plain apple juice, which carries a thinner, less concentrated flavor (Cooked by Megan; Ask The Food Geek). Because collagen breaks down gradually rather than at some fixed moment, the same basic braised pork shoulder with apple cider can run anywhere from about 3.5 hours at 325°F to 5 or 6 hours at a lower 250°F, depending on how much time is on hand (The Seasoned Mom; Ask The Food Geek, about a year ago).
What you need
Video of the Day
This method uses a 4 to 5 pound bone-in pork shoulder or Boston butt roast, along with 2 tablespoons of a neutral, high-smoke-point oil, 2 cups fresh apple cider, 2 cups chicken stock, 2 tablespoons Dijon mustard, 1 tablespoon dehydrated minced onion, 3 sprigs rosemary, 4 sprigs thyme, one red onion cut into thick slices, and two firm, slightly tart apples, peeled and cut into thick wedges (Cooked by Megan). You'll also want a generous hand with kosher salt for the roast itself, a large Dutch oven, kitchen twine for tying herbs into a bundle, and an instant-read thermometer as a backup to the fork test.
Video of the Day
How to make Dutch oven apple cider pork shoulder
1. Season and sear the shoulder
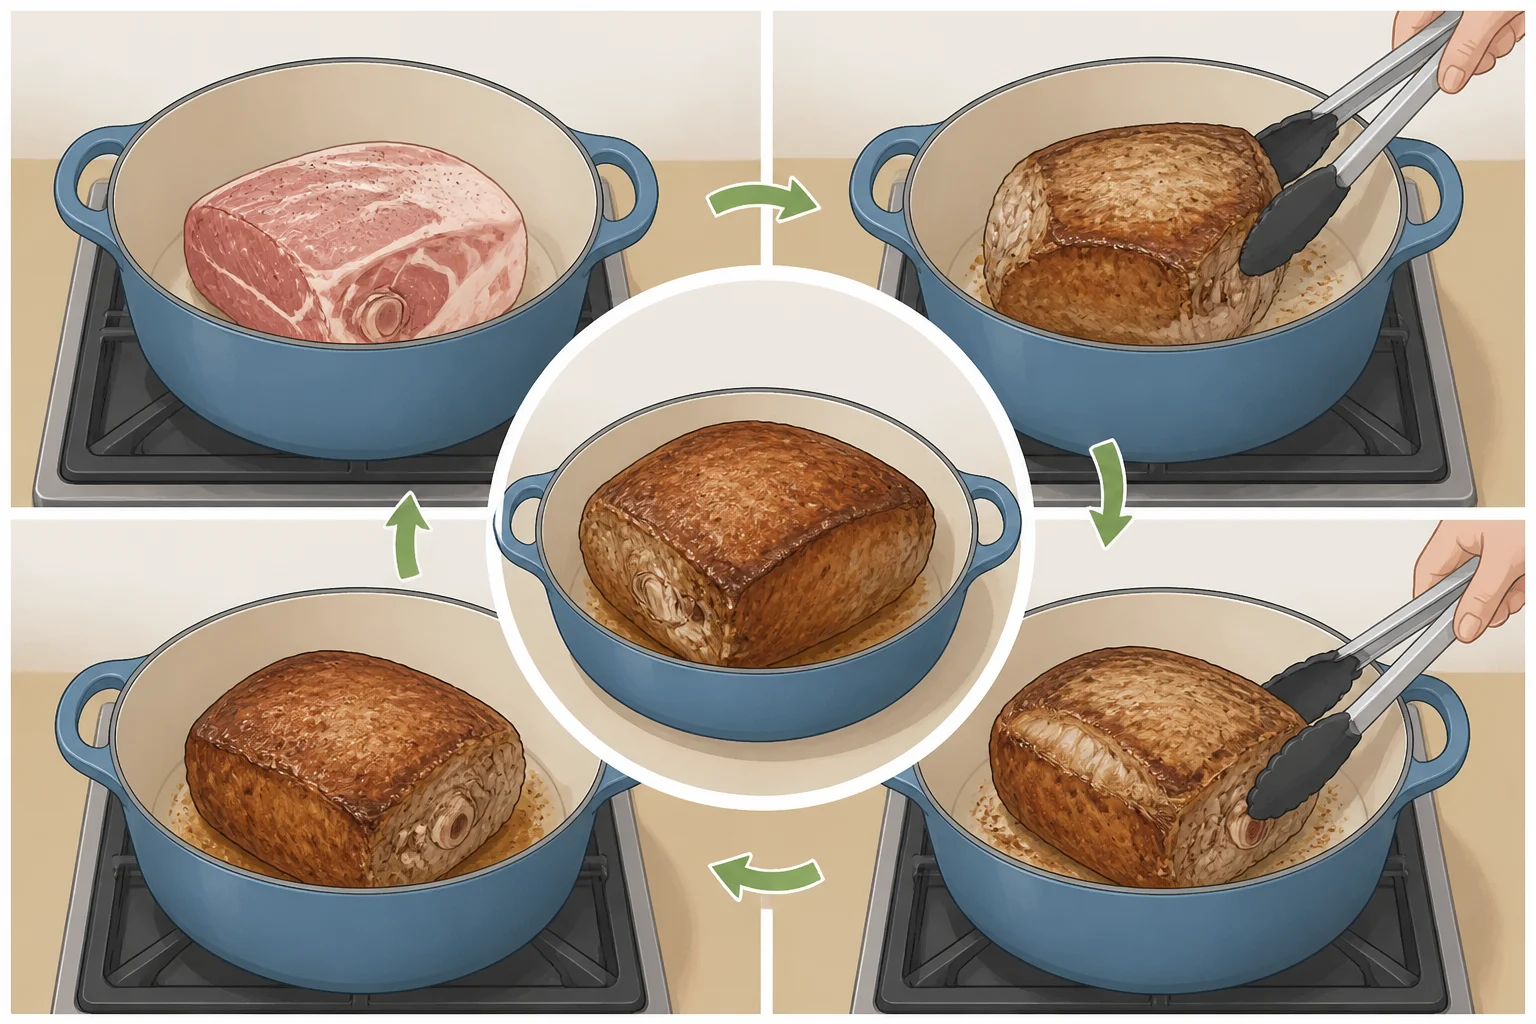
If there's time, salt the roast generously the night before and refrigerate it uncovered. An overnight salt rub is a recognized way to help the meat hold onto moisture through a multi-hour braise (Ask The Food Geek). It's not required, but it's a low-effort head start.
When ready to cook, preheat the oven to 325°F. Heat the neutral oil in the Dutch oven over medium-high heat and sear the roast about 4 to 5 minutes per side, until it's deeply browned on all sides (Cooked by Megan). This step is about building flavor at the surface, not locking anything in. The long braise ahead is what actually determines the texture.
2. Build the braising liquid
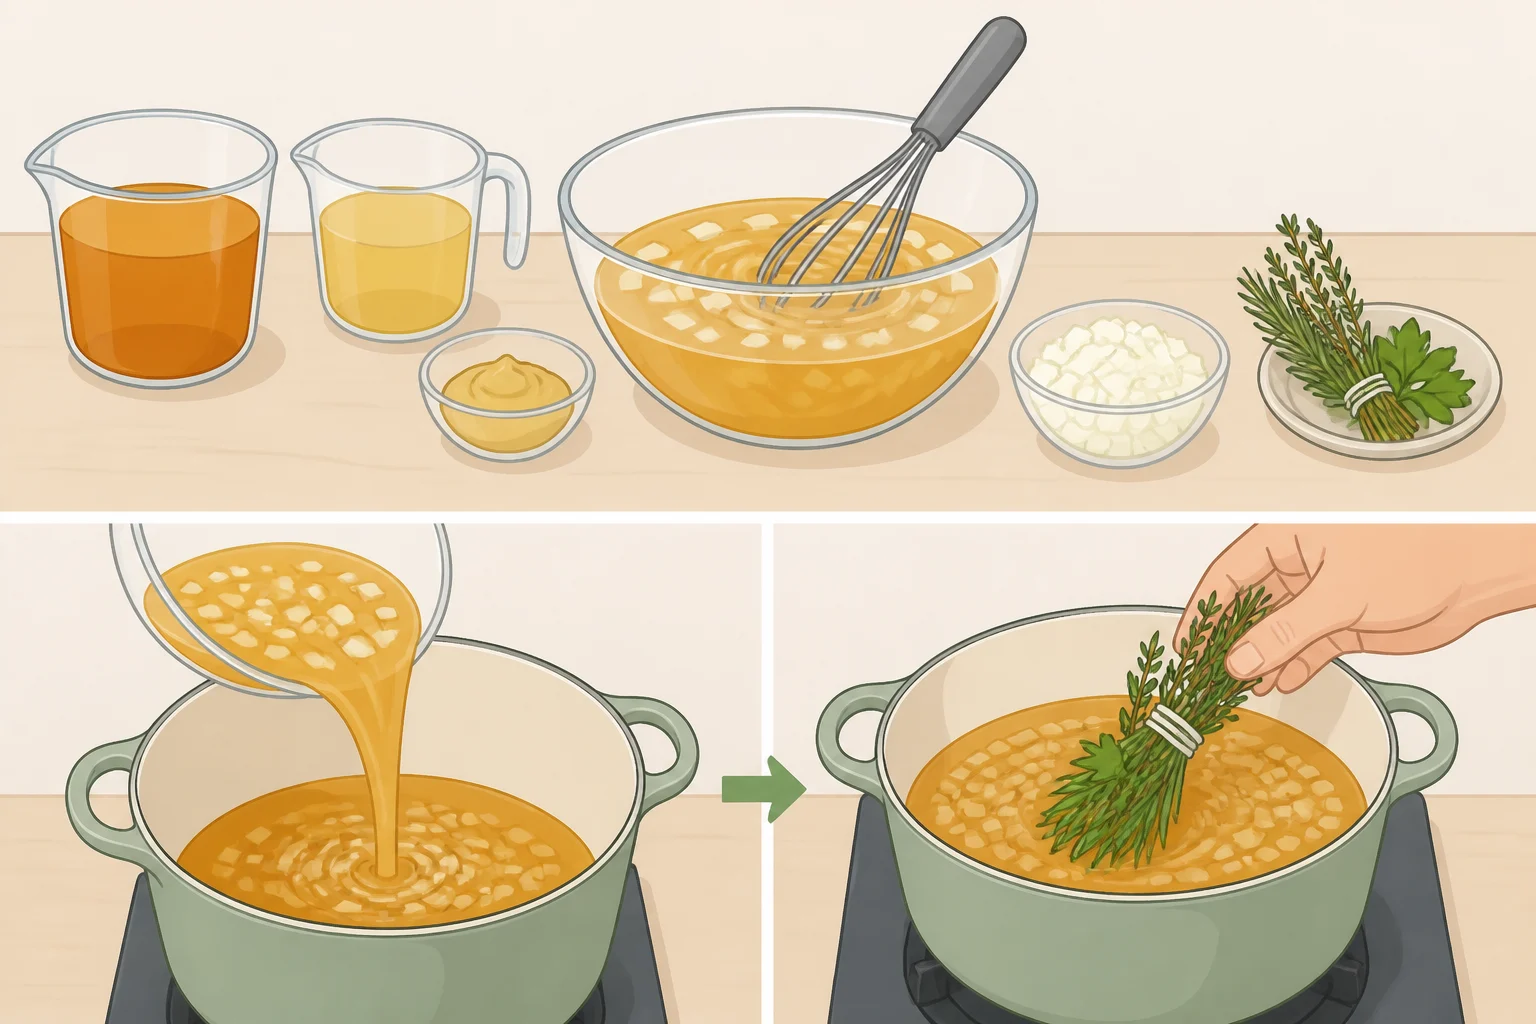
While the pork sears, whisk together the apple cider, chicken stock, Dijon mustard, and dehydrated onion in a bowl. Tie the rosemary and thyme sprigs into a bouquet garni with kitchen twine (Cooked by Megan). The stock matters here as much as the cider does; without it, the dish leans one-note sweet instead of savory-sweet.
Return the seared pork to the Dutch oven, pour in the liquid, drop in the herb bundle, and cover. On the question of the lid, two tested approaches diverge. The Seasoned Mom keeps the lid on for the entire cook, arguing that trapped steam keeps the roast's surface from drying out over three or four hours, and that uncovered braising is a common cause of a leathery exterior with a tough interior (The Seasoned Mom). Ask The Food Geek instead leaves the lid slightly ajar, which caps the temperature inside the pot around 185°F and keeps the liquid from ever reaching a hard boil, since a boil cooks the pork too fast and can toughen it (Ask The Food Geek). Start covered, the simpler default for most home ovens. If, when you check the pot, the liquid is visibly rolling rather than barely simmering, crack the lid an inch. Either way, a bare simmer is the target, not a boil.
3. Braise until fork-tender
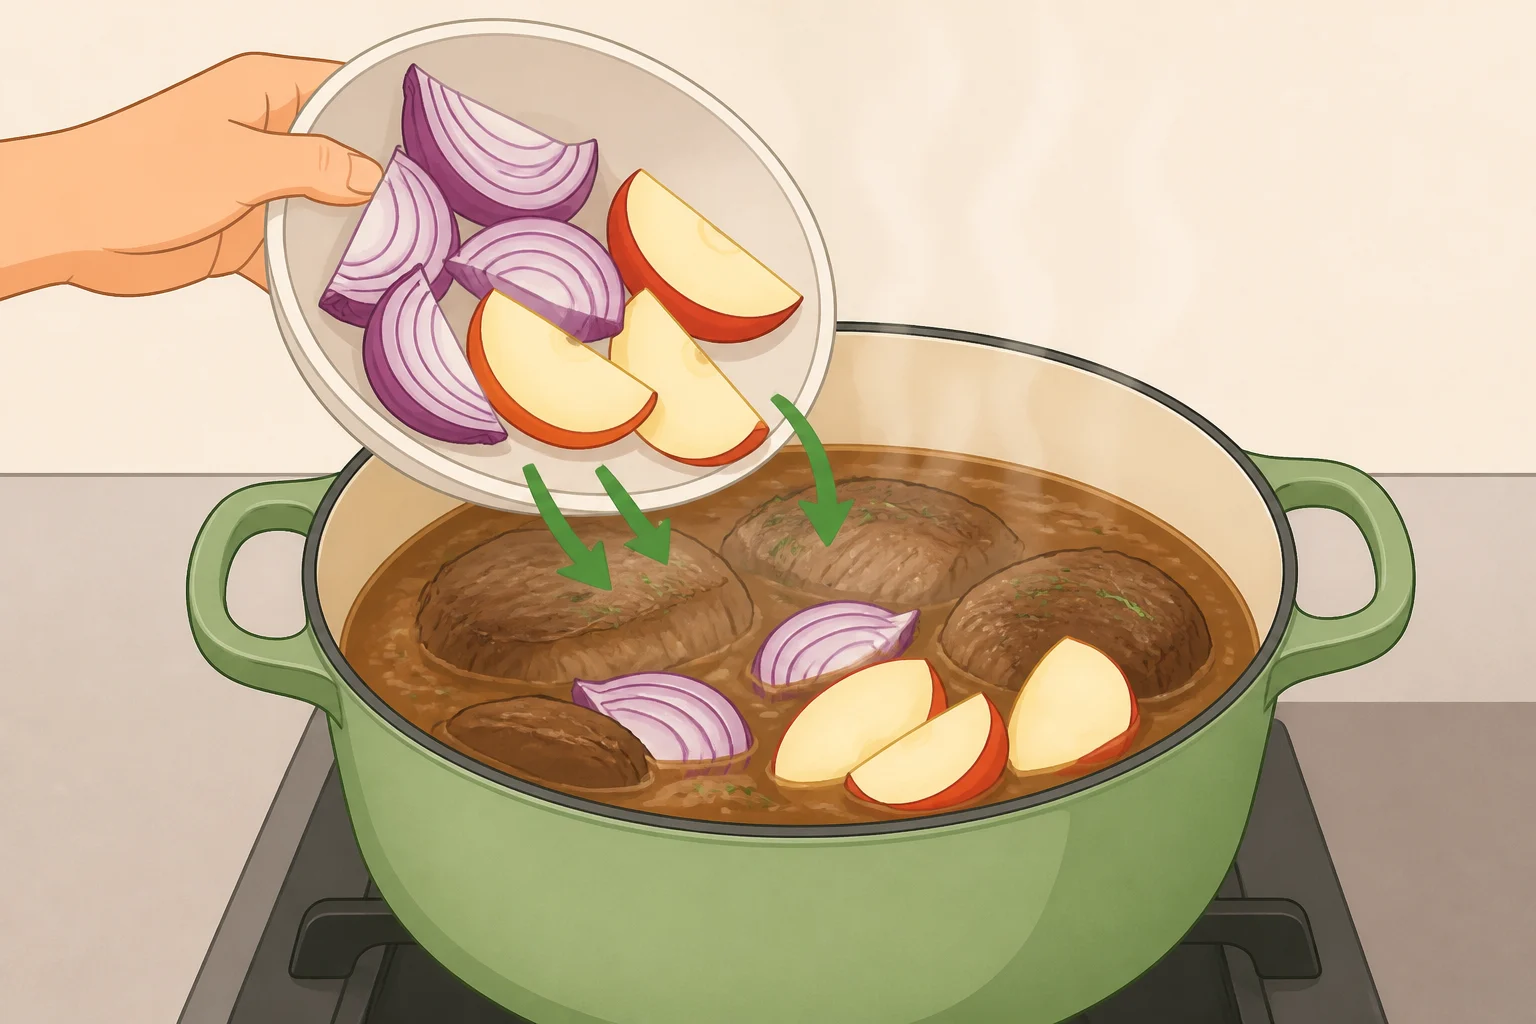
At 325°F, plan on roughly 3.5 to 4 hours (The Seasoned Mom). One tested recipe runs the braise about 3 hours, then returns the pot to the oven for a final 30 to 45 minutes once the apples and onions go in, landing in a similar window overall (Cooked by Megan). If the roast is boneless, it tends to cook a little faster, so start checking around the 2.5-hour mark (Cooked by Megan).
For a longer, gentler cook, dropping to 250°F stretches the braise to 5 or 6 hours. One cook who tried this reported noticeably more cider flavor soaking into the meat at the slower pace, compared to almost none at the shorter, hotter setting; treat that as one tester's observation worth trying rather than a rule (Ask The Food Geek).
Nestle the red onion slices and apple wedges around the pork for the final 30 to 45 minutes of cooking only. Cutting the apples into thick wedges and adding them late is what keeps them from turning mushy, giving the finished dish some texture alongside the meat (Cooked by Megan).
Judge doneness primarily with a fork: twist it into the thickest part of the roast, and it should meet almost no resistance (The Seasoned Mom; Cooked by Megan). Use temperature as a backup check rather than the deciding factor. Collagen starts to dissolve around 160°F, and holding the roast somewhere between 160°F and 180°F for at least an hour helps it break down further, though that hour figure is described as a rough guess rather than a hard number (Ask The Food Geek). For slicing, aim for a final temperature around 185 to 190°F; for an apple cider pulled pork you plan to shred, push closer to 200 to 210°F (Ask The Food Geek).
4. Rest, reduce, and finish
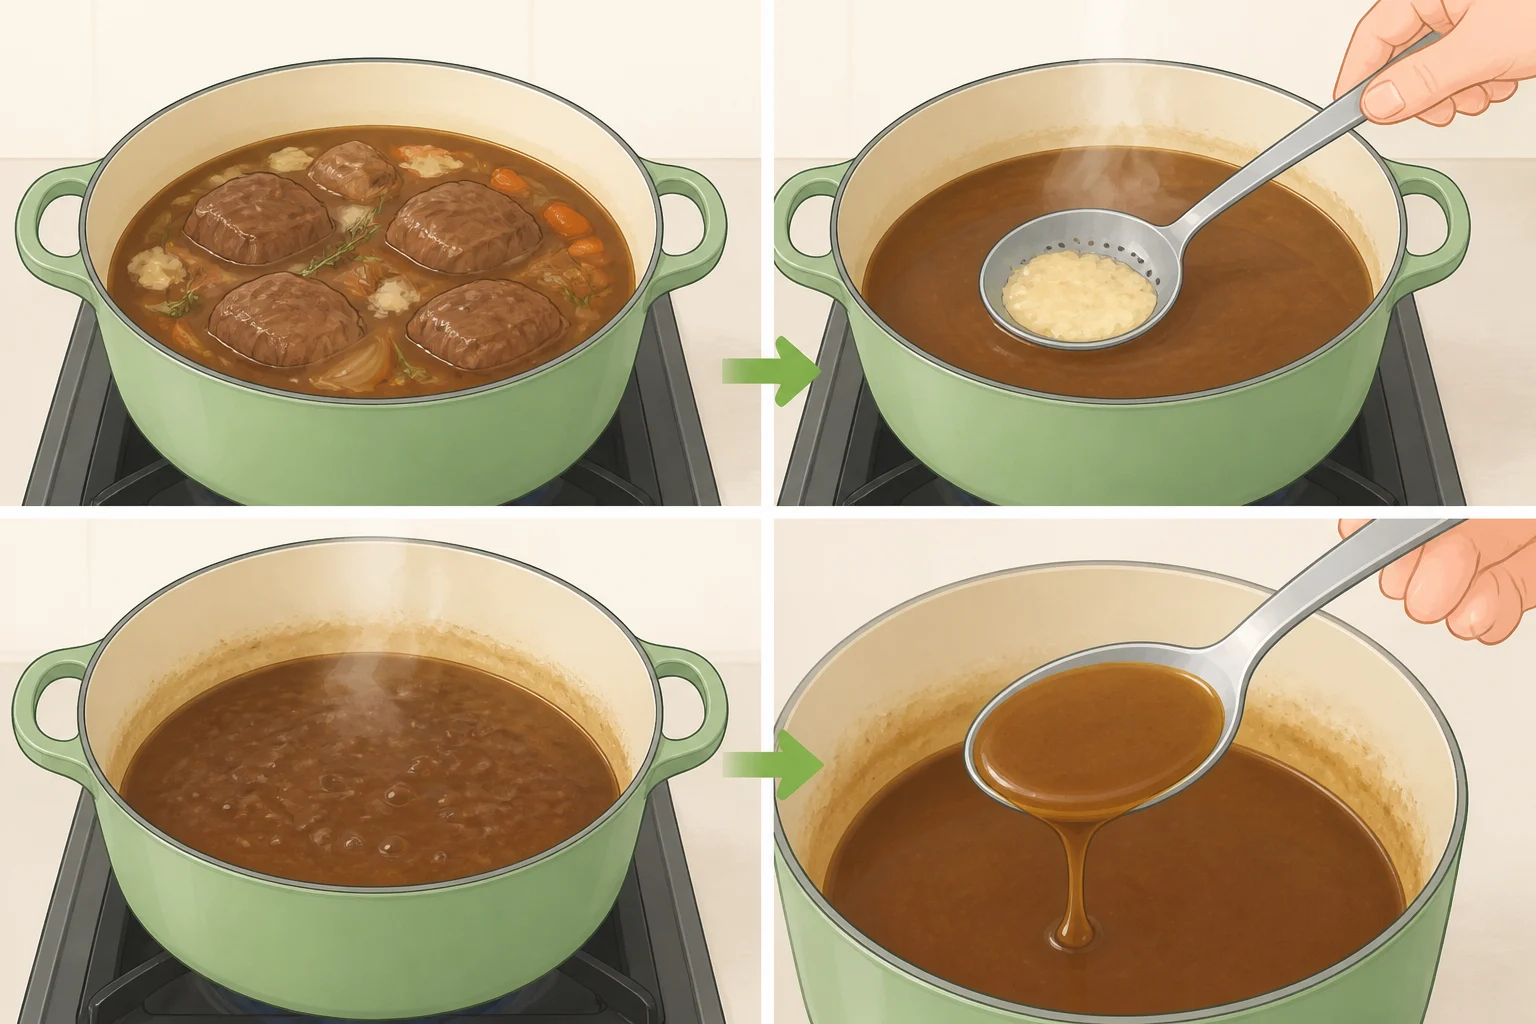
Once the pork is tender, let it rest right in the braising liquid for about 30 minutes. This helps the meat hold onto its moisture and gives the flavors time to meld before serving (Cooked by Megan; Ask The Food Geek).
Lift the pork out onto a platter. Skim the layer of fat that's risen to the surface of the braising liquid with a spoon before you go any further; it renders out steadily over hours and there's a fair amount to remove. Then set the pot on the stovetop and reduce the remaining liquid into a sauce, using the pan drippings as the base rather than building a separate gravy from scratch (Cooked by Megan; Ask The Food Geek). Keep it at a steady simmer until it coats the back of a spoon; a sauce that's still thin needs more reduction time, not a thickener.
This method yields about six servings (Cooked by Megan). Mashed potatoes, buttered egg noodles, roasted vegetables, and a crisp green salad are all suggested pairings from the recipe's author, worth trying rather than treating as the only options.
Troubleshooting a tender pork shoulder braise
A few things go wrong often enough to call out on their own. If the pork has hit the target temperature but still resists the fork, keep braising. It needs more time at gentle heat, not a hotter oven; pushing the temperature up just cooks the outside faster without finishing the interior.
If the liquid is at a rolling boil rather than a lazy simmer, lower the oven or crack the lid rather than pulling the pork early to avoid it toughening the meat. And if the finished sauce looks thin after a first pass at reducing, keep the pork covered and off the heat while the liquid keeps cooking down. Watery sauce is a time problem, not a recipe flaw.
Storage, slow cooker variation, and serving ideas
This braise adapts well to a slow cooker. Sear the pork on the stovetop exactly as in step one, then transfer the pork, braising liquid, and herbs into the slow cooker and cook on low for 6 to 8 hours, adding the apples and onion during the final hour (Cooked by Megan).
Leftovers keep well. Store the pork and its liquid together in an airtight container in the refrigerator for 4 to 6 days, or freeze for up to 3 months. Reheat gently on the stovetop rather than in the microwave, which tends to dry the meat out or heat it unevenly (Cooked by Megan).
Once the recipe is familiar, most of the effort disappears into muscle memory: the ratios, the timing windows, the fork test all become second nature after a run or two. If wine's part of the meal, a medium-bodied white like Chardonnay or a fruit-forward red like Pinot Noir plays well against the dish's sweet-savory balance (Cooked by Megan).