Things You'll Need
1 sheet blank paper
Ruler
Pencil
Scissors
1 sheet foam board, any color
Spray paint, any color (optional)
4 ounces contrasting latex-based acrylic paint, any color
Size 4 flat-edged brush
Size 2 flat-edged brush
Craft glitter glue
Water
Spoon
1 flat head-bead pin
Needle-nose jewelry pliers
Side-cutter jewelry pliers
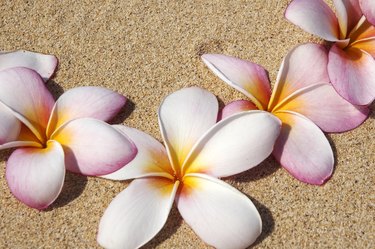
You can almost smell the coconut trees, sparkling ocean and Hawaiian breezes when you make these adorable plumeria foam flowers. Traditional Hawaiian leis created from plumerias are one of this exotic flower's most recognizable craft projects, but these blooms are adaptable for a number of other tropical crafts. Easy-to-create plumeria foam flowers are versatile, and you can get creative with color, because the flower is found in a wide variety of hues in nature. Crafters of all skill levels can make strikingly beautiful plumeria flowers.
Easy Plumeria Foam Flower
Step 1
Create a plumeria petal pattern. Draw a 2-by-1-inch tear-shaped petal onto a blank sheet of paper. Cut the pattern from the paper.
Video of the Day
Step 2
Spray-paint the foam board if you are customizing the color of the board, then let the paint dry. If you are using the original foam color, skip this step.
Step 3
Trace the plumeria petal pattern onto the foam board five times. Cut the petals from the foam board and set them aside.
Step 4
Use latex-based acrylic paint in a contrasting color to create details on the plumeria petals -- for example, yellow on white. You'll be adding detail in strokes from the centers of the petals outward, stroking details from the teardrop "tips" toward the wider bases. With the size 4 flat-edged brush, start by coloring the centers of the petals, shading only the innermost quarters. Paint around the edges of the petals delicately with a size 2 flat-edged brush. Use a shade slightly lighter than you did for the flower-petal base. Let the paint dry.
Step 5
Remove the lid from the glitter glue and set it on the table. Pour a small dab of glue into the lid and add a bit of water to create a thin, watery glitter-glue substance. Paint the tops of the plumeria petals with the glue mixture and let dry. Once dry, turn the petals and paint the undersides; let dry.
Step 6
Push one petal onto a flat head-bead pin. Make sure that the pin goes through the center of the teardrop's "tip" end. Add petals until five petals are on the pin. Carefully fan the petals outward so that they overlap slightly.
Step 7
Secure the plumeria flower into place: Twist the underside head pin with the needle-nose pliers so that the petals are close together and do not move. Cut the remaining head pin away with the side-cutter pliers.
Tip
Use this basic pattern to create large plumeria flowers. Multiply the existing measurements by two to double the size.
Add the plumeria flowers to jewelry pieces, hats or barrettes.
Video of the Day